写文章配图,配视频是博客的灵魂,所谓图床不稳,写作心累。
告别404!本文利用GitHub+Cloudflare+PicList的完美组合,手把手教你搭建永不消失的免费图床,优化图片加载速度,提升博客体验。
图床是什么?
图床是指用于存储和分享图片的网络服务或平台。用户可以将图片上传到图床,图床会为图片生成一个可外链的地址链接,这个链接可以直接嵌入到网页、博客、论坛帖子、文档等各种支持图片显示的平台中,使图片能够在这些平台展示出来。
图床的主要作用是为提供图片存储和快速访问的能力,尤其一些大型网站、论坛或博客平台,若所有用户上传的图片都存储在自身服务器上,会占用大量存储空间和带宽资源,而借助图床可以将图片存储在外部服务器,通过外链调用展示,减轻自身服务器的负担。
为什么选择GitHub?
七牛云、腾讯云、阿里云、又拍云都是收费的,SM.MS和Imgur有免费版也有收费版,免费的量也不多。
当前GitHub公开仓库个数不限,而且单个仓库容量为1GB,如不够就再建一个公开仓库,现在有微软托管GitHub稳定、免费、可靠。
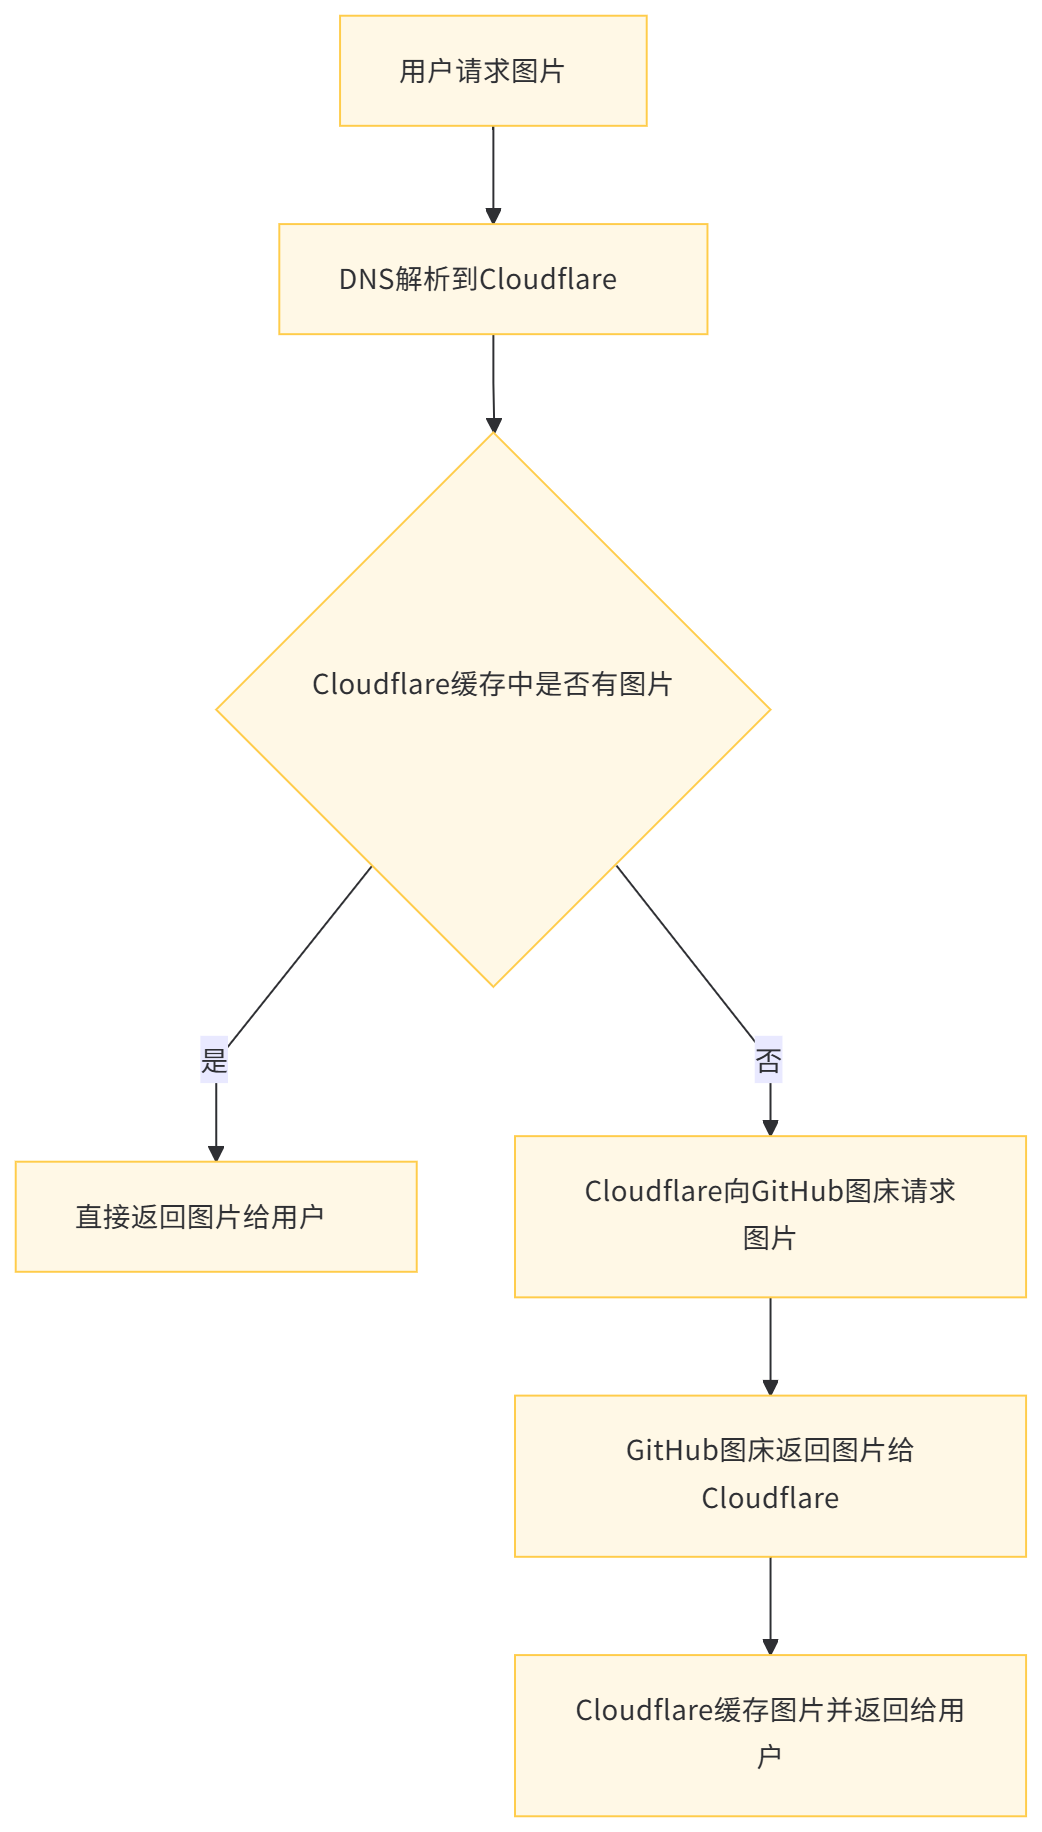
Cloudflare 提升访问速度
Cloudflare 拥有全球分布的大量 CDN 节点,当用户请求 GitHub 图床中的图片时,请求会被路由到距离用户最近的 CDN 节点,节点会缓存 GitHub 上的图片数据,使用户能够快速加载图片,减少了因地理位置不同而产生的网络延迟。
Cloudflare 的 CDN 技术会对图片进行缓存优化,根据用户请求的频率和数据的热度等因素,合理地分配和利用缓存资源,进一步提高图片的加载速度。
PicList 强大的云存储与图床管理工具
PicList是一款高效的云存储和图床平台管理工具,基于PicGo深度二次开发,提供完整的图床功能和全面的云存储管理能力,主要特点包括:
完整保留PicGo所有功能,兼容大部分PicGo插件
扩展了内置图床平台,如WebDav、本地图床和SFTP等
相册支持同步云端删除文件
全面的云存储管理功能,包括文件操作、搜索和预览
内置图像处理工具,如水印、压缩、缩放、旋转和格式转换
经过前期调研软件并综合需求,帮助其轻松实现免费、高效、稳定的图床搭建,满足图片存储与分享需求。
使用场景 用户群体 特点 常见需求 个人博客 博客作者 ●需要稳定的图片托管服务 社交媒体分享 社交媒体用户 Markdown编辑 Markdown用户 网站开发 开发者 电商运营 电商运营者 论坛发帖 论坛用户 视频创作 视频创作者 小型商业站点 小型企业或个人站长
本文章教程通过GitHub、Cloudflare与PicList组合形式,搭建免费图床的方法,下面开始教程。
1、搭建准备工作
1. GitHub 注册账号(必须)
https://github.com/
用于创建仓库存放图片等资源。
2. Cloudflare 注册账号(必须)
https://dash.cloudflare.com/login
可能需要信用卡,用于验证身份,选择免费套餐用。
3. PicList软件下载安装(必须)
https://github.com/Kuingsmile/PicList/releases/latest
PicList是一款高效的云存储和图床平台管理工具,完整保留了PicGo的所有功能,还增添了许多新的feature。
4. PicGo软件下载安装(非必须)
用于管理图片上传的工具,功能上比PicList少一点,推荐使用PicList。
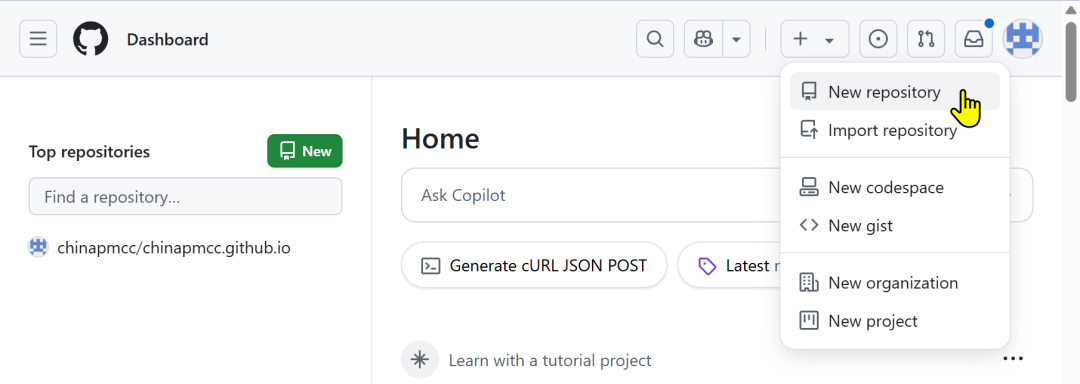
2、GitHub上创建图床
➢2.1 登录github(https://github.com/),点击New repository
➢2.2 输入自定义仓库名(如:img),推荐勾选私有,原因如下:
隐私保护:私有仓库中的图片不会对外公开,只有授权用户可以访问。
安全性高:通过访问令牌和代理服务,可以有效保护仓库中的图片不被未经授权的访问。
访问限制:私有仓库的图片无法直接通过 GitHub 的 URL 访问,需要通过代理服务或自定义域名,防止蹭图。
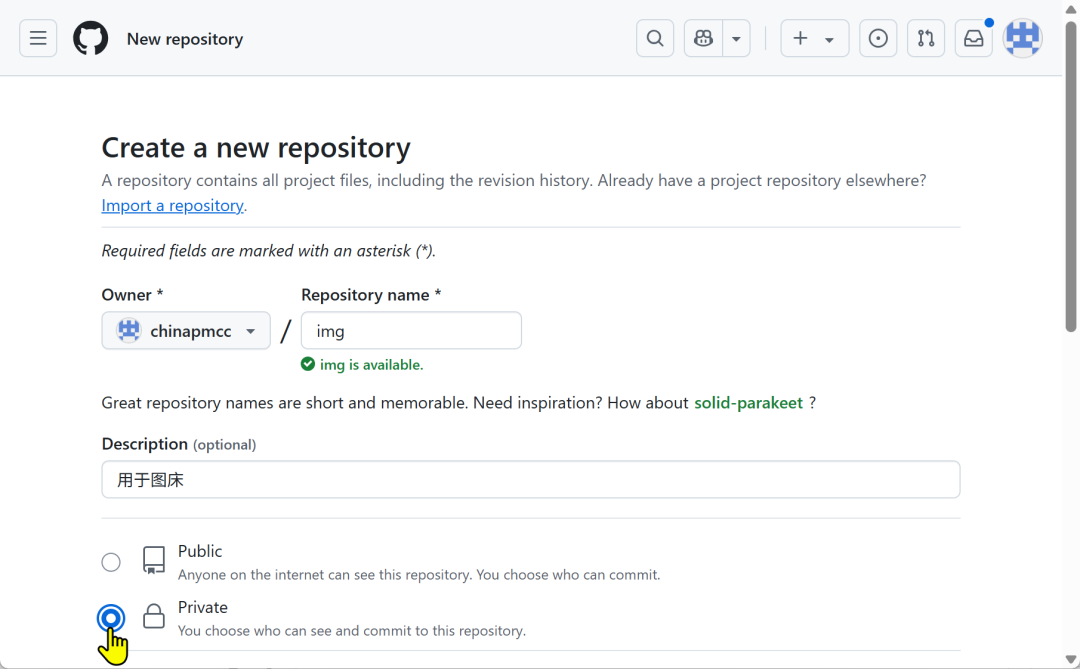
随便创建一个文件,点击创建,存储图片的仓库创建完成。
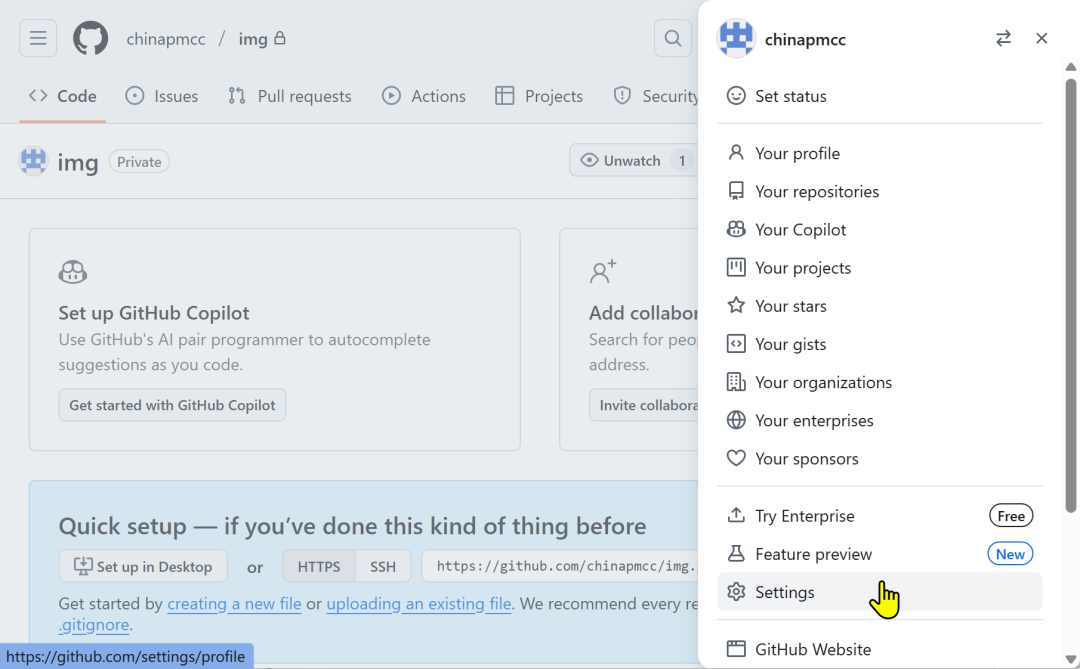
➢2.3 创建个人Token
https://github.com/settings/profile
点击右上角的个人头像→设置(Settings)→开发者设置(Developer Settings)→个人访问令牌(Personal access tokens)→通用令牌(Tokens (classic))→生成新的令牌(Generate new token (classic))
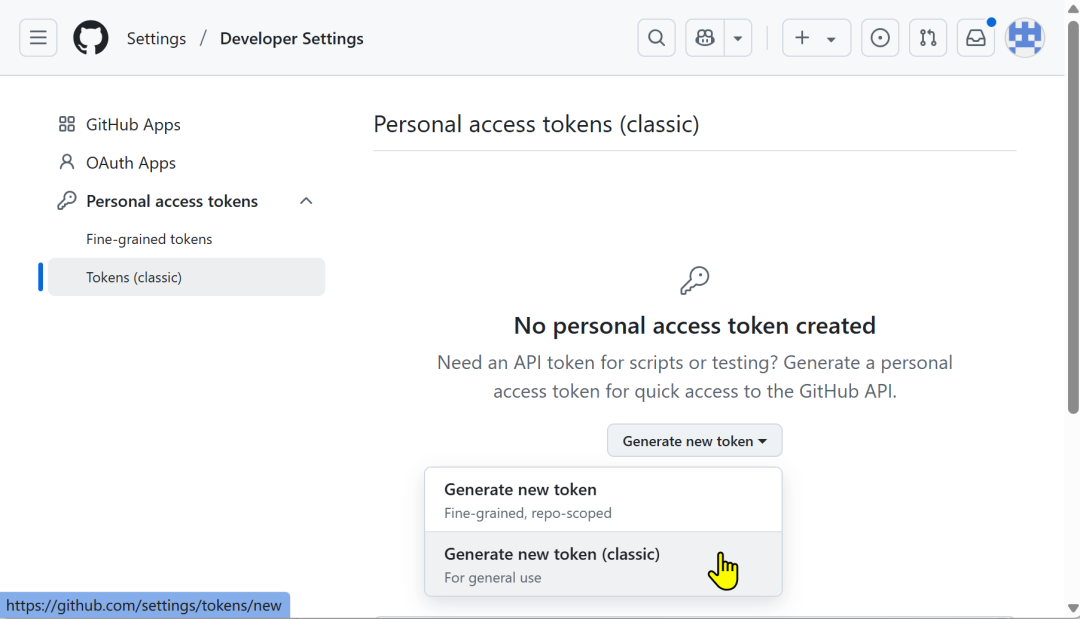
➢2.4 生成新令牌页面中设置参数 Generate new token (classic)
https://github.com/settings/tokens/new
Note:自定义填写备注
Expiration:不要选择具体时间,选择不过期(No Expiration)
Select scopes:勾选(repo)
其他权限不用勾选,点击底部按钮 “Generate token”

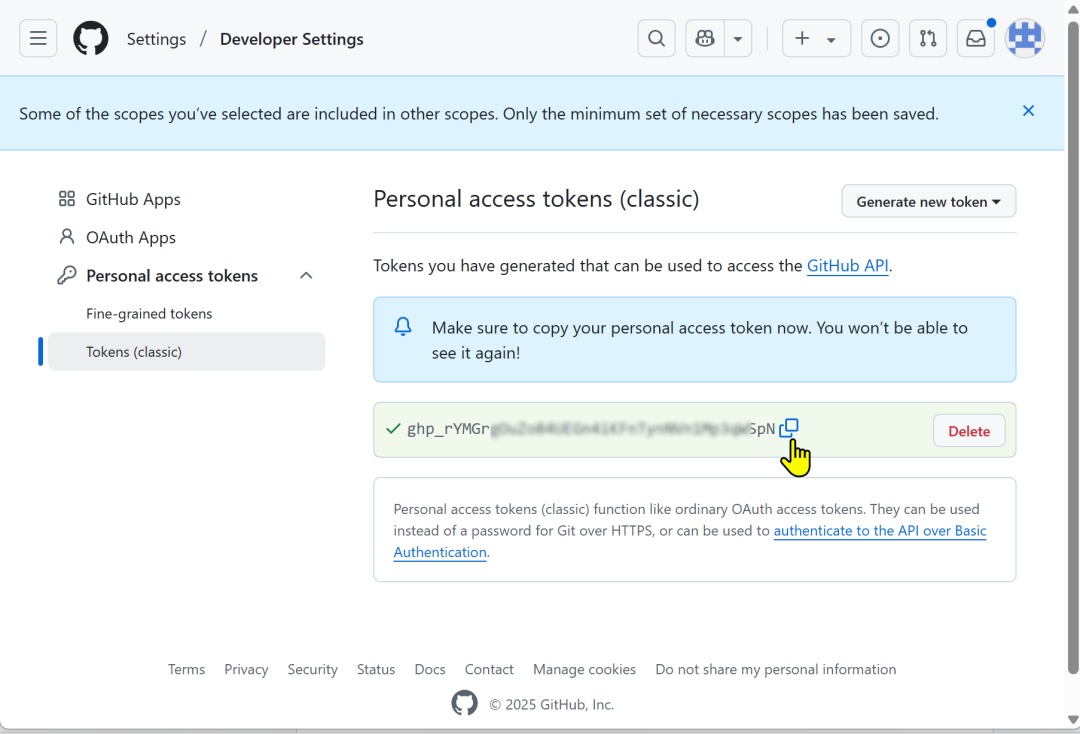
➢2.5 将生成的 Token 复制记录下来,关闭页面后就再也看不到该令牌了。后续配置需使用
3、PicList or PicGo配置
PicList是一款高效的云存储和图床平台管理工具,在PicGo的基础上经过深度的二次开发,不仅完整保留了PicGo的所有功能,还增添了许多新的feature。
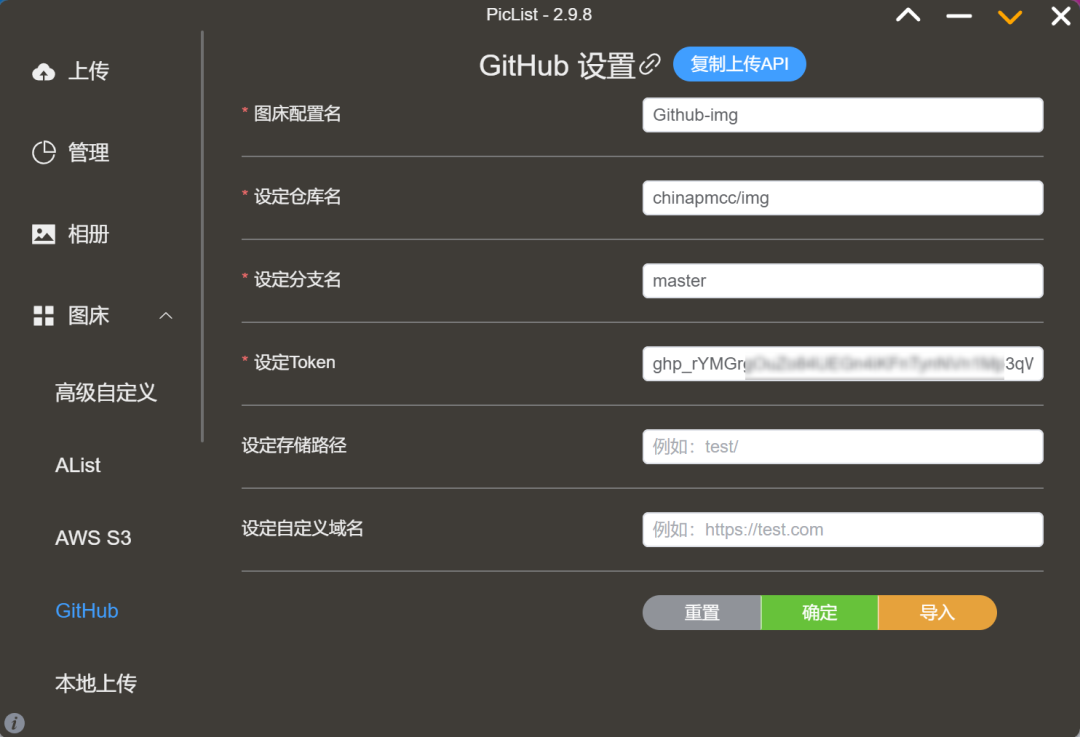
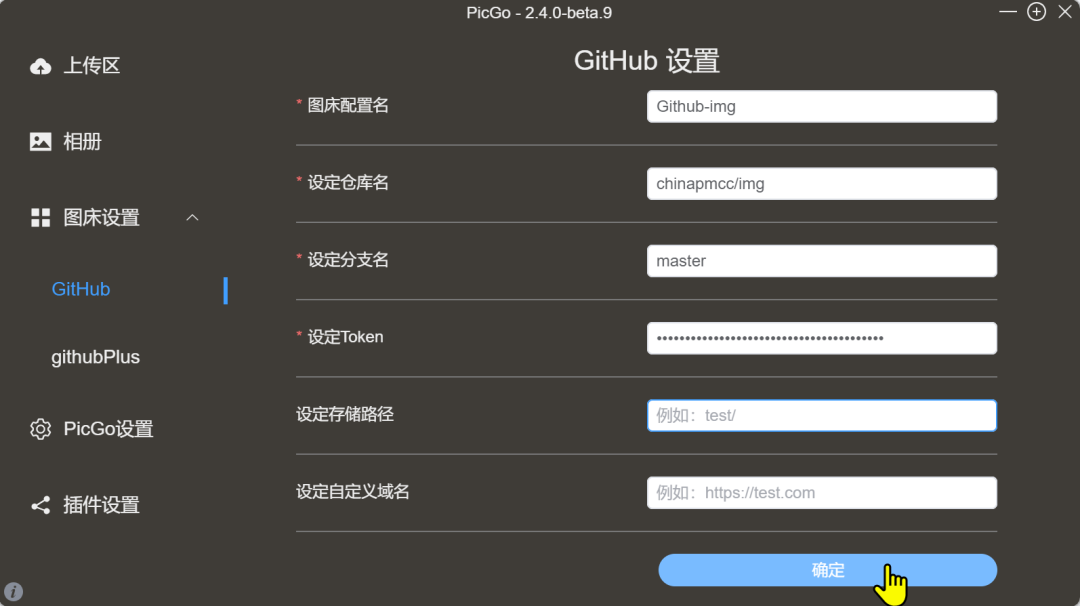
➢3.1 下载安装PicList软件,打开GitHub设置页,配置如下
https://github.com/Kuingsmile/PicList/releases/latest
图床配置名:本地标识用,自定义取名
设定仓库名:github用户名/仓库名
设定分支名:master
设定 Token:github中生成的token
设定存储路径:空=上传到跟目录,建议创建用于分类
设定自定义域名:为了使用 CDN 加快图片的访问速度,可在下面方法中2选一
1️⃣使用方法1:用Cloudflare方法,此处为空(接着步骤4、Cloudflare加速访问图床)
2️⃣使用方法2:直接使用CDN服务加速的链接访问
填写格式:https://cdn.jsdelivr.net/gh/github用户名/仓库名
如不可用,请尝试替换以下地址
https://cdn.jsdelivr.net
https://fastly.jsdelivr.net
https://gcore.jsdelivr.net
https://testingcf.jsdelivr.net
https://test1.jsdelivr.net
设置PicList软件页面:点击图床→Github
设置PicGo软件页面:点击图床设置→Github
➢3.2 点击上传区,选择图片或拖入或剪切板粘贴,上传成功后得到图片地址。
仓库为公开时,图片链接不带token
仓库为私有时,图片链接带token

➢3.3 设定统一图片大小
PicList设置→上传设置→自定义链接格式→点击设置→输入以下格式
<img src="$url" width="500px" height="300px">
上传区→选择格式链接=HTML
上传新图片或点击下方复制链接按钮,即可返回设定大小的图片链接
<img src="https://raw.githubusercontent.com/chinapmcc/img/master/PicGO+Typora.gif" width="500px" height="300px"/>
PicList or PicGo插件安装
如同步删除云端图片需要安装插件:picgo-plugin-github-plus
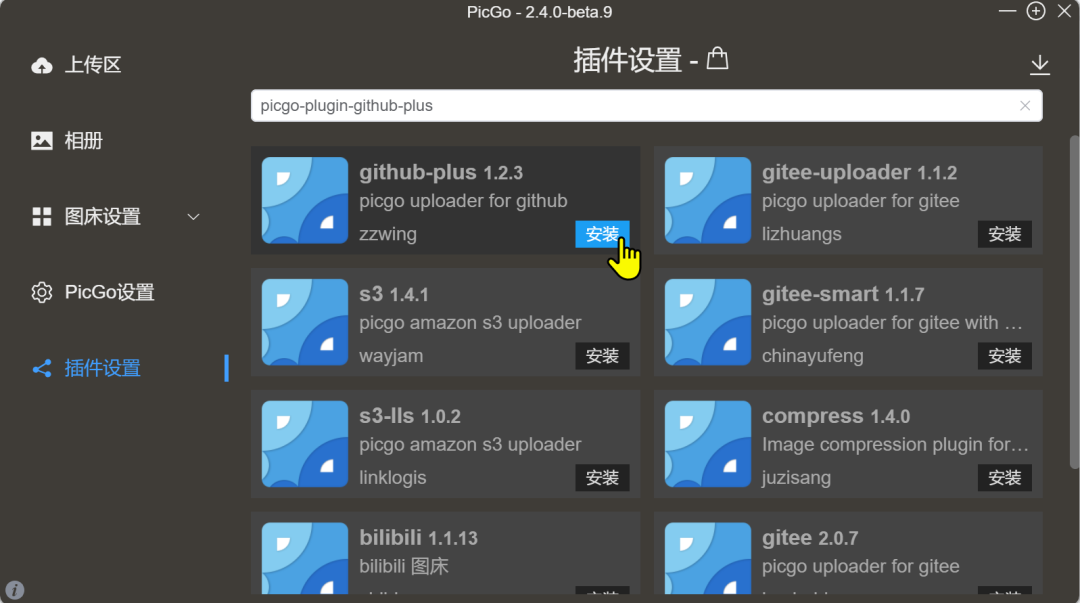
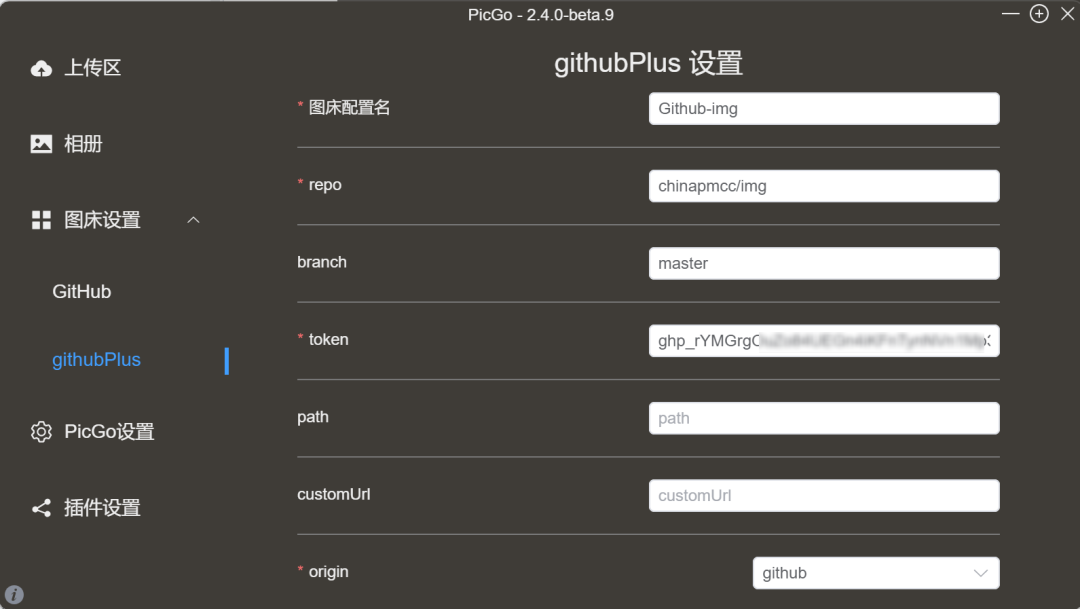
配置插件与Github基本一致
如遇到安装失败:尝试清理并重置本地配置
1. 关闭 PicGo 应用程序。 2. 导航到 PicGo 的配置文件目录: 通常是 C:\Users\HUAWEI\AppData\Roaming\picgo。
3. 删除以下文件和文件夹: package.json
package-lock.json
node_modules 文件夹。
4. 重新启动 PicGo,并再次尝试安装插件
4、Cloudflare加速图床访问
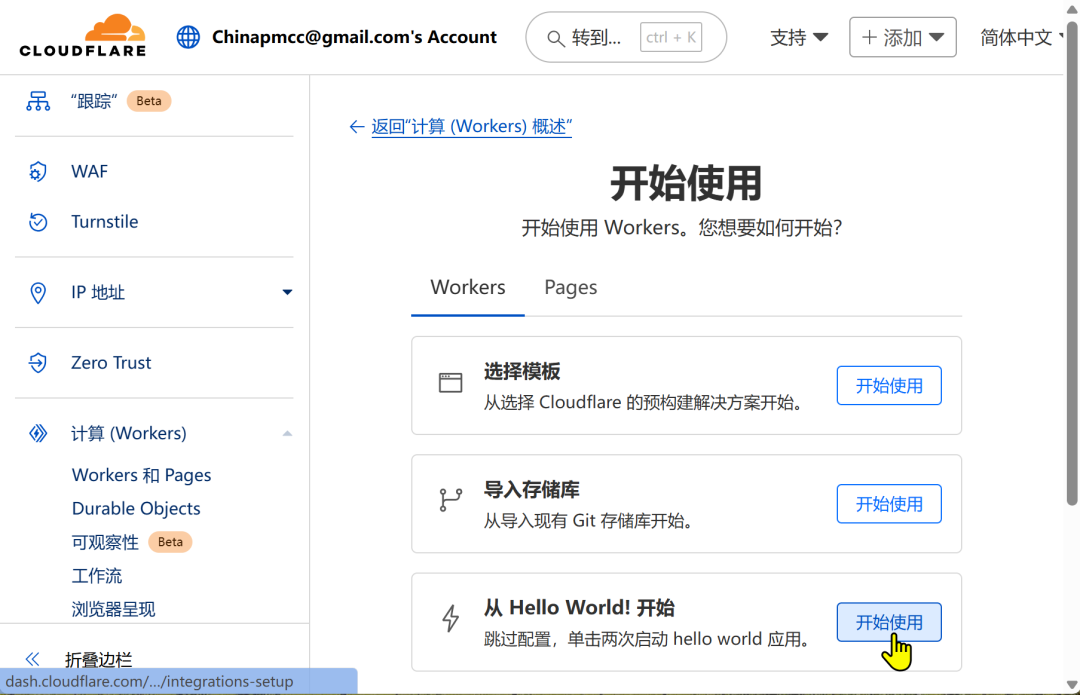
➢4.1 登录Cloudflare:
https://dash.cloudflare.com/login
点击左侧菜单栏:Workers 和 Pages菜单,点击创建创建一个Workers的项目
免费套餐:一天10万次请求,如果访问超了说明你是个大网红博主了。

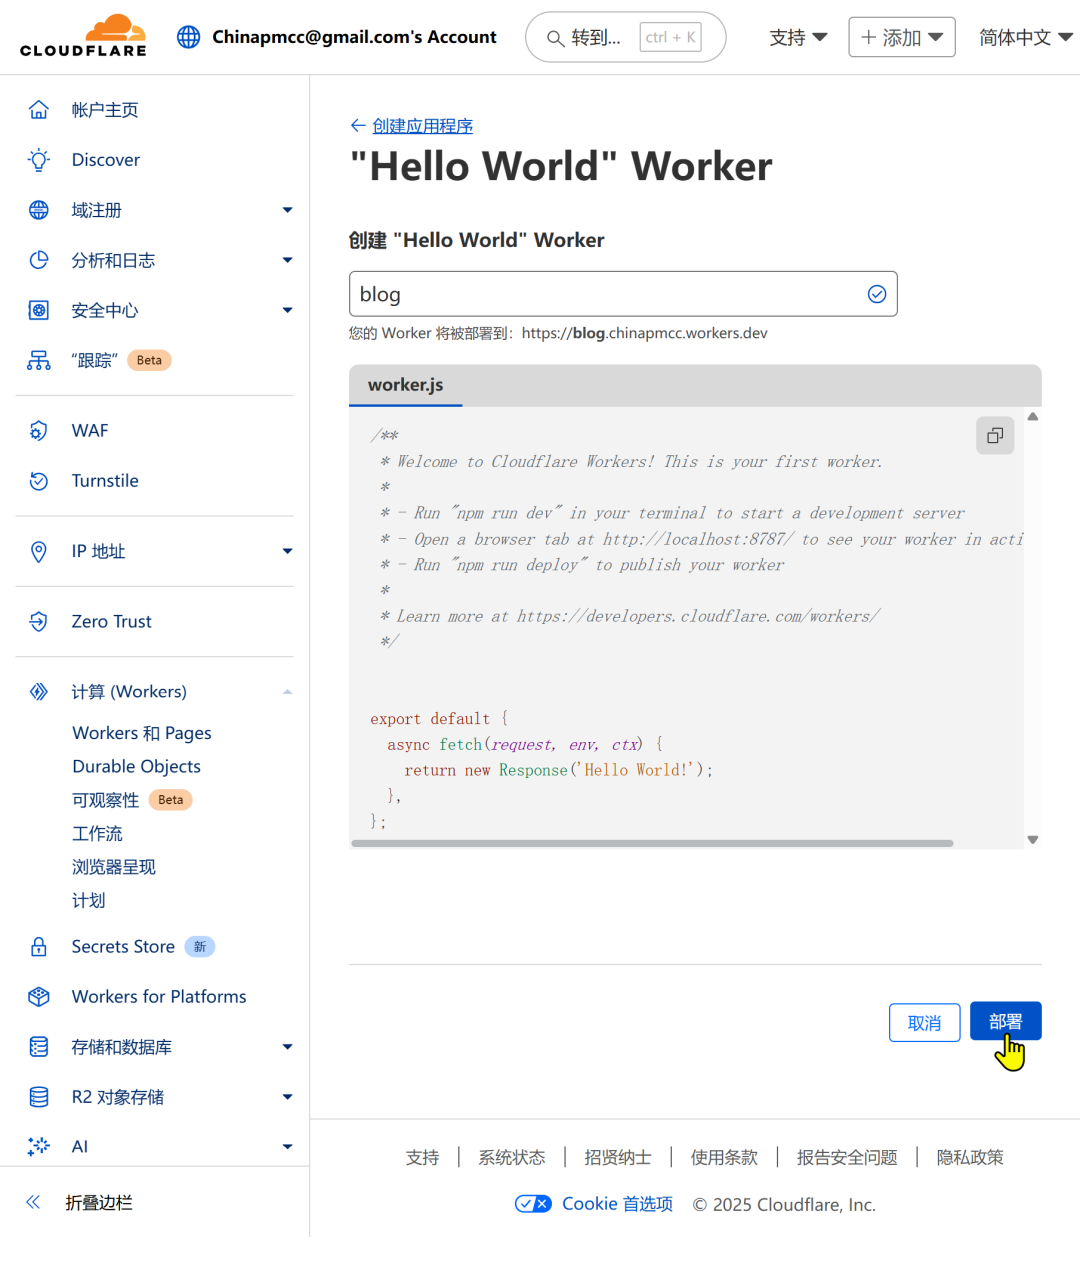
➢4.2 创建Hello World,输入一个自定义域名(如:blog),点击部署
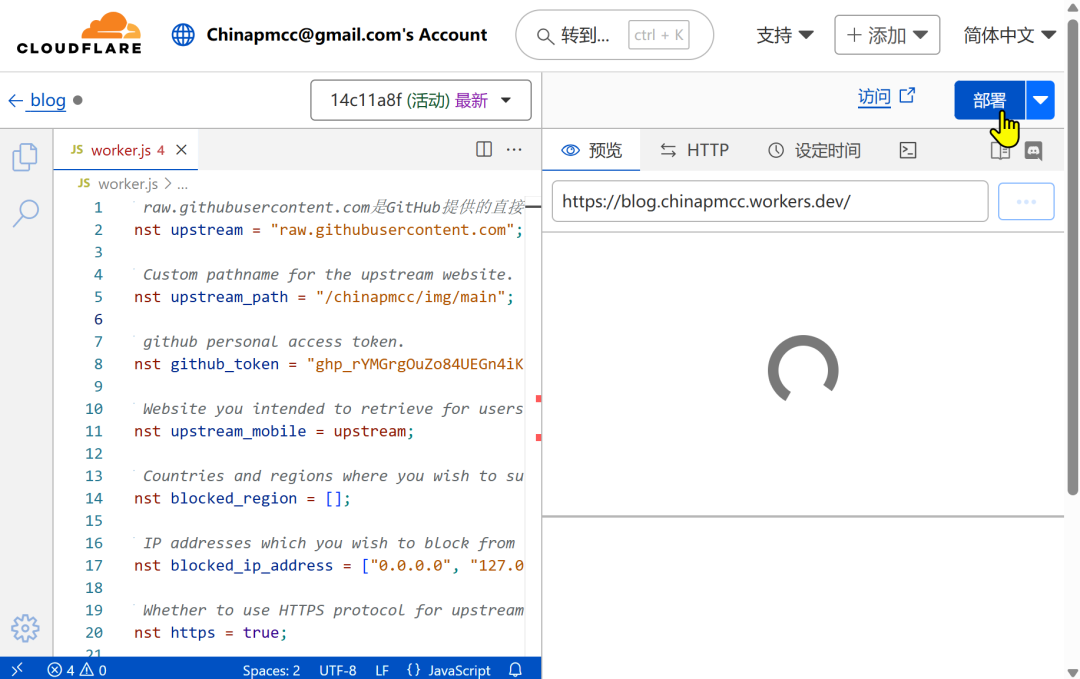
➢4.3 点击编辑代码,将复制worker.js完整代码
主要替换下面两项内容,然后点击部署
const upstream_path = "/github用户/github仓库名/分支"
const github_token = "github的token";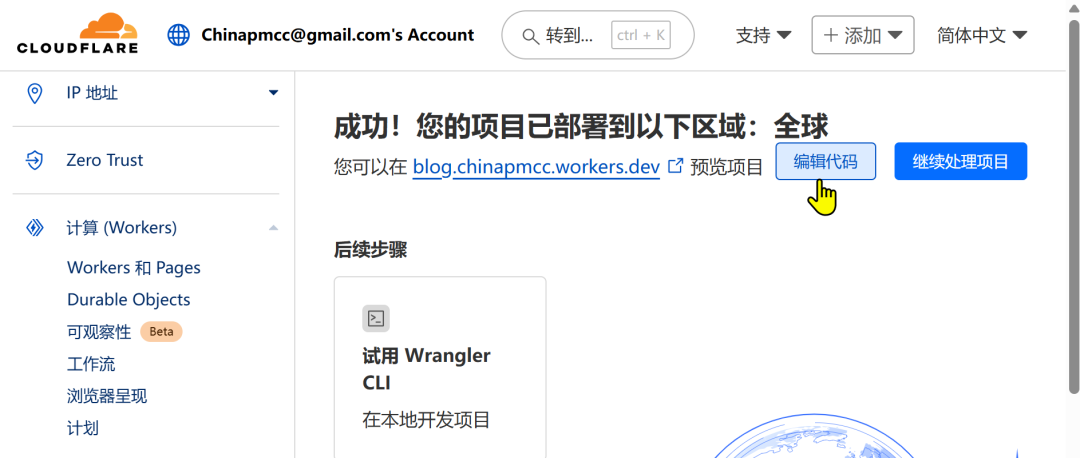
worker.js代码作用
1. 代理请求: 当有人访问你的网站时,这段代码会把他们的请求转发到另一个指定的网站(比如 GitHub 的文件服务)。
就像一个“中间人”,帮你从别的地方拿东西给访问者。
2. 自定义处理: 设备检测:判断访问者是用手机还是电脑访问的。如果是手机,可能会转发到一个更适合移动设备的地址。
地区和IP限制:可以根据访问者的地理位置或IP地址阻止某些请求。比如,你可以设置某些地区或某些IP地址的用户无法访问。
修改请求和响应:在转发请求之前,代码会修改一些请求头(比如添加认证信息),确保请求能正确到达目标网站。同时,它也会修改返回的响应头,比如设置缓存策略或允许跨域访问。
3. 文本替换: 如果返回的内容是HTML页面,代码会根据预设的规则替换页面中的某些文本。比如,可以把页面中的某个链接地址替换为你自己的域名。
4. 缓存控制: 你可以选择是否让浏览器缓存返回的内容。如果启用缓存,用户再次访问时可以更快地加载内容;如果禁用缓存,每次访问都会获取最新的内容。
5. 跨域支持: 为了让你的网站能够安全地从其他域名加载资源,代码会设置一些特殊的响应头,允许跨域访问。
// Website you intended to retrieve for users.
// GitHub提供的直接访问仓库原始文件的域名(如代码、图片、文本)。
const upstream = "raw.githubusercontent.com";

// Custom pathname for the upstream website.
// ①自定义上游网站的路径:格式为 /<用户>/<仓库名>/<分支>
const upstream_path = "/chinapmcc/img/main";

// github personal access token.
// ②填写github个人令牌
const github_token = "ghp_rYMGrgOuZoxxxxxxx3qWSpN";

// Website you intended to retrieve for users using mobile devices.
// 你打算为使用移动设备的用户检索的网站。
const upstream_mobile = upstream;

// Countries and regions where you wish to suspend your service.
// 你希望暂停服务的国家和地区
const blocked_region = [];

// IP addresses which you wish to block from using your service.
// 你希望阻止使用服务的IP地址
const blocked_ip_address = ["0.0.0.0", "127.0.0.1"];

// Whether to use HTTPS protocol for upstream address.
// 是否使用HTTPS协议访问上游地址
const https = true;

// Whether to disable cache.
// 是否禁用缓存
const disable_cache = false;

// Replace texts.
// 替换文本
const replace_dict = {
$upstream: "$custom_domain",
};

addEventListener("fetch", (event) => {
  event.respondWith(fetchAndApply(event.request));
});

asyncfunctionfetchAndApply(request) {
const region = request.headers.get("cf-ipcountry")?.toUpperCase();
const ip_address = request.headers.get("cf-connecting-ip");
const user_agent = request.headers.get("user-agent");

let response = null;
let url = newURL(request.url);
let url_hostname = url.hostname;

if (https == true) {
    url.protocol = "https:";
  } else {
    url.protocol = "http:";
  }

if (awaitdevice_status(user_agent)) {
    var upstream_domain = upstream;
  } else {
    var upstream_domain = upstream_mobile;
  }

  url.host = upstream_domain;
if (url.pathname == "/") {
    url.pathname = upstream_path;
  } else {
    url.pathname = upstream_path + url.pathname;
  }

if (blocked_region.includes(region)) {
    response = newResponse(
      "Access denied: WorkersProxy is not available in your region yet.",
      {
        status: 403,
      }
    );
  } elseif (blocked_ip_address.includes(ip_address)) {
    response = newResponse(
      "Access denied: Your IP address is blocked by WorkersProxy.",
      {
        status: 403,
      }
    );
  } else {
    let method = request.method;
    let request_headers = request.headers;
    let new_request_headers = newHeaders(request_headers);

    new_request_headers.set("Host", upstream_domain);
    new_request_headers.set("Referer", url.protocol + "//" + url_hostname);
    new_request_headers.set("Authorization", "token " + github_token);

    let original_response = awaitfetch(url.href, {
      method: method,
      headers: new_request_headers,
      body: request.body,
    });

    connection_upgrade = new_request_headers.get("Upgrade");
    if (connection_upgrade && connection_upgrade.toLowerCase() == "websocket") {
      return original_response;
    }

    let original_response_clone = original_response.clone();
    let original_text = null;
    let response_headers = original_response.headers;
    let new_response_headers = newHeaders(response_headers);
    let status = original_response.status;

    if (disable_cache) {
      new_response_headers.set("Cache-Control", "no-store");
    } else {
      new_response_headers.set("Cache-Control", "max-age=43200000");
    }

    new_response_headers.set("access-control-allow-origin", "*");
    new_response_headers.set("access-control-allow-credentials", true);
    new_response_headers.delete("content-security-policy");
    new_response_headers.delete("content-security-policy-report-only");
    new_response_headers.delete("clear-site-data");

    if (new_response_headers.get("x-pjax-url")) {
      new_response_headers.set(
        "x-pjax-url",
        response_headers
          .get("x-pjax-url")
          .replace("//" + upstream_domain, "//" + url_hostname)
      );
    }

    const content_type = new_response_headers.get("content-type");
    if (
      content_type != null &&
      content_type.includes("text/html") &&
      content_type.includes("UTF-8")
    ) {
      original_text = awaitreplace_response_text(
        original_response_clone,
        upstream_domain,
        url_hostname
      );
    } else {
      original_text = original_response_clone.body;
    }

    response = newResponse(original_text, {
      status,
      headers: new_response_headers,
    });
  }
return response;
}

asyncfunctionreplace_response_text(response, upstream_domain, host_name) {
let text = await response.text();

var i, j;
for (i in replace_dict) {
    j = replace_dict[i];
    if (i == "$upstream") {
      i = upstream_domain;
    } elseif (i == "$custom_domain") {
      i = host_name;
    }

    if (j == "$upstream") {
      j = upstream_domain;
    } elseif (j == "$custom_domain") {
      j = host_name;
    }

    let re = newRegExp(i, "g");
    text = text.replace(re, j);
  }
return text;
}

asyncfunctiondevice_status(user_agent_info) {
var agents = [
    "Android",
    "iPhone",
    "SymbianOS",
    "Windows Phone",
    "iPad",
    "iPod",
  ];
var flag = true;
for (var v = 0; v < agents.length; v++) {
    if (user_agent_info.indexOf(agents[v]) > 0) {
      flag = false;
      break;
    }
  }
return flag;
}
?恭喜~你的图床已搭建完毕,即可分享图片,文件等内容。
GitHub 加速资源方法(可选)
1.文件加速方法
加速下载 Github Release、Archive 等文件。
在源网址前加上 https://hub.gitmirror.com/,例如:
https://hub.gitmirror.com/https://github.com/chinapmcc/img/blob/master/chinapmcc.png
如链接无法使用,请尝试替换成以下链接:
https://ghproxy.com/
https://ghps.cc/
https://gh.ddlc.top/
使用说明
GitHub文件链接带不带协议头都可以,支持 Release、Archive 以及文件,右键复制出来的链接都是符合标准的。不支持项目文件夹,合法的输入示例:
分支源码:https://github.com/chinapmcc/img/archive/main.zip
Release 源码:https://github.com/chinapmcc/img/archive/refs/tags/v1.1.0.zip
Release 文件:https://github.com/chinapmcc/img/releases/download/v1.2.0/chinapmcc.exe
分支文件:https://github.com/chinapmcc/img/blob/main/README.md
2.RAW加速方法
为了在亲爱的祖国流畅地访问 Github RAW 资源,您只要替换一下网址。就可以在任何地方、任何时候轻松访问 Github 的各种 RAW 资源,包括代码片段、文件和其他相关内容。
原raw地址
https://raw.githubusercontent.com
替换为新的raw地址
https://raw.gitmirror.com
如样例:
https://raw.githubusercontent.com/chinapmcc/img/master/PicGO+Typora.gif

https://raw.gitmirror.com/chinapmcc/img/master/PicGO+Typora.gif
3.Gist加速方法
为了在亲爱的祖国流畅地访问 Github Gist 资源,您只要替换一下网址。就可以在任何地方、任何时候轻松访问 Github Gist 的各种资源,包括代码片段、文件和其他相关内容。
原gist地址
https://gist.githubusercontent.com
替换为新的gist地址
https://gist.gitmirror.com
如样例:
https://gist.gitmirror.com/chinapmcc/5a8ufjytwh1b/raw/520/create-user.sh
4.Github/Gitlab/Bitbucket 加速方法
为了在亲爱的祖国流畅地加速访问 Github/Gitlab/Bitbucket RAW 资源。
使用URL
https://cdn.gitmirror.com
使用说明
GitHub /gh/:user/:repo/:tag/:file
GitLab /gl/:user/:repo/:tag/:file
Bitbucket /bb/:user/:repo/:tag/:file
其中:
:user Github/Gitlab/Bitbucket username
:repo Project repository
:tag Branch/commit/hash
:file File name with patch
如样例:
https://cdn.gitmirror.com/gh/chinapmcc/img/main/maker.ps1
使用Markdown软件(如Typora)上传图片(可选)
若你在使用 Typora 撰写 Markdown 文档,可实现图片自动上传至图床GitHub。
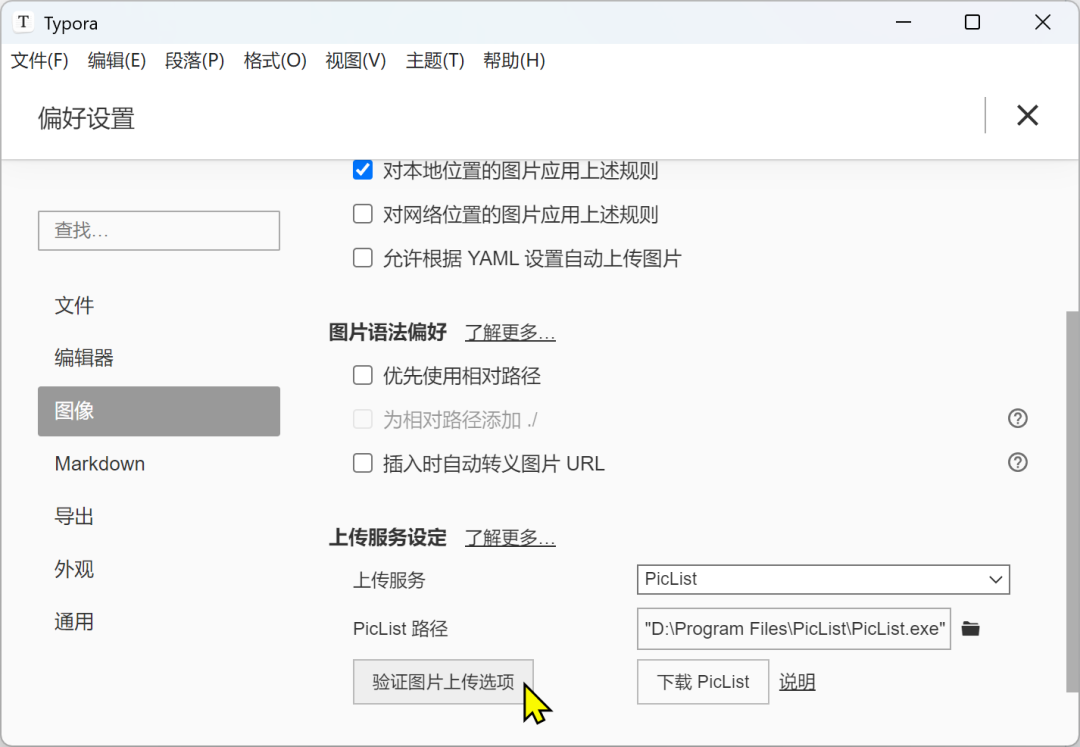
设置路径:格式 → 图像 → 全局图像设置 → 图像(左侧菜单) → 上传服务=PicList → PicList路径=安装路径 → 点击验证图片上传选项
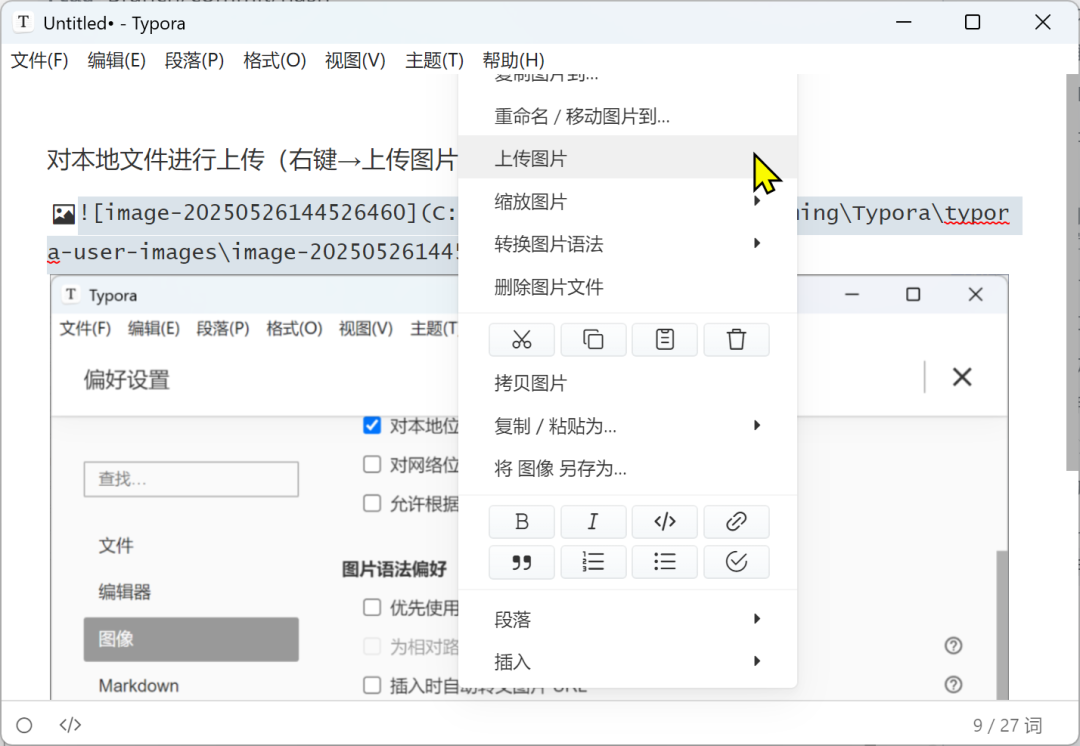
编辑文档内的图片右键点击,选择上传图片,URL地址即替换为在线链接了。
通过以上步骤,你就成功搭建了一个免费、稳定、高效的图床,无论是博客写作、论坛发帖还是其他需要图片存储与分享的场景,都能轻松应对,快去试试吧!

 支付宝微信扫一扫,打赏作者吧~
本文链接:https://kinber.cn/post/5356.html 转载需授权!
推荐本站淘宝优惠价购买喜欢的宝贝:

 您阅读本篇文章共花了: