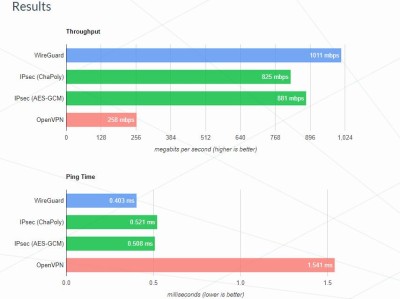
wireguard项目刚推出的时候,我就第一时间把它介绍给了中文区,撰写了详细的wireguard安装配置教程。
2018年下半年,wireguard逐渐走进中国用户视野。越来越多的海外代理商开始提供wireguard服务。国内的机场,仍然处于ss向v2ray转型的时期,几乎没有机场提供wireguard代理。
wireguard介绍
所以最佳方式是你自己搭建wireguard,现在有国内开发者弄了一键安装包,十分钟就能搞定一台wireguard服务器。
目前wireguard没有被墙算法识别干扰,稳定性非常好。

由于wireguard使用udp连接,所以不需要安装bbr或锐速tcp加速算法。
wireguard一键安装包作者yobabyshark,他会在github项目定期更新脚本。(本文部分图片来自yobabyshark博客)
该脚本在Vultr、搬瓦工、谷歌云、Linode、digitalocean都支持安装。
| Vultr成立于2014年 | $5/月购买链接 | $10/月 | $20/月 |
|---|---|---|---|
| 套餐配置 | 25 GB固态硬盘 1 CPU 1024MB内存 1TB/月流量 | 40 GB固态硬盘 1 CPU 2048MB内存 2TB/月流量 | 60 GB固态硬盘 2 CPU 4096MB内存 3TB/月流量 |
| 架构:KVM | 支持ss/v2ray/pptp/l2tp/openvpn | 支持安装Windows Server | 支持安装BBR/锐速算法 |
| 机房带宽 | 1Gbps | 1 IPv4 | 提供IPv6 |
| 机房位置 | 东京(日本) 洛杉矶(美国) 西雅图(美国) 硅谷(美国) 法兰克福(德国) 巴黎(法国) | 阿姆斯特丹(荷兰) 伦敦(英国) 纽约(美国) 芝加哥(美国) 亚特兰大(美国) | 迈阿密(美国) 达拉斯(美国) 新加坡 悉尼(澳大利亚) |
| 付款方式 | 支付宝 | 信用卡 | Paypal |
| 优惠码 SSDVPS | Vultr注册链接 | BBR加速教程 | Linode对比评测 |
推荐购买Vultr VPS机房,KVM架构服务器,采用CentOS 7操作系统。
wireguard安装步骤
创建成功后,SSH登录你的服务器,输入一键安装包命令:
yum install -y wget && wget https://raw.githubusercontent.com/yobabyshark/wireguard/master/wireguard_install.sh && chmod +x wireguard_install.sh && ./wireguard_install.sh
输入数字1升级VPS内核,重启服务器;
再连接服务器,输入命令:
./wireguard_install.sh
输入数字2安装wireguard,安装成功后,会自动显示二维码。

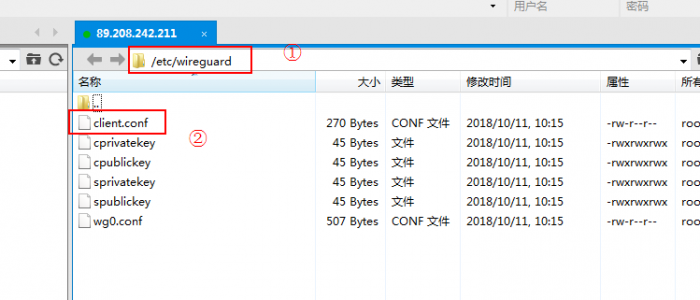
client.conf是客户端配置文件,需要下载到本地使用。放在tunsafe安装目录的conf文件夹里面。
wireguard客户端
Windows: tunsafe
Android: wireguard
Mac: 暂时没有GUI客户端,只有编译包命令行版本。
wireguard缺陷
wireguard原理设计没有考虑中国大陆特殊情况,虽然它是基于Linux Kernel的模块,效率高,速度快,但是wireguard传输特征明显,易于被识别封锁。
wireguard没有考虑多用户管理和流量管理、连接设备数量限制,这是商用必备条件,因此国内没有卖家提供wireguard服务。
wireguard最佳用途是,个人私用、家庭和公司设备互连,而不是穿墙。
wireguard脚本源代码
| #!/bin/bash | |
| #判断系统 | |
| if [ ! -e ‘/etc/redhat-release‘ ]; then | |
| echo “仅支持centos7“ | |
| exit | |
| fi | |
| if [ -n “$(grep ‘ 6\.‘ /etc/redhat-release)“ ] ;then | |
| echo “仅支持centos7“ | |
| exit | |
| fi | |
| #更新内核 | |
| update_kernel(){ | |
| yum -y install epel-release | |
| sed -i “0,/enabled=0/s//enabled=1/“ /etc/yum.repos.d/epel.repo | |
| yum remove -y kernel-devel | |
| rpm –import https://www.elrepo.org/RPM-GPG-KEY-elrepo.org | |
| rpm -Uvh http://www.elrepo.org/elrepo-release-7.0-2.el7.elrepo.noarch.rpm | |
| yum –disablerepo=“*“ –enablerepo=“elrepo-kernel“ list available | |
| yum -y –enablerepo=elrepo-kernel install kernel-ml | |
| sed -i “s/GRUB_DEFAULT=saved/GRUB_DEFAULT=0/“ /etc/default/grub | |
| grub2-mkconfig -o /boot/grub2/grub.cfg | |
| wget https://elrepo.org/linux/kernel/el7/x86_64/RPMS/kernel-ml-devel-4.19.1-1.el7.elrepo.x86_64.rpm | |
| rpm -ivh kernel-ml-devel-4.19.1-1.el7.elrepo.x86_64.rpm | |
| yum -y –enablerepo=elrepo-kernel install kernel-ml-devel | |
| read -p “需要重启VPS,再次执行脚本选择安装wireguard,是否现在重启 ? [Y/n] :“ yn | |
| [ -z “${yn}“ ] && yn=“y“ | |
| if [[ $yn == [Yy] ]]; then | |
| echo -e “${Info} VPS 重启中…“ | |
| reboot | |
| fi | |
| } | |
| #生成随机端口 | |
| rand(){ | |
| min=$1 | |
| max=$(($2–$min+1)) | |
| num=$(cat /dev/urandom | head -n 10 | cksum | awk -F ‘ ‘ ‘{print $1}‘) | |
| echo $(($num%$max+$min)) | |
| } | |
| config_client(){ | |
| cat > /etc/wireguard/client.conf <<–EOF | |
| [Interface] | |
| PrivateKey = $c1 | |
| Address = 10.0.0.2/24 | |
| DNS = 8.8.8.8 | |
| MTU = 1420 | |
| [Peer] | |
| PublicKey = $s2 | |
| Endpoint = $serverip:$port | |
| AllowedIPs = 0.0.0.0/0, ::0/0 | |
| PersistentKeepalive = 25 | |
| EOF | |
| } | |
| #centos7安装wireguard | |
| wireguard_install(){ | |
| curl -Lo /etc/yum.repos.d/wireguard.repo https://copr.fedorainfracloud.org/coprs/jdoss/wireguard/repo/epel-7/jdoss-wireguard-epel-7.repo | |
| yum install -y dkms gcc-c++ gcc-gfortran glibc-headers glibc-devel libquadmath-devel libtool systemtap systemtap-devel | |
| yum -y install wireguard-dkms wireguard-tools | |
| yum -y install qrencode | |
| mkdir /etc/wireguard | |
| cd /etc/wireguard | |
| wg genkey | tee sprivatekey | wg pubkey > spublickey | |
| wg genkey | tee cprivatekey | wg pubkey > cpublickey | |
| s1=$(cat sprivatekey) | |
| s2=$(cat spublickey) | |
| c1=$(cat cprivatekey) | |
| c2=$(cat cpublickey) | |
| serverip=$(curl icanhazip.com) | |
| port=$(rand 10000 60000) | |
| chmod 777 -R /etc/wireguard | |
| systemctl stop firewalld | |
| systemctl disable firewalld | |
| yum install -y iptables-services | |
| systemctl enable iptables | |
| systemctl start iptables | |
| iptables -P INPUT ACCEPT | |
| iptables -P OUTPUT ACCEPT | |
| iptables -P FORWARD ACCEPT | |
| iptables -F | |
| service iptables save | |
| service iptables restart | |
| echo 1 > /proc/sys/net/ipv4/ip_forward | |
| echo “net.ipv4.ip_forward = 1“ > /etc/sysctl.conf | |
| cat > /etc/wireguard/wg0.conf <<–EOF | |
| [Interface] | |
| PrivateKey = $s1 | |
| Address = 10.0.0.1/24 | |
| PostUp = iptables -A FORWARD -i wg0 -j ACCEPT; iptables -A FORWARD -o wg0 -j ACCEPT; iptables -t nat -A POSTROUTING -o eth0 -j MASQUERADE | |
| PostDown = iptables -D FORWARD -i wg0 -j ACCEPT; iptables -D FORWARD -o wg0 -j ACCEPT; iptables -t nat -D POSTROUTING -o eth0 -j MASQUERADE | |
| ListenPort = $port | |
| DNS = 8.8.8.8 | |
| MTU = 1420 | |
| [Peer] | |
| PublicKey = $c2 | |
| AllowedIPs = 10.0.0.2/32 | |
| EOF | |
| config_client | |
| wg-quick up wg0 | |
| systemctl enable wg-quick@wg0 | |
| content=$(cat /etc/wireguard/client.conf) | |
| echo “电脑端请下载client.conf,手机端可直接使用软件扫码“ | |
| echo “${content}“ | qrencode -o – -t UTF8 | |
| } | |
| #开始菜单 | |
| start_menu(){ | |
| clear | |
| echo “=========================“ | |
| echo “ 介绍:适用于CentOS7“ | |
| echo “ 作者:atrandys“ | |
| echo “ 网站:www.atrandys.com“ | |
| echo “ Youtube:atrandys“ | |
| echo “=========================“ | |
| echo “1. 升级系统内核“ | |
| echo “2. 安装wireguard“ | |
| echo “3. 退出脚本“ | |
| echo | |
| read -p “请输入数字:“ num | |
| case “$num“ in | |
| 1) | |
| update_kernel | |
| ;; | |
| 2) | |
| wireguard_install | |
| ;; | |
| 3) | |
| exit 1 | |
| ;; | |
| *) | |
| clear | |
| echo “请输入正确数字“ | |
| sleep 5s | |
| start_menu | |
| ;; | |
| esac | |
| } | |
| start_menu | |
本文链接:https://kinber.cn/post/662.html 转载需授权!
推荐本站淘宝优惠价购买喜欢的宝贝:

 支付宝微信扫一扫,打赏作者吧~


