https://iis-blogs.azurewebsites.net/msdeploy/announcing-web-deploy-2-0-refresh
\
Announcing Web Deploy 2.0 Refresh!
We are happy to announce that we have just released a refresh of Web Deploy 2.0 for MIX ‘11. Our goal for this release was to make Web Deploy easier to install and manage. You can download the x86 or x64 versions.
Web Deploy 2.0 will upgrade to the latest version, and this latest version will continue to live side-by-side with Web Deploy 1.1.
Here’s a rundown of new features:
1. Easier setup for non-administrator deployments on IIS7
One of the common requests from our users was to make it easier to setup Web Deploy so non-administrators can publish to their sites. Typically, you will need to do this if you are running a shared hosting environment or if you are administering a build machine and you do not want users to have admin access.
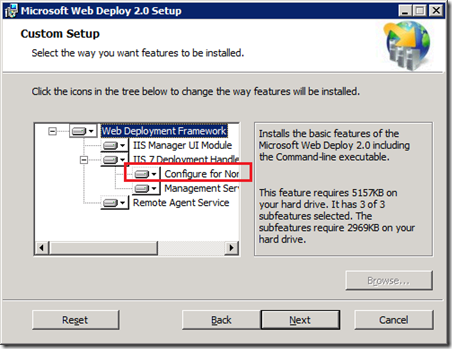
If you launch the Web Deploy installer and choose “Custom”, you will notice a new option, “Configure for Non-administrator Deployments”:
If you choose this option, Web Deploy will automatically create Management Service Delegation rules for the following providers, as well as user the accounts needed for providers like createApp and recycleApp that need elevated privileges.
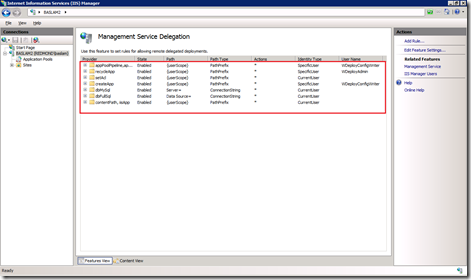
These are the rules you will have in the Management Service Delegation UI in IIS Manager after you install this component:
Notice that Web Deploy setup created two new local user accounts:
- WDeployConfigWriter, which has Write permissions to the IIS server’s applicationHost.config. This is used by delegation rules for createApp, appPoolNetFx and appPoolPipelineMode.
- WDeployAdmin, which is an administrator. This is used by delegation rules for recycleApp.
If you prefer to create these rules by hand, uncheck the component in the installer. We also provide a PowreShell script for creating delegation rules (more on this later in the post) if you prefer that route.
2. Services are configured out of the box
We made a few common-sense changes to Web Deploy setup so you, as an administrator, can just run our installer and have the right sets of services started and configured so Web Deploy just works out of the box.
- If Remote Agent Service is installed, it is started automatically by the installer.
- If the Management Service is installed and you install the IIS7 Deployment Handler component, Web Deploy setup enables incoming connections to the Management Service from Windows and IIS Manager Users and starts the service.
Additionally, administrators are allowed to bypass Management Service Delegation rules by default. This is useful if you are an administrator on the box and just want to deploy to it without having to worry about delegation rules getting in the way.
3. Improved error messages
Web Deploy now includes error codes and friendlier error messages. This can be helpful in diagnosing why your Web Deploy command is not working.
Read more about error codes here.
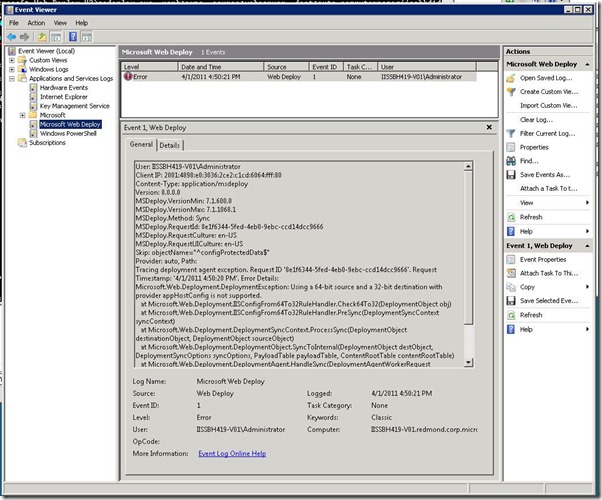
Notice that the first line shows a request ID. Guess what? The same request ID now shows up in ..
4. Per-request tracing for Web Management Service (IIS7 only) in the Windows Event Log
By default, Web Deploy now logs errors caused by requests to the Web Management Service. This is a major improvement over previous logging mechanisms which logged to a text file or to Failed Request Tracing (aka FREB) logs.
To view Web Deploy logs, simply start Event Viewer and navigate to Applications and Service Logs > Microsoft Web Deploy. Quick tip: add the User column to the view to sort by User ID – this can be useful when you’re on the phone with a remote user!
Note that the logging level is Errors Only by default. You can change the logging level from 1 to 4 (4 being the most verbose) by setting this registry key (HKEY_LOCAL_MACHINE\SOFTWARE\Microsoft\IIS Extensions\MSDeploy\2\WMSVCTracing) and restarting the Web Management Service – be forewarned, a logging level of 4 will greatly slow down the Web Management Service and is NOT recommended for production! You can read more about Management Service logging levels here.
5. IIS Manager UI for Configuring Web Deploy for a Site (IIS7 only)
The very first feature in this list set up rules which allow non-administrators to run some Web Deploy providers on your server. However, you still need to enable Web Deploy for specific web sites. This is similar to how you install and configure FTP globally for your server, but you still have to enable FTP for a site before users can access it.
In the past, this involved manually setting file system security permissions. And when you wanted to generate a publish settings file which could be consumed by Microsoft WebMatrix, you were on your own. Now, IIS Manager includes a new UI to make it easy to set up file system and IIS Manager permissions needed to enable Web Deploy publishing for a site. As an added bonus, this UI also generates a publish settings file which can be used to quickly set up publishing in WebMatrix.
To try this UI,
1) Start IIS Manager by clicking Start > Run and type “inetmgr.exe”
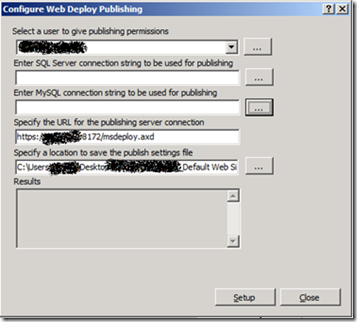
2) Right-click the site you want to publish to, click Deploy and then click “Configure Web Deploy Publishing…”
For now, you can just click “Setup” and copy the generated file to your development computer. If you are interested in customizing some of these options, here’s an explanation of what each one of them does:
Select a user to give publishing permissions | If you want to publish as the currently logged-in user, leave this unchanged. Otherwise, you can specify a different account by clicking on “…” |
Enter a SQL Server / MySQL connection string to be used during publishing | If you enter connection strings here, they will be saved to the publish settings file this dialog generates. |
Specify the URL for the publishing server connection | This is the HTTPS endpoint your development computer will talk to. For the majority of cases, you can leave this unchanged. However, in cases where your computer name does not match its public DNS name (common in many virtual dedicated computers), you should enter the public DNS name or IP here. |
6. PowerShell Setup Automation Scripts
Note: Requires PowerShell 2 installed
Web Deploy 2.0 also comes with a set of PowerShell scripts which automate setup-related tasks. Web Deploy 2.0 comes with the following scripts in the \scripts folder of the installation directory:
- Create delegation rules
- Set up a site for Web Deploy publishing
- Create a MySQL database
- Create a SQL Server database
You can read more about the scripts here.
Lastly, a big thank you to all our users for your feedback and for using your product. We hope you find this refresh useful. If you need help, check out our forum or drop us a line at wdtrel@microsoft.com with your thoughts!
7 Comments
本文链接:https://kinber.cn/post/4676.html 转载需授权!
推荐本站淘宝优惠价购买喜欢的宝贝:


 支付宝微信扫一扫,打赏作者吧~

