H3C(s1850)初始化配置流程
1.配置时间
clock datetime HH:MM:SS YYYY/MM/DD
clock timezone bj add 8
2.配置交换机名称
sysname
3.关闭console登录认证
user-interface aux 0
authentication-mode
none
4.开启Telnet服务
service telnet enable
5.配置本地用户
local-user xxx
password cipher xxx
authotization-attritute level 3
service-type telnet
6.配置远程
user-interface vty 0 15
authentication-mode scheme
7.配置vlan
vlan xxxx
port-group manual 1
group-member g1/0/1 to g1/0/24
port link-type access
port access vlan xxxx
8.虚拟机接口配置地址
int vlan-interface xxxx
ip add x.x.x.x 27
9.配置路由
ip route-static 0.0.0.0 0.0.0.0 x.x.x.x
10.保存
save
————————————————
一、本地用户Telnet登录管理(模拟器实验)
1、在配置之前要添加一个以太网接口,默认是桥接到本地的网卡上(建议添加一个微软的逻辑口,并禁用本地物理网卡,让它桥接到逻辑接口上) 也可以编辑路由器的配置文件“hardcfg.tcl”添加代码“AddEthernet -index 1”,在启动路由器即可!!
<H3C>format flash: //要想保存数据 ,必须格式化
All data on flash: will be lost , proceed with format ? [Y/N]:y
./
%Format flash: completed.
<H3C>system-view
[H3C]telnet server enable //启动telnet服务
[H3C]password-control length 4 //默认密码长度为10,这里设为4
[H3C]local-user zzx //添加一个用户
New local user added.
[H3C-luser-zzx]password simple admin //密码
Updating user(s) information, please wait....
[H3C-luser-zzx]service-type telnet level 3 //服务类型 ,权限为3 即管理级别(有的是命令authorization-attribute level 3)
[H3C-luser-zzx]quit
[H3C]user-interface vty 0 4 //设置同时登录的用户为5个
[H3C-ui-vty0-4]authentication-mode scheme //验证用户名和密码
[H3C-ui-vty0-4]quit
[H3C]inter Ethernet 0/1/0 //配置接口地址
[H3C-Ethernet0/1/0]ip add 192.168.10.10 255.255.255.0
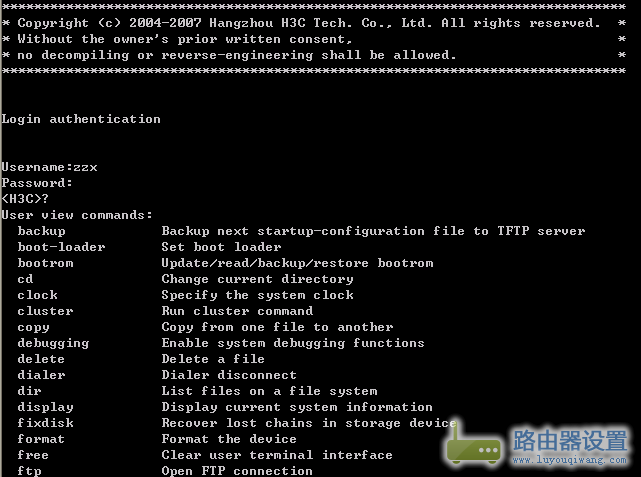
缺省情况下,用户使用Telnet方式登录设备,通过口令验证后,只能使用级别为0的命令。 如果想使用1,2,3级别的命令可以配置super password xxxx 来实现
或者通过验证密码
[H3C] user-interface vty 0 4
[H3C-ui-vty0-4] authentication-mode password
[H3C-ui-vty0-4] set authentication password cipher 123
[H3C-ui-vty0-4] user privilege level 2 //在这里指明级别
二、本地用户console登录管理
(不同之处)
[H3C-luser-zzx]service-type terminal //设置服务类型为terminal
[H3C]user-interface con 0
[H3C-ui-vty0-4]authentication-mode scheme //设置scheme认证
三、SSH方式登录管理
1、验证方式为pasword认证
[H3C]local-user zzx //创建本地账号
[H3C-luser-zzx]password simple zzx123
[H3C-luser-zzx]service-type ssh //服务类型为ssh
[H3C-luser-zzx]level 3 //级别为3
[H3C]inter Ethernet 0/1/0 //配置接口地址
[H3C-Ethernet0/1/0]ip add 192.168.10.10 255.255.255.0
[H3C]ssh server enable //开启ssh服务
[H3C]ssh user zzx service-type stelnet authentication-type password //SSH用户client1的服务类型为stelnet,即安全Telnet,使用密码认证方式
[H3C]public-key local create rsa //生成本地密钥对并指定密钥长度
The range of public key size is (512 ~ 2048).
NOTES: If the key modulus is greater than 512,
It will take a few minutes.
Press CTRL+C to abort.
Input the bits of the modulus[default = 1024]:
Generating Keys...
...++..++...++..++...++...++...++..++.+++++++++.+++++++
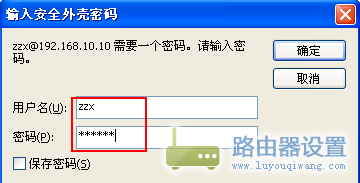
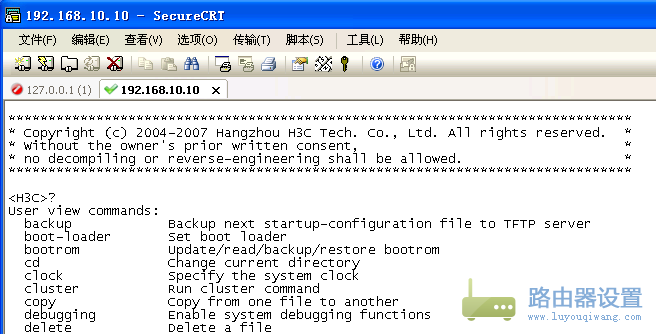
连接一下看看如下;

2、验证方式为公钥认证
[H3C]public-key local create rsa //生成1024位的rsa本地密钥对
The range of public key size is (512 ~ 2048).
NOTES: If the key modulus is greater than 512,
It will take a few minutes.
Press CTRL+C to abort.
Input the bits of the modulus[default = 1024]:
Generating Keys...
...++..++...++..++...++...++...++..++.+++++++++.+++++++
<H3C>tftp 192.168.10.1 get Identity.pub //导入公钥.(公钥是用Secure CRT软件创建的)
File will be transferred in binary mode
Downloading file from remote TFTP server, please wait...\
TFTP: 360 bytes received in 0 second(s)
File downloaded successfully.
<H3C>dir
Directory of flash:/
0 drw- - Mar 12 2013 13:11:12 logfile
1 -rw- 360 Mar 12 2013 15:17:09 identity.pub
2540 KB total (2507 KB free)
[H3C]public-key peer sshpub import sshkey Identity.pub //将导入的公钥转换为RSA格式sshpub
[H3C]ssh server enable
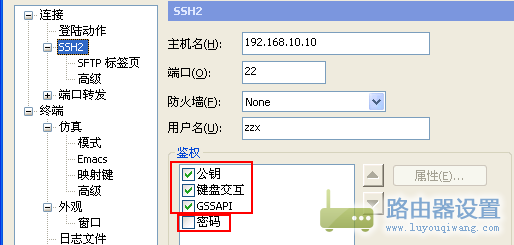
[H3C]ssh user zzx service-type stelnet authentication-type publickey assign publickey sshpub
//SSH用户zzx的服务类型为stelnet、使用公钥认证,并且为该用户名分配生成的公钥sshpub
登录时 勾掉”密码”这一项
四、radius进行telnet验证
[H3C]telnet server enable //打开Telnet服务器,缺省关闭,必须打开
[H3C]radius scheme telnetlogin //创建RADIUS方案
[H3C-radius-telnetlogin]primary authentication 192.168.10.1 //配置验证的服务器地址与共享密钥
[H3C-radius-telnetlogin]key authentication test
[H3C-radius-telnetlogin]user-name-format without-domain
[H3C-radius-telnetlogin]server-type standard
//Telnet用户属于Login类型,引用RADIUS方案test,不进行计费
[H3C]domain system
[H3C-isp-system]authentication login radius-scheme telnetlogin
[H3C-isp-system]authorization login radius-scheme telnetlogin
[H3C-isp-system]accounting optional
//设置scheme认证
[H3C]user-interface vty 0 4
[H3C-ui-vty0-4]authentication-mode sch
[H3C-ui-vty0-4]authentication-mode scheme
在配置相应的接口
------------------
交换机名牌:H3C
交换机类型:三层交换机
交换机型号:S3600-28TP-SI
一、通过console线连接交换机,给交换机配置一个vlan管理地址。
<H3C>system-view                                            //进入系统视图[H3C]interface Vlan-interface1
[H3C-Vlan-interface1]ip address 172.16.1.1 255.255.255.0    //给vlan1配置IP地址
二、配置VTY(Virtual Teletype Terminal)虚拟终端接口的认证方式。
[H3C]user-interface vty 0 4[H3C-ui-vty0-4]authentication-mode scheme //进行本地或远端用户名和口令认证。即AAA认证
关于认证,一共有三种认证方式,如下图所示:

三、接下来就是本地用户的创建与配置,可按下命令操作:
[H3C]local-user admin //设置创建本地认证的用户名[H3C-luser-admin]password cipher 5201351 //使用命令查看当前配置时,会显示加密后的字符串[H3C-luser-admin]service-type telnet level 3 //作用于telnet服务,用户级别可单独一行,缺省为级别0
说到用户级别,这里首先需要提到命令级别,命令级别共分为访问、监控、系统、管理4个级别,分别对应标识0、1、2、3。
管理员可以根据用户需要改变命令级别,使其在相应的视图下工作。缺省情况下,ping、tracert、telnet 等为访问级(0级);
display、debugging为监控级(1级);所有的配置命令为系统级(2级);FTP、XMODEM、TFTP以及文件系统操作的命令为管理级(3级)。
四、通过以上的配置后,我们便可以远程使用telnet对交换机进行管理配置,telnet默认使用23号端口。
打赏

支付宝微信扫一扫,打赏作者吧~
本文链接:https://kinber.cn/post/1627.html 转载需授权!
推荐本站淘宝优惠价购买喜欢的宝贝:

 您阅读本篇文章共花了:


 支付宝微信扫一扫,打赏作者吧~

