https://www.howtoforge.com/tutorial/how-to-setup-ikev2-vpn-using-strongswan-and-letsencrypt-on-centos-7/
Strongswan is an open source multiplatform IPSec implementation. It's an IPSec-based VPN solution that focuses on strong authentication mechanisms. Strongswan offers support for both IKEv1 and IKEv2 key exchange protocols, authentication based on X.509 certificates or pre shared keys, and secure IKEv2 EAP user authentication.
In this tutorial, I will show you how to install an IPSec VPN server using Strongswan. We will create an IKEv2 VPN server with the 'EAP-MSCHAPv2' authentication and be using Letsencrypt certificates on CentOS 7 server.
Prerequisites
CentOS 7 Server
Root privileges
What we will do?
Install Strongswan on CentOS 7
Generate SSL Letsencrypt
Configure Strongswan
Enable NAT Firewall
Enable Port-Forwarding
Testing
Step 1 - Install Strongswan on CentOS 7
In this first step, we will install the strongswan IPsec implement software and all packages needed from the EPEL repository.
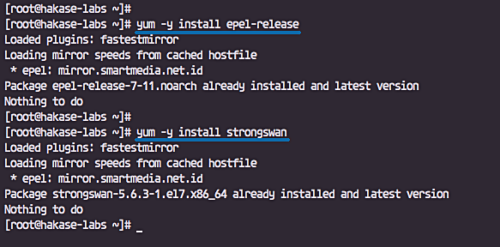
Install the EPEL repository and install the strongswan package using yum commands below.
yum -y install epel-release
yum -y install strongswan
Wait for the strongswan package to be installed.
Step 2 - Generate SSL Certificate with Let's encrypt
We will create the IKEv2 VPN server using a domain name 'ikev2.hakase-labs.io' and use certificates generated from letsencrypt.
In this step, we will install the letsencrypt tool 'certbot' and generate certificates for the server domain name 'ikev2.hakase-labs.io'.
Install 'certbot' letsencrypt tool.
yum -y install certbot
After the certbot installation, we need to open the HTTP and HTTPS port of the server using firewall-cmd.
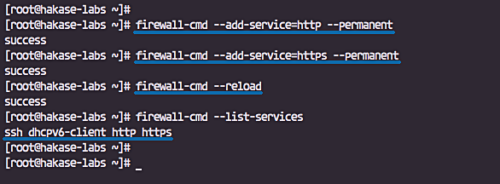
Add the HTTP and HTTPS services to the firewalld service list by running firewall-cmd commands below.
firewall-cmd --add-service=http --permanent
firewall-cmd --add-service=https --permanent
firewall-cmd --reload
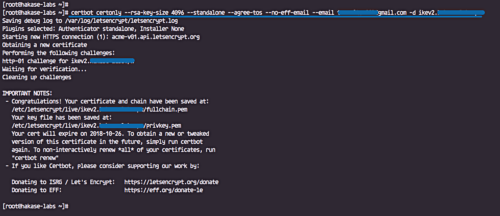
Now we can generate new SSL certificate files using the letsencrypt tool certbot.
Run the certbot command below.
certbot certonly --rsa-key-size 4096 --standalone --agree-tos --no-eff-email --email hakase@gmail.com -d ikev2.hakase-labs.io
Letsencrypt certificates for the vpn domain name 'ikev2.hakase-labs.io' has been generated, and are located at the '/etc/letsencrypt/live' directory.
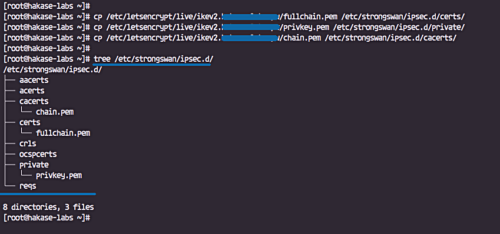
Next, we need to copy the certificate files 'fullchain.pem', 'privkey.pem', and the 'chain.pem' to the '/etc/strongswan/ipsec.d/' directory.
cp /etc/letsencrypt/live/ikev2.hakase-labs.io/fullchain.pem /etc/strongswan/ipsec.d/certs/
cp /etc/letsencrypt/live/ikev2.hakase-labs.io/privkey.pem /etc/strongswan/ipsec.d/private/
cp /etc/letsencrypt/live/ikev2.hakase-labs.io/chain.pem /etc/strongswan/ipsec.d/cacerts/
All letsencrypt certificates for the Strongswan VPN named 'ikev2.hakase-labs.io' have been generated and copied to the '/etc/strongswan/ipsec.d' directory.
tree /etc/strongswan/ipsec.d/
Step 3 - Configure Strongswan
Go to the '/etc/strongswan' directory and backup the default 'ipsec.conf 'configuration file.
cd /etc/strongswan/
mv ipsec.conf ipsec.conf.asli
Create a new one 'ipsec.conf' using vim editor.
vim ipsec.conf
And paste the following configuration.
#global configuration IPsec
#chron logger
config setup
    charondebug="ike 1, knl 1, cfg 0"
    uniqueids=no

#define new ipsec connection
conn hakase-vpn
    auto=add
    compress=no
    type=tunnel
    keyexchange=ikev2
    ike=aes128-sha1-modp1024,aes128-sha1-modp1536,aes128-sha1-modp2048,aes128-sha256-ecp256,aes128-sha256-modp1024,aes128-sha256-modp1536,aes128-sha256-modp2048,aes256-aes128-sha256-sha1-modp2048-modp4096-modp1024,aes256-sha1-modp1024,aes256-sha256-modp1024,aes256-sha256-modp1536,aes256-sha256-modp2048,aes256-sha256-modp4096,aes256-sha384-ecp384,aes256-sha384-modp1024,aes256-sha384-modp1536,aes256-sha384-modp2048,aes256-sha384-modp4096,aes256gcm16-aes256gcm12-aes128gcm16-aes128gcm12-sha256-sha1-modp2048-modp4096-modp1024,3des-sha1-modp1024!
    esp=aes128-aes256-sha1-sha256-modp2048-modp4096-modp1024,aes128-sha1,aes128-sha1-modp1024,aes128-sha1-modp1536,aes128-sha1-modp2048,aes128-sha256,aes128-sha256-ecp256,aes128-sha256-modp1024,aes128-sha256-modp1536,aes128-sha256-modp2048,aes128gcm12-aes128gcm16-aes256gcm12-aes256gcm16-modp2048-modp4096-modp1024,aes128gcm16,aes128gcm16-ecp256,aes256-sha1,aes256-sha256,aes256-sha256-modp1024,aes256-sha256-modp1536,aes256-sha256-modp2048,aes256-sha256-modp4096,aes256-sha384,aes256-sha384-ecp384,aes256-sha384-modp1024,aes256-sha384-modp1536,aes256-sha384-modp2048,aes256-sha384-modp4096,aes256gcm16,aes256gcm16-ecp384,3des-sha1!
    fragmentation=yes
    forceencaps=yes
    dpdaction=clear
    dpddelay=300s
    rekey=no
    left=%any
    leftid=@ikev2.hakase-labs.io
    leftcert=fullchain.pem
    leftsendcert=always
    leftsubnet=0.0.0.0/0
    right=%any
    rightid=%any
    rightauth=eap-mschapv2
    rightsourceip=10.15.1.0/24
    rightdns=1.1.1.1,8.8.8.8
    rightsendcert=never
    eap_identity=%identity
Save and exit.
Configuration details:
Create a new IPSec VPN tunnel connection named 'hakase-vpn'.
Specify the IKEv2 and ESP cipher suites for authentication.
The 'left' server configuration using a domain name 'ikev2.hakase-labs.io' and using the letsencrypt certificate 'fullchain.pem' located at the '/etc/strongswan/ipsec.d/certs' directory.
The 'right' clients/remote setup with the EAP authentication method 'eap-mschapv2', assign the virtual IP address range '10.15.1.0/24' to all connected clients, and using public DNS Cloudflare and google.
Next, we need to edit the 'ipsec.secrets' file to define the RSA server private key and EAP user password credentials.
Edit the 'ipsec.secrets' file.
vim ipsec.secrets
Paste the configuration below.
: RSA "privkey.pem"
hakase : EAP "hakase321@"
tensai : EAP "tensai321@"
Save and exit.
Configuration details:
Specify the RSA server private key using the letsencrypt certificate 'privkey.pem' located at the '/etc/strongswan/ipsec.d/private' directory.
Define the EAP user credentials with format 'user : EAP "password"'.
The strongswan IPSec configuration has been completed. Start the strongswan service and enable it to launch everytime at system boot.
systemctl start strongswan
systemctl enable strongswan
Step 4 - Enable NAT in Firewalld
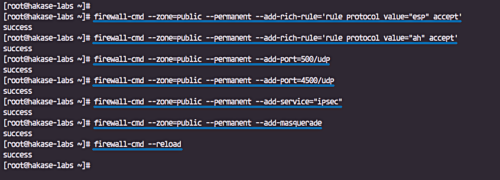
In this step, we will enable the NAT masquerading and add the IPSec protocols Authentication Header (AH) and Encapsulating Security Payload (ESP) on Firewalld using the 'rich-rule' configuration.
Add 'AH' and 'ESP' for authentication and encryption protocols to the firewalld.
firewall-cmd --zone=public --permanent --add-rich-rule='rule protocol value="esp" accept'
firewall-cmd --zone=public --permanent --add-rich-rule='rule protocol value="ah" accept'
Add the ipsec UDP ports and service.
firewall-cmd --zone=public --permanent --add-port=500/udp
firewall-cmd --zone=public --permanent --add-port=4500/udp
firewall-cmd --zone=public --permanent --add-service="ipsec"
Now enable the NAT mode masquerade and reload the firewalld configuration rules.
firewall-cmd --zone=public --permanent --add-masquerade
firewall-cmd --reload
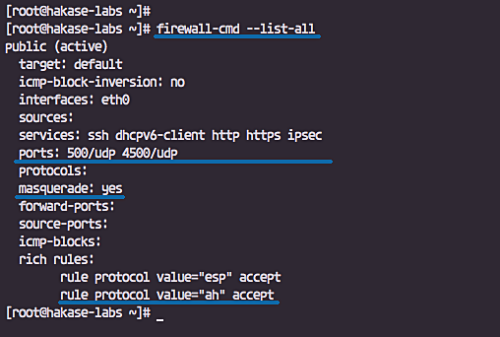
The NAT mode on firewalld has been enabled, check using the command below.
firewall-cmd --list-all
Following is the result.
Step 5 - Enable Port-Forwarding
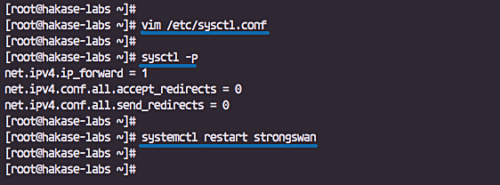
To enable port-forwarding, we need to edit the 'sysctl.conf' file.
Edit the '/etc/sysctl.conf' file using vim editor.
vim /etc/sysctl.conf
Paste the following configuration there.
net.ipv4.ip_forward = 1
net.ipv4.conf.all.accept_redirects = 0
net.ipv4.conf.all.send_redirects = 0
Save and exit, now reload using the sysctl command below.
sysctl -p
Port-forwarding has been enabled. Now restart the strongswan service.
systemctl restart strongswan
Step 6 - Testing Strongswan IPSec VPN
In this case, we will do the test on the MacOS X and android phone.
On MacOS
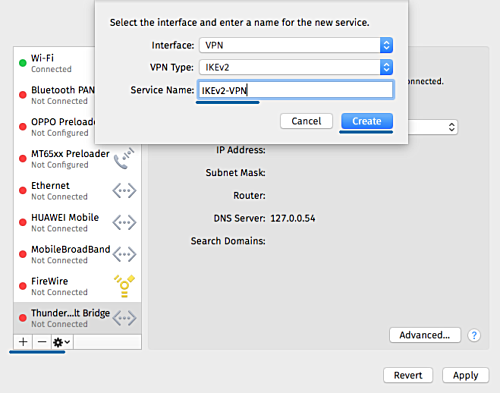
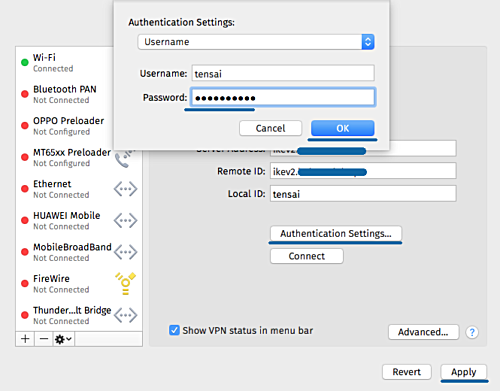
- Open the 'System Preferences' and click the 'Network' menu.
Click the '+' button to create a new VPN connection.
Interface: 'VPN'
VPN Type: 'IKEv2'
Service Name: 'IKEv2-vpn
- On the 'Server Address' and 'Remote ID', type the VPN domain name 'ikev2.hakase-labs.io'.
- Click 'Authentication Settings'.
- Authentication using a 'Username'.
- Type the username 'tensai' with password 'tensai321@'
- Click 'OK' and click 'Apply'.
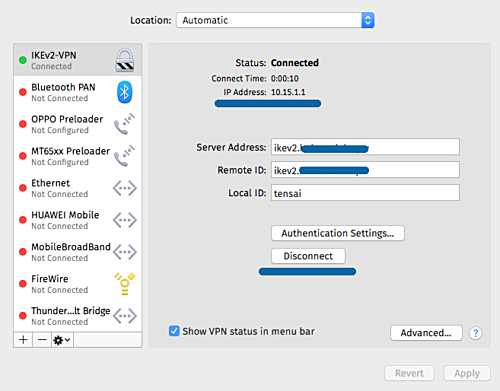
New IKEv2 VPN connection has been created on the client. Now click the connect button.
And the client has been connected to the strongswan VPN server and has an internal/private IP address 10.15.1.1.
On Android
- Download and install the native strongswan android application from Google-Play.
- Add new VPN profile
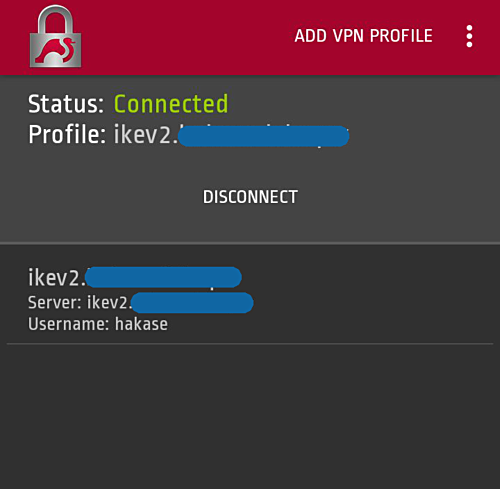
- Type the server domain name 'ikev2.hakase-labs.io' and use the IKEv2 EAP Username and Password authentication.
Following is the result when we connect to the VPN server.
The IKEv2 IPSec-based VPN server has been created using Strongswan and Letsencrypt on CentOS 7 server.
Reference
本文链接:https://kinber.cn/post/947.html 转载需授权!
推荐本站淘宝优惠价购买喜欢的宝贝:


 支付宝微信扫一扫,打赏作者吧~


