一 简介
tun是一个网络层(IP)的点对点设备,它启用了IP层隧道功能。Linux原生支持的三层隧道,可以通过命令ip tunnel help来查看:
[root@centos ~]# ip tunnel help
Usage: ip tunnel { add | change | del | show | prl | 6rd } [ NAME ]
[ mode { ipip | gre | sit | isatap | vti } ] [ remote ADDR ] [ local ADDR ]
[ [i|o]seq ] [ [i|o]key KEY ] [ [i|o]csum ]
[ prl-default ADDR ] [ prl-nodefault ADDR ] [ prl-delete ADDR ]
[ 6rd-prefix ADDR ] [ 6rd-relay_prefix ADDR ] [ 6rd-reset ]
[ ttl TTL ] [ tos TOS ] [ [no]pmtudisc ] [ dev PHYS_DEV ]
Where: NAME := STRING
ADDR := { IP_ADDRESS | any }
TOS := { STRING | 00..ff | inherit | inherit/STRING | inherit/00..ff }
TTL := { 1..255 | inherit }
KEY := { DOTTED_QUAD | NUMBER }
可以看到Linux一共原生支持5种三层隧道(tunnel),如下表:
二 实战组网
三 配置说明
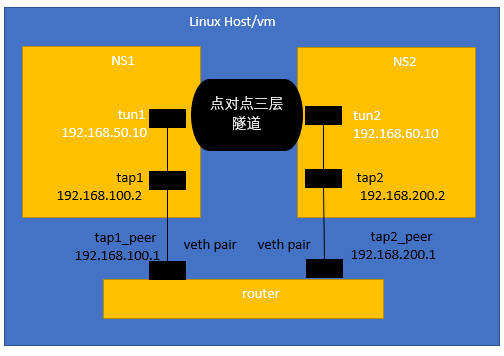
测试用例第一步:就是图中tap1和tap2配置能通,配置方法见
https://blog.csdn.net/chengqiuming/article/details/80140768
当tap1和tap2设备配通以后,如果不把图中tun1和tun2暂时当做tun设备,而是当做两个“死”设备(比如当做是两个不做任何配置的网卡),那么这时候tun1和tun2就像两个孤岛,不仅互相不通,而且跟tap1和tap2也没关系
这个时候,就需要对tun1和tun2做相关配置,以使得这两个孤岛能够互相通信。
我们以ipip tunnel为例进行配置。
首先我们要加载ipip模块,Linux默认是没有加载这个模块。
#查看方法:
[root@centos ~]# lsmod |grep ip
iptable_mangle 12695 1
ipt_MASQUERADE 12678 3
nf_nat_masquerade_ipv4 13412 1 ipt_MASQUERADE
iptable_nat 12875 1
nf_nat_ipv4 14115 1 iptable_nat
nf_nat 26146 2 nf_nat_ipv4,nf_nat_masquerade_ipv4
nf_conntrack_ipv4 14862 2
nf_defrag_ipv4 12729 1 nf_conntrack_ipv4
nf_conntrack 105745 5 nf_nat,nf_nat_ipv4,xt_conntrack,nf_nat_masquerade_ipv4,nf_conntrack_ipv4
ipt_REJECT 12541 2
ip6table_filter 12815 0
ip6_tables 27025 1 ip6table_filter
iptable_filter 12810 1
ip_tables 27240 3 iptable_filter,iptable_mangle,iptable_nat
#加载方法
[root@centos ~]# modprobe ipip
#再次查看
[root@centos ~]# lsmod |grep ip
#多出下面三项
ipip 13472 0
tunnel4 13252 1 ipip
ip_tunnel 25216 1 ipip
iptable_mangle 12695 1
ipt_MASQUERADE 12678 3
nf_nat_masquerade_ipv4 13412 1 ipt_MASQUERADE
iptable_nat 12875 1
nf_nat_ipv4 14115 1 iptable_nat
nf_nat 26146 2 nf_nat_ipv4,nf_nat_masquerade_ipv4
nf_conntrack_ipv4 14862 2
nf_defrag_ipv4 12729 1 nf_conntrack_ipv4
nf_conntrack 105745 5 nf_nat,nf_nat_ipv4,xt_conntrack,nf_nat_masquerade_ipv4,nf_conntrack_ipv4
ipt_REJECT 12541 2
ip6table_filter 12815 0
ip6_tables 27025 1 ip6table_filter
iptable_filter 12810 1
ip_tables 27240 3 iptable_filter,iptable_mangle,iptable_nat
#加载了ipip模块以后,我们就可以创建tun,并且给tun绑定一个ipip隧道,命令如下
#在ns1上创建tun1和ipip tunnel
[root@centos ~]# ip netns exec ns1 ip tunnel add tun1 mode ipip remote 192.168.200.2 local 192.168.100.2 ttl 255
[root@centos ~]# ip netns exec ns1 ip link set tun1 up
[root@centos ~]# ip netns exec ns1 ip addr add 192.168.50.10 peer 192.168.60.10 dev tun1
#在ns2上创建tun2和ipip tunnel
[root@centos ~]# ip netns exec ns2 ip tunnel add tun2 mode ipip remote 192.168.100.2 local 192.168.200.2 ttl 255
[root@centos ~]# ip netns exec ns2 ip link set tun2 up
[root@centos ~]# ip netns exec ns2 ip addr add 192.168.60.10 peer 192.168.50.10 dev tun2
#ping测试
[root@centos ~]# ip netns exec ns1 ping 192.168.60.10
PING 192.168.60.10 (192.168.60.10) 56(84) bytes of data.
64 bytes from 192.168.60.10: icmp_seq=1 ttl=64 time=0.147 ms
64 bytes from 192.168.60.10: icmp_seq=2 ttl=64 time=0.051 ms
#因为我们说tun是一个设备,那么我们可以通过ifconfig这个命令,来看看这个设备的信息:
[root@centos ~]# ip netns exec ns1 ifconfig -a
lo: flags=8<LOOPBACK> mtu 65536
loop txqueuelen 0 (Local Loopback)
RX packets 0 bytes 0 (0.0 B)
RX errors 0 dropped 0 overruns 0 frame 0
TX packets 0 bytes 0 (0.0 B)
TX errors 0 dropped 0 overruns 0 carrier 0 collisions 0
tap1: flags=4163<UP,BROADCAST,RUNNING,MULTICAST> mtu 1500
inet 192.168.100.2 netmask 255.255.255.0 broadcast 0.0.0.0
inet6 fe80::7c6d:aaff:fe0c:20d prefixlen 64 scopeid 0x20<link>
ether 7e:6d:aa:0c:02:0d txqueuelen 1000 (Ethernet)
RX packets 24 bytes 2578 (2.5 KiB)
RX errors 0 dropped 0 overruns 0 frame 0
TX packets 16 bytes 1248 (1.2 KiB)
TX errors 0 dropped 0 overruns 0 carrier 0 collisions 0
tun1: flags=209<UP,POINTOPOINT,RUNNING,NOARP> mtu 1480
inet 192.168.50.10 netmask 255.255.255.255 destination 192.168.60.10
tunnel txqueuelen 0 (IPIP Tunnel)
RX packets 2 bytes 168 (168.0 B)
RX errors 0 dropped 0 overruns 0 frame 0
TX packets 2 bytes 168 (168.0 B)
TX errors 0 dropped 0 overruns 0 carrier 0 collisions 0
tunl0: flags=128<NOARP> mtu 1480
tunnel txqueuelen 0 (IPIP Tunnel)
RX packets 0 bytes 0 (0.0 B)
RX errors 0 dropped 0 overruns 0 frame 0
TX packets 0 bytes 0 (0.0 B)
TX errors 0 dropped 0 overruns 0 carrier 0 collisions 0
#可以看到,tun1是一个ipip tunel的一个端点,IP是192.168.50.10,其对端IP是192.168.60.10
#再看看路由表
[root@centos ~]# ip netns exec ns1 route -nee
Kernel IP routing table
Destination Gateway Genmask Flags Metric Ref Use Iface MSS Window irtt
192.168.60.10 0.0.0.0 255.255.255.255 UH 0 0 0 tun1 0 0 0
192.168.100.0 0.0.0.0 255.255.255.0 U 0 0 0 tap1 0 0 0
192.168.200.0 192.168.100.1 255.255.255.0 UG 0 0 0 tap1 0 0 0
#到达目的地192.168.60.10的路由的一个直连路由直接从tun1出去即可。
本文链接:https://kinber.cn/post/678.html 转载需授权!
推荐本站淘宝优惠价购买喜欢的宝贝:


 支付宝微信扫一扫,打赏作者吧~

