Install-WindowsFeature -Name hyper-v,Multipath-IO -IncludeAllSubFeature -IncludeManagementTools -Restart
New-VMSwitch -Name SW-1G -NetAdapterName "Local Area Connection 2"
If you have only one NIC, run the following command:
New-VMSwitch -Name SW-1G-NetAdapterName "Local Area Connection" - AllowManagementOS $true
Change default paths to store virtual machine configuration and its hard disks.
Set-VMHost -ComputerName localhost -VirtualHardDiskPath 'D:\VMs\vHDs' -VirtualMachinePath 'D:\VMs'
Do not install any features other than Failover Clustering and Multipath I/O(MPIO) on a Hyper-V host.
2.Creating virtual machines:
New-VM -Generation 2
New-VM -Name VM01 -Path C:\VM01 -Memorystartupbytes 1024MB
New-VHD -Path C:\vms\vm01\vm01_c.vhdx -SizeBytes 60GB -Dynamic
Add-VMHardDiskDrive -VMName VM01 -Path C:\vms\vm01\vm01_c.vhdx
Add-VMNetworkAdapter -vmname "VM01" -switchname "external"
3.Deploying Highly Available Hyper-v Clusters
A Hyper-V Failover Cluster consists of two or more Hyper-V Server compute nodes.
Install Microsoft Multipath IO when using redundant storage paths:
Install-WindowsFeature -Name Multipath-IO -ComputerName Pyhyv01, Pyhyv02
rename the network connections from the defaults:
Rename-NetAdapter -Name "Ethernet" -NewName "Host"
Rename-NetAdapter -Name "Ethernet 2" -NewName "LiveMig"
Rename-NetAdapter -Name "Ethernet 3" -NewName "VMs"
Rename-NetAdapter -Name "Ethernet 4" -NewName "Cluster"
Rename-NetAdapter -Name "Ethernet 5" -NewName "Storage"
activate the necessary Failover Clustering features on both of our Hyper-V hosts:
Invoke-Command -ComputerName hyperv01,hyperv02 -ScriptBlock {Install-WindowsFeature -Name Failover-Clustering -IncludeManagementTools}
Before actually creating the cluster, we will launch a cluster validation:
Test-Cluster hyperv01, hyperv02
create cluster:
New-Cluster -Name CN=Cluster-Hyv01,OU=SCVMM,DC=artingykx,DC=com -Node hyperv01, hyperv02 -StaticAddress 192.168.66.35
Quorum configuration:
specify a disk witness:
Set-ClusterQuorum -NodeAndDiskMajority "Cluster Disk 2"
using a file share witness:
Set-ClusterQuorum -NodeAndFileShareMajority \\File01\Share01
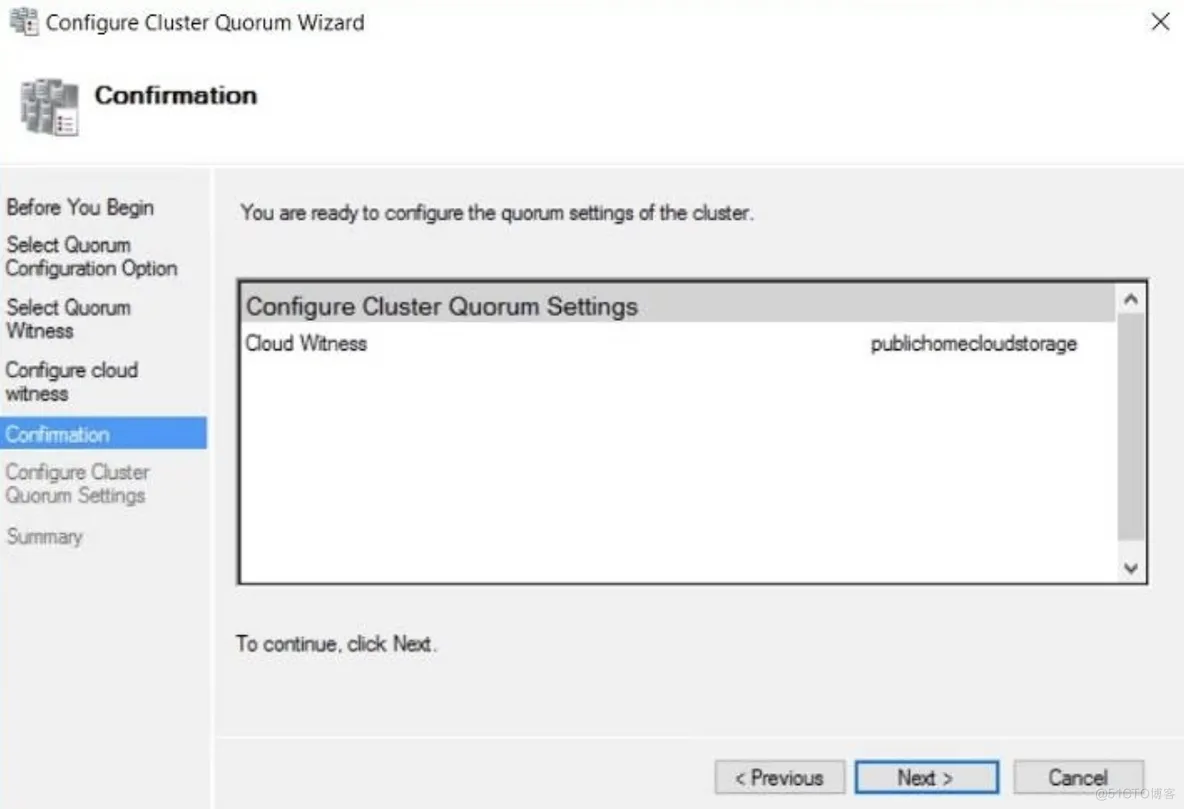
use a cloud witness:
Set-ClusterQuorum -CloudWitness -AccountName <StorageAccountName> -AccessKey <AccessKey>
Live migration configuration:
CredSSP is the default authentication protocol in Windows Server.
It is easy to use, but it's not the most secure solution and not recommended for production systems.
If your Hyper-V hosts are part of the same Active Directory domain—and in most cases they will be—you can use the Kerberos protocol for live migration authentication.
$Host="hyperv01"
$Domain="artingykx.com"
Get-ADComputer hyperv02 | Set-ADObject -Add @{"msDS-AllowedToDelegateTo"="Microsoft Virtual System Migration Service/$Host.$Domain", "cifs/$Host.$Domain","Microsoft Virtual System Migration Service/$Host", "cifs/$Host"}
$Host="hyperv02"
Get-ADComputer hyperv01 | Set-ADObject -Add @{"msDS-AllowedToDelegateTo"="Microsoft Virtual System Migration Service/$Host.$Domain", "cifs/$Host.$Domain","Microsoft Virtual System Migration Service/$Host", "cifs/$Host"}
get-adcomputer -Identity hyperv01 -Properties msDS-AllowedToDelegateTo | select -ExpandProperty msDS-AllowedToDelegateTo
activate incoming and outgoing live migrations for Hyper-V hosts:
Enable-VMMigration -ComputerName hyperv01, hyperv02
Set-VMHost -ComputerName hyperv01, hyperv02 -VirtualMachineMigrationAuthenticationType Kerberos
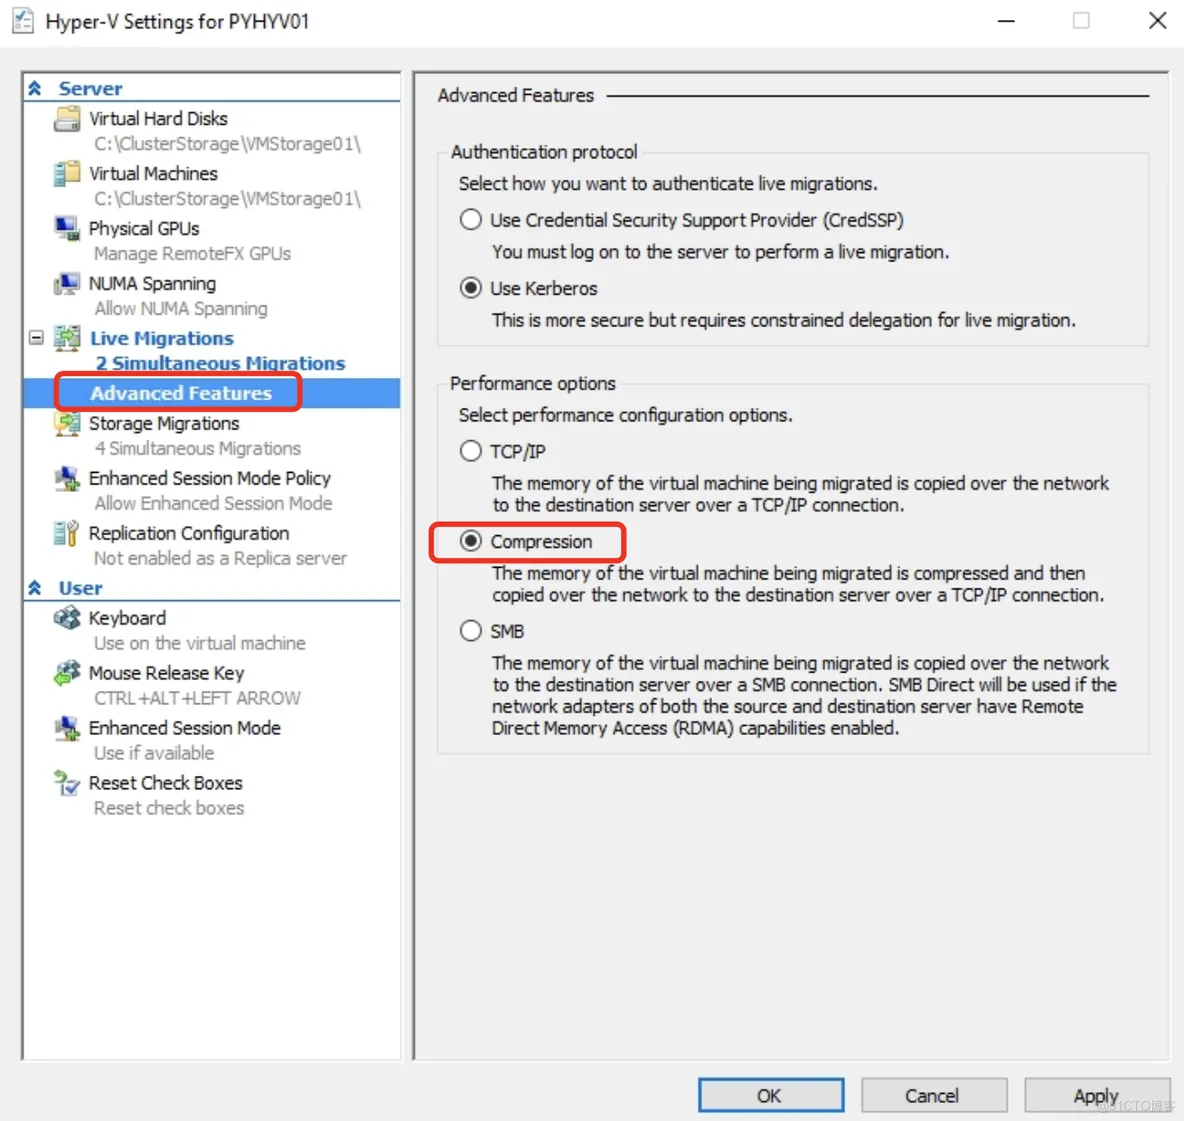
If you are using 10 GB/s network connections, switch live migrations to SMB3 for even better performance:
Set-VMHost -ComputerName hyperv01, hyperv02 -MaximumVirtualMachineMigrations 4 -MaximumStorageMigrations 4 -VirtualMachineMigrationPerformanceOption SMBTransport
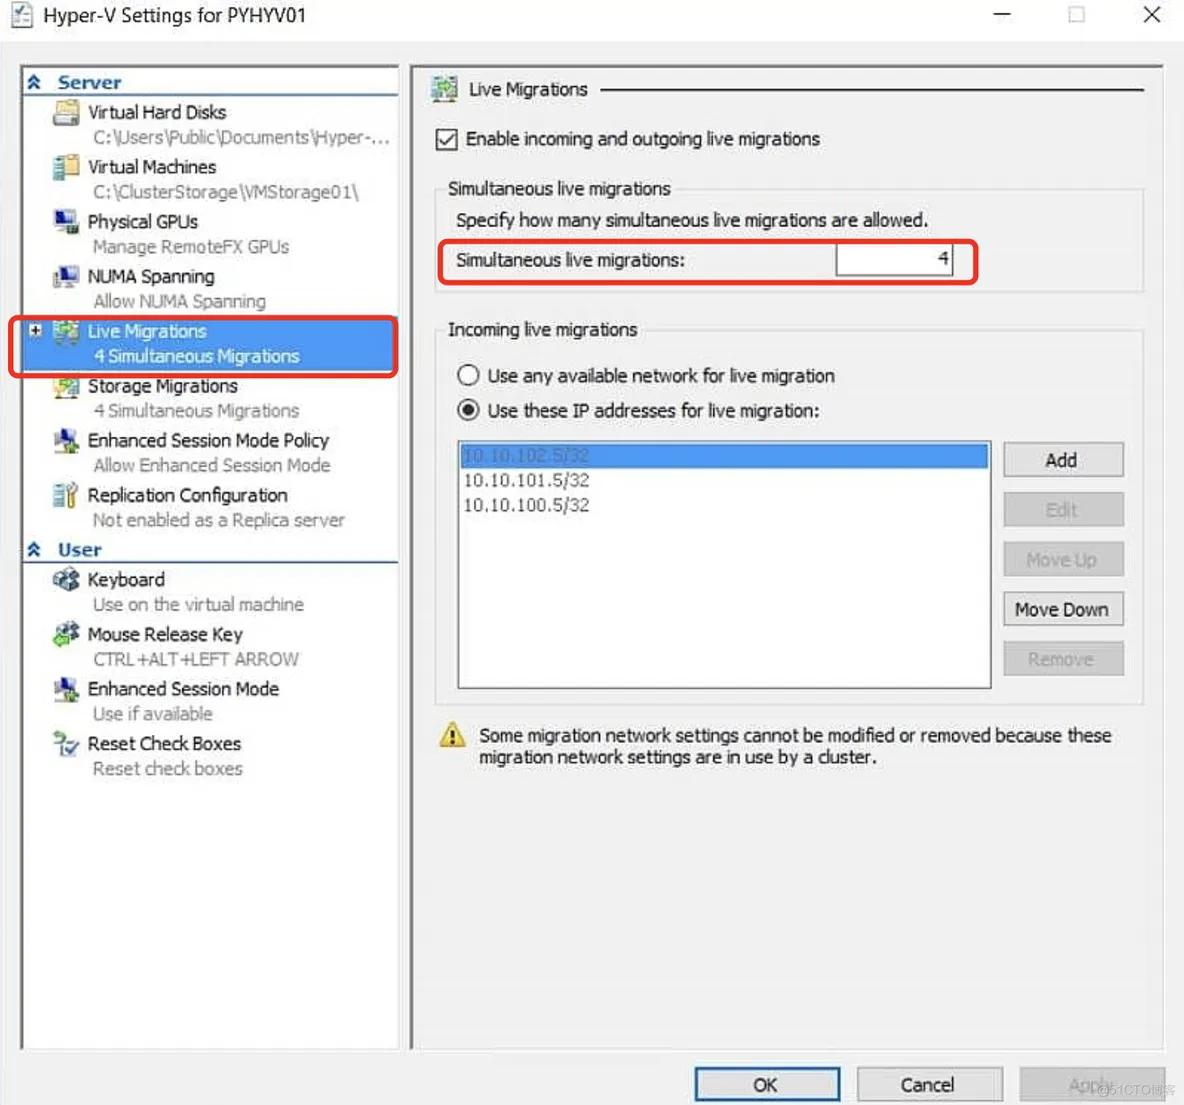
you can switch back to the defaults:
Set-VMHost -ComputerName hyperv01, hyperv02 -MaximumVirtualMachineMigrations 2 -MaximumStorageMigrations 2 -VirtualMachineMigrationPerformanceOption Compression
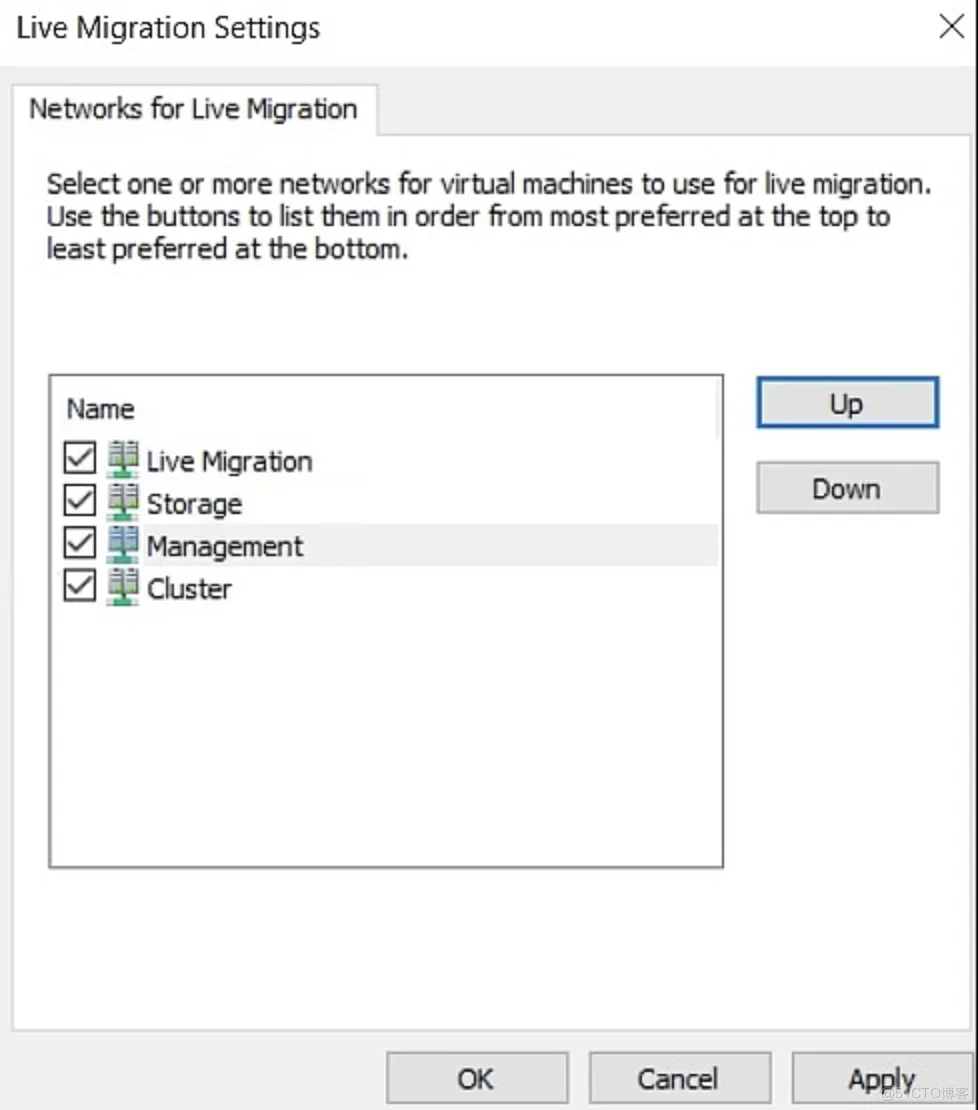
specifying a lower priority (the default is greater than 5.000) to our live migration network:
Set-VMMigrationNework 192.168.10.* -Priority 4.000
(Get-ClusterNetwork -Name "Live-Migration").Role = 1
live migrate VM to other Host:
Move-VM "centos" hyperv02
If you want to live migrate all virtual machines from one host to another:
Suspend-ClusterNode -Name hyperv01 -Target hyperv02 -Drain
VM start ordering
新建Cluster组:
New-ClusterGroupSet -Name DCServers
New-ClusterGroupSet -Name SQLServers
New-ClusterGroupSet -Name VMMServers
configure the groups to be ready when the group has reached an online state(这意味着依赖组中的VM将在依赖组联机之前启动)
Set-ClusterGroupSet -Name DCServers -StartupSetting Online
Set-ClusterGroupSet -Name SQLServers -StartupSetting Online
Set-ClusterGroupSet -Name VMMServers -StartupSetting Online
建立依赖关系:create the dependencies between SQLServers and VMMServers, then between SQLServers and DCServers:
Add-ClusterGroupSetDependency -Name SQLServers - ProviderSet DCServers
Add-ClusterGroupSetDependency -Name VMMServers - ProviderSet SQLServers
Finally, add the related VMs to the groups:
Add-ClusterGroupToSet -Name VMDC01 -Group DCServers
Add-ClusterGroupToSet -Name VMSQL01 -Group SQLServers
Add-ClusterGroupToSet -Name VMSQL02 -Group SQLServers
Add-ClusterGroupToSet -Name VMVMM01 -Group VMMServers
Add-ClusterGroupToSet -Name VMVMM02 -Group VMMServers
Node fairness
Node fairness is an enhancement of the Failover Clustering feature in Windows Server,It enables balancing virtual machines across the cluster node. It is enabled by default. If you manage your cluster from System Center Virtual Machine Manager, this feature is disabled for the benefit of dynamic optimization:
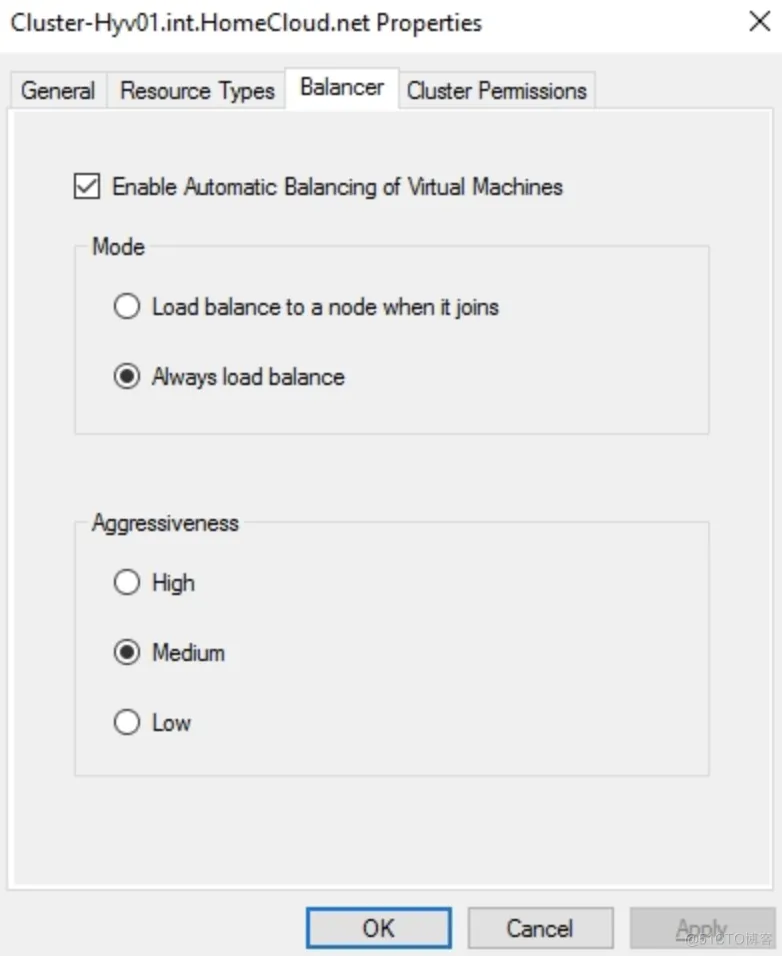
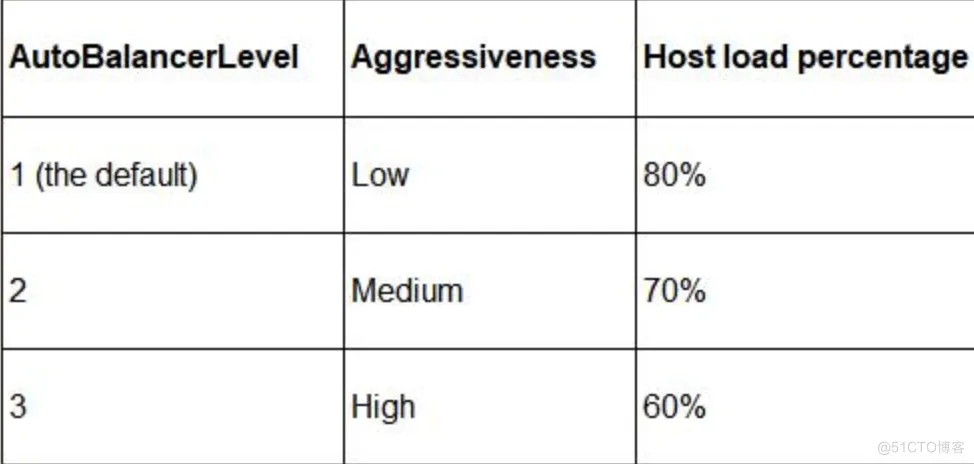
For aggressiveness, you can refer to the following table:
For the automatic balancer behavior, you can refer to these values:
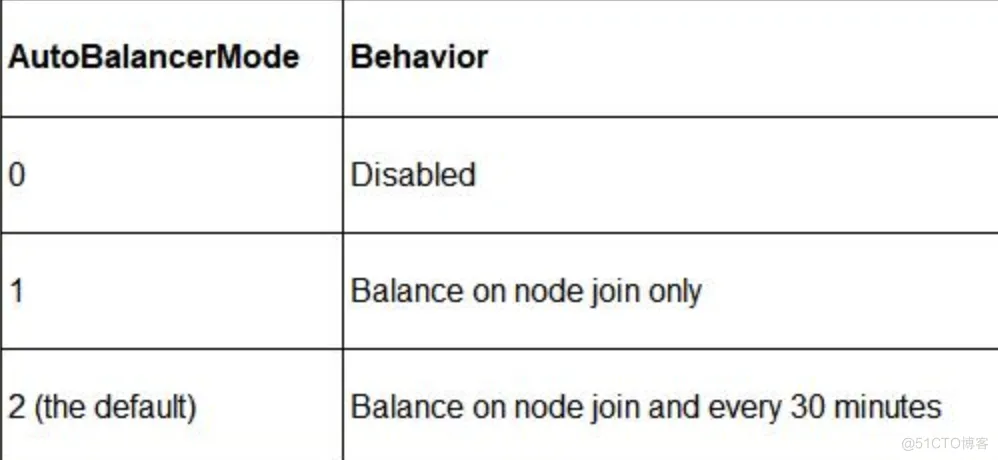
You Can change the default value of these settings,
(Get-Cluster).AutoBalancerLevel = 3
(Get-Cluster).AutoBalancerMode = 1
create a new anti-affinity rule:
These VMs won't be placed on the same host if possible.
(Get-ClusterGroup ERP-VM1).AntiAffinityClassNames = "GuestClusterERP1"
(Get-ClusterGroup ERP-VM2).AntiAffinityClassNames = "GuestClusterERP1"
Check your current anti-affinity rules affecting a virtual machine:
Get-ClusterGroup VM1 | fl anti*
Hyper-V Replica
Hyper-V Replia is the ability to replicate a virtual machine in near real time to another Hyper-V host.
You cannot replicate between hosts that are members of the same cluster because the replica virtual machine is an exact copy of the original, and you cannot have duplicates within the cluster.
Hyper-V Replica is not a backup solution; it is a disaster recovery plan solution.
1.准备第一个Host:
Set-VMReplicationServer -AllowedAuthenticationType kerberos -ReplicationEnabled 1
若要启用多台host:
Set-VMReplicationServer -AllowedAuthenticationType kerberos -ReplicationEnabled 1 -ComputerName "Hyperv01", "Hyperv02" -DefaultStorageLocation "C:\ClusterStorage\Volume1\Hyper-V Replica"
Hyper-V Replica默认使用的认证方式是Kerberos,如果是不同的AD或跨WAN之间启用Replica,则认证方式要改为基于证书方式加密传输数据:
Set-VMReplicationServer -ReplicationEnabled 1 -AllowedAuthenticationType Certificate -CertificateAuthenticationPort 8000 -CertificateThumbprint "0442C676C8726ADDD1CE029AFC20EB158490AFC8"
如果在一个故障转移群集中使用Replica,则需配置一台为Replica代理角色:
Add-ClusterServerRole -Name Replica-Broker -StaticAddress 192.168.1.5
Add-ClusterResource -Name "Virtual Machine Replication Broker" -Type "Virtual Machine Replication Broker" -Group Replica-Broker
Add-ClusterResourceDependency "Virtual Machine Replication Broker" Replica-Broker
Start-ClusterGroup Replica-Broker
$ BrokerName = “Replica-Broker”
Add- ClusterServerRole -Name $BrokerName
Add- ClusterResource -Name “Virtual Machine Replication Broker” -Type "Virtual Machine Replication Broker" -Group $BrokerName
Add- ClusterResourceDependency “Virtual Machine Replication Broker” $BrokerName
Start- ClusterGroup $BrokerName
在同一个Cluster中可以通过组策略GPO运行如下命令实现一次性设置为kerberos或基于证书的认证方式配置防火墙规则:
get-clusternode | ForEach-Object {Invoke-command -computername $_.name - scriptblock {Enable-Netfirewallrule -displayname "Hyper-V Replica HTTP Listener (TCP-In)"}}
基于证书的防火墙规则:
get-clusternode | ForEach-Object {Invoke-command -computername $_.name - scriptblock {Enable-Netfirewallrule -displayname "Hyper-V Replica HTTPS Listener (TCP-In)"}}
By default, Hyper-V Replica allows incoming replications from all servers.It's a best practice to filter this to only the corresponding replication hosts.
Set-VMReplicationServer -AllowedAuthenticationType kerberos -ReplicationEnabled 1 -ComputerName "Hyperv01", "Hyperv02" -DefaultStorageLocation "C:\ClusterStorage\Volume1\Hyper-V Replica" -ReplicationAllowedFromAnyServer 0
New-VMReplicationAuthorizationEntry -AllowedPrimaryServer Hyperv01.artingykx.com -ReplicaStorageLocation C:\ClusterStorage\Volume1\ -TrustGroup EYGroup01 -ComputerName Hyperv02.artingykx.com
TrustGroup is a logical group. Add all corresponding replication hosts and brokers to the same security tag.
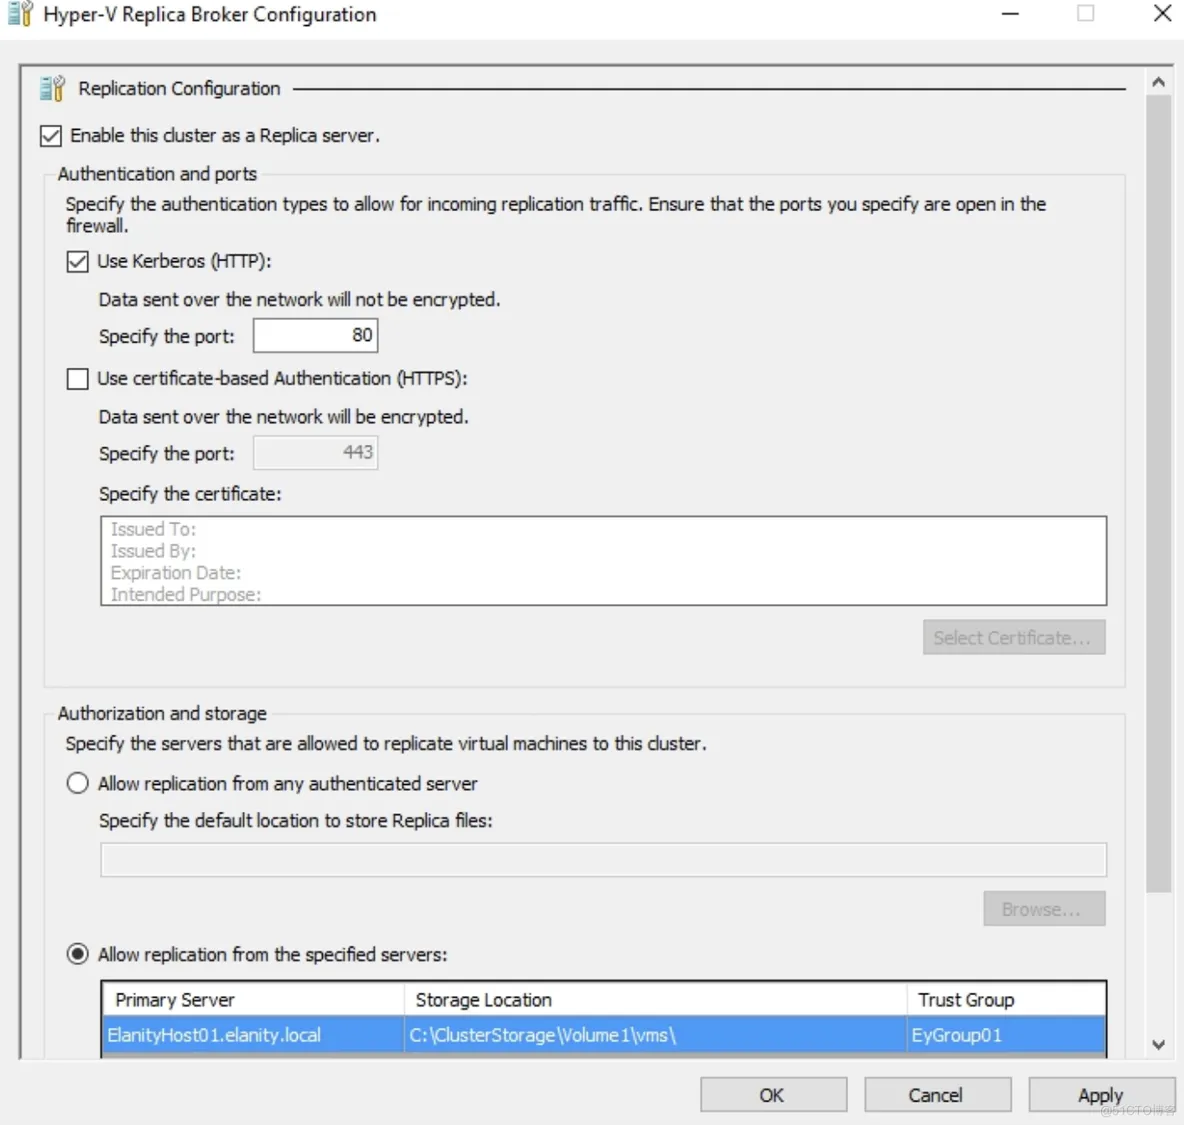
Activate VM replication
Set-VMReplication -VMName VM01 -ReplicaServerName hyperv02.artingykx.com -ReplicaServerPort 80
Start the initial replication
Start-VMInitialReplication -VMName VM01
启用压缩:
Start-VMInitialReplication -VMName VM01 -CompressionEnabled 1
还可以指定复制频率和保留版本数及快照频次:
Set-VMReplication -VMName VM01 -ReplicaServerName hyperv02.artingykx.com -ReplicaServerPort 80 -RecoveryHistory 24 -ReplicationFrequencySec 30 -VSSSnapshotFrequencyHour 4
可以指定开始时间:
Start-VMInitialReplication -VMName VM01 -CompressionEnabled 1 -InitialReplicationStartTime 8/1/2023 7:00 AM
To automate the whole process, use the following script to configure Hyper-V Replica between two hosts:
$HVSource = "hyperv01"
$HVReplica = "hyperv02"
$Port = 80
$HVdisabld = get-vm -ComputerName $HVSource | where {$_.replicationstate -eq 'disabled' }
foreach ($VM in $HVdisabld) {
enable-VMReplication $VM $Replica $Port $Auth
Set-VMReplication -VMName $VM.name -ReplicaServerName $HVReplica -ReplicaServerPort $Port -AuthenticationType kerberos -CompressionEnabled $true -RecoveryHistory 0 -computername $HVSource
Start-VMInitialReplication $VM.name -ComputerName $HVSource}
Monitoring Hyper-V Replica:
Measure-VMReplication | format-list *
To test whether your replica is or not working:
Stop-VM -VMName VM1 -ComputerName hyperv01
Start-VMFailover -VMName VM01 -ComputerName hyperv01 -Prepare
Start-VMFailover -VMName VM01 -ComputerName hyperv02 -as Test
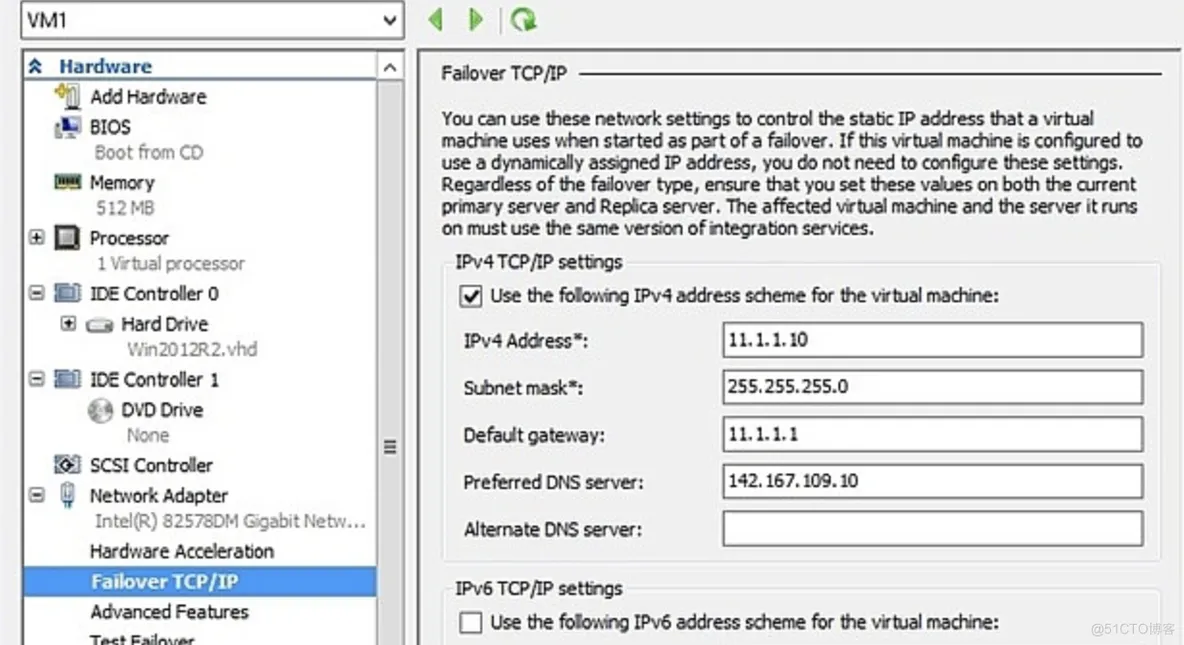
Configuration of the replicated virtual machines due to other subnets:
Set-VMNetworkAdapterFailoverConfiguration VM01 -IPv4Address 192.168.1.1 -IPv4SubnetMask 255.255.255.0 -IPv4DefaultGateway 192.168.1.254
To change the vSwitch of the VM for a test failover:
Set-VMNetworkAdapter VM01 -TestReplicaSwitchName 'vSwitchTest01'
Chapter 4. Storage Best Practices
Scale-Out File Servers (SOFS)扩展文件服务器.
Logical Unit Numbers (LUNs)逻辑单元数.
just a bunch of disks(JBODs) 磁盘塔,简单磁盘捆绑.
Resilient File System (ReFS)弹性文件系统.
Offloaded Data Transfer (ODX)
Remote Direct Access Memory (RDMA)
DataCenter Bridging (DCB)
Priority Flow Control (PFC)
RDMA over Converged Ethernet (RoCE)
internet Wide Area RDMA (iWARP)
Host Bus Adapter (HBA)
Storage Spaces Direct(S2D)
Storage Spaces is able to provide more than a million IOPS over 10 Gbe-NICs,Storage Spaces offer Active/Active Cluster configurations leveraging the performance of all storage cluster nodes with the additional benefit of transparent failover.
The iSCSI target:
Add-WindowsFeature -Name FS-iSCSITarget-Server,iSCSITarget-VSS-VDS
Create a new LUN:
New-IscsiVirtualDisk -Path d:\VHD\LUN1.vhdx -Size 60GB
Create a new iSCSI target:
New-IscsiServerTarget -TargetName Target1 -InitiatorId IPAddress:192.168.66.240,IPAddress:192.168.66.241
Assign the iSCSI LUN to its target:
Add-IscsiVirtualDiskTargetMapping -TargetName target1 Path d:\VHD\LUN1.vhdx - Lun 10
Connect to your iSCSI target through the iSCSI initiator on your Hyper-V hosts:
Connect-IscsiTarget -NodeAddress <targetIQN>
Chapter 5. Network Best Practices
External vSwitch
New-VMSwitch -Name external -NetAdapterName "Local Area Connection 2"
Internal vSwitch
New-VMSwitch -Name internal -SwitchType internal -Notes 'Internal VMs only'
Private vSwitch:allows for communication between Hyper-V virtual machines on the same host.
New-VMSwitch -Name private -SwitchType Private
To add a single VLAN to our vNIC external:
Set-VMNetworkAdapterVlan -VMName VM01 -VMNetworkAdapterName "External" -Access -VlanId 10
It is also possible to add VLAN ranges to a vNIC via trunking:
Set-VMNetworkAdapterVlan -VMName VM01 -Trunk -AllowedVlanIdList 1-100 -NativeVlanId 10
Set-VMNetworkAdapter -VMName VM1 -MinimumBandwidth 1000000
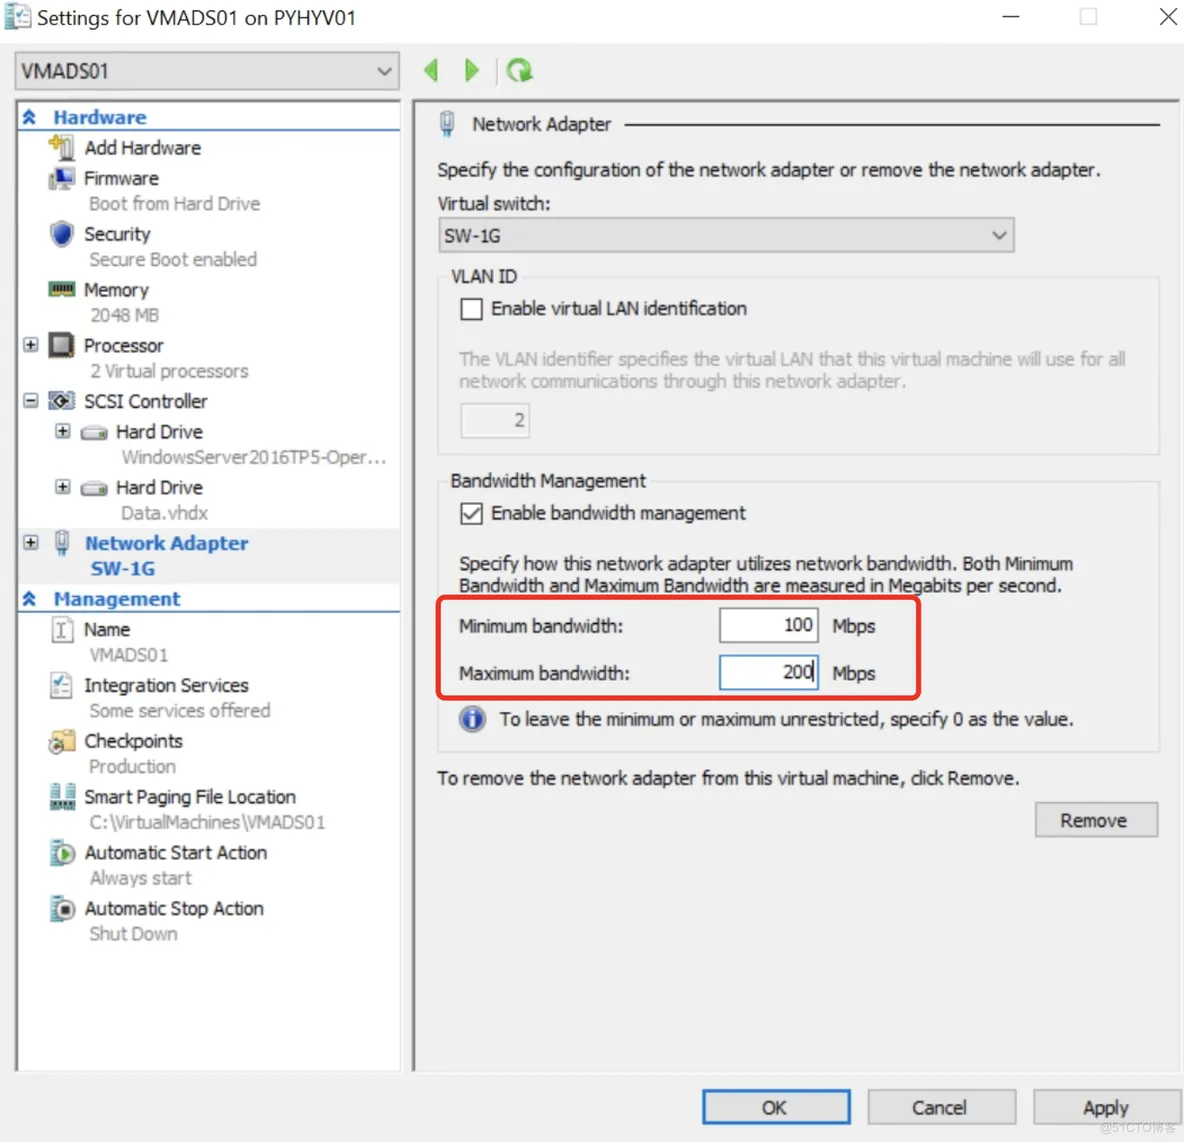
New-VMSwitch -Name external -NetAdapterName "Local Area Connection 2" -DefaultFlowMinimumBandwidthWeight
Load Balancing and Failover (LBFO)
Switch Embedded Teaming (SET)
you can only deploy SET in physical nodes with the Hyper-V role installed.In a single SET, you can add a maximum of 8 physical network adapters.
Datacenter bridging (DCB)
Remote Direct Memory Access (RDMA)
Virtual Machine Queues (VMQ)
Virtual Receive-side Scaling (vRSS)
Single root I/O virtualization (SR-IOV)
create a SET:
New-VMSwitch -Name SwitchSET -NetAdapterName "NIC 1","NIC 2" -EnableEmbeddedTeaming $true -ManagementOS $True
add physical NICs to the SET:
Set-VMSwitchTeam -Name SwitchSET -NetAdapterName "NIC 1","NIC 3"
If earlier NIC 2was in the SwitchSET SET, the preceding cmdlet removes it from the SET.
Converged networking:
Add-VMNetworkAdapter -ManagementOS -Name "Management" -SwitchName "External" MinimumBandwidthWeight 10
Add-VMNetworkAdapter -ManagementOS -Name "Live Migration" -SwitchName "External" MinimumBandwidthWeight 25
Add-VMNetworkAdapter -ManagementOS -Name "VMs" -SwitchName "External" MinimumBandwidthWeight 50
Add-VMNetworkAdapter -ManagementOS -Name "Cluster" -SwitchName "External" MinimumBandwidthWeight 15
Storage network:
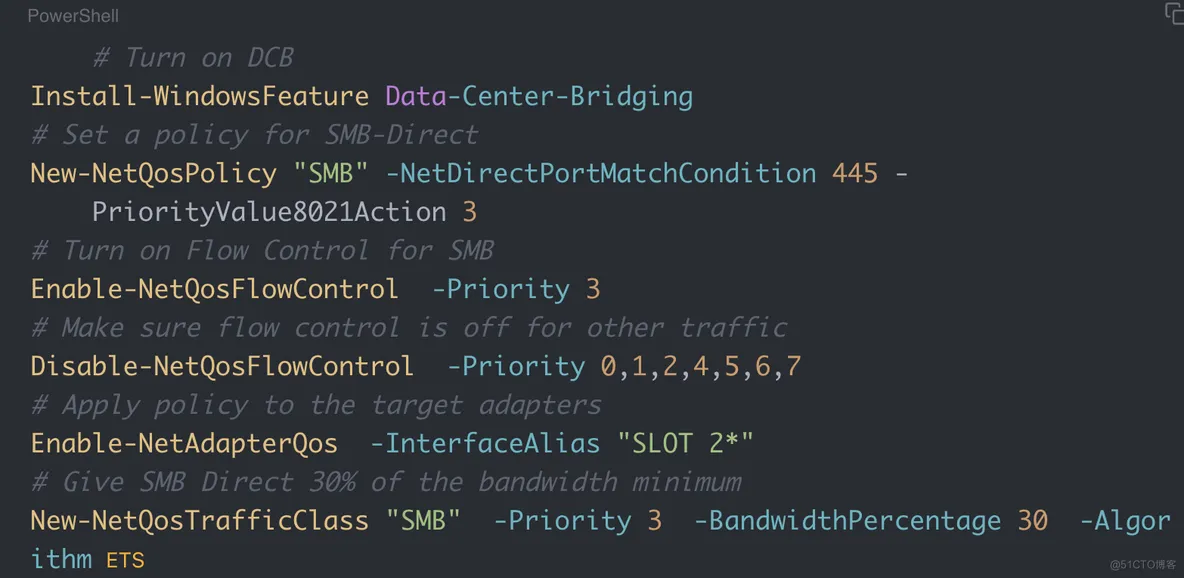
To install and configure DCB for SMB3:
# Turn on DCB
Install-WindowsFeature Data-Center-Bridging
# Set a policy for SMB-Direct
New-NetQosPolicy "SMB" -NetDirectPortMatchCondition 445 - PriorityValue8021Action 3
# Turn on Flow Control for SMB
Enable-NetQosFlowControl -Priority 3
# Make sure flow control is off for other traffic
Disable-NetQosFlowControl -Priority 0,1,2,4,5,6,7
# Apply policy to the target adapters
Enable-NetAdapterQos -InterfaceAlias "SLOT 2*"
# Give SMB Direct 30% of the bandwidth minimum
New-NetQosTrafficClass "SMB" -Priority 3 -BandwidthPercentage 30 -Algorithm ETS
To create a vNIC on a SET with RDMA capability:
Add-VMNetworkAdapter -SwitchName SETswitch -Name SMB_1 -managementOS
Add-VMNetworkAdapter -SwitchName SETswitch -Name SMB_2 -managementOS
Enable-NetAdapterRDMA "vEthernet (SMB_1)","vEthernet (SMB_2)"

create an affinity between a vNIC and a physical network adapter:
Set-VMNetworkAdapterTeamMapping -VMNetworkAdapterName SMB_1 -ManagementOS -PhysicalNetAdapterName NIC 1
Set-VMNetworkAdapterTeamMapping -VMNetworkAdapterName SMB_2 -ManagementOS -PhysicalNetAdapterName NIC 2
SMB Direct:
Windows Server will also automatically spread the workload between the NICs using SMB multichannel. RDMA enables high-performance networking while using very little CPU load. SMB Direct will be automatically enabled when RDMA-capable NICs are detected on the host.

three types of RDMA-aware network architectures:
ROCE(RDMA over converged Ethernet)
iWARP
InfiniBand
enable DHCP Guard for all VMs:
Get-VM | Set-VMNetworkAdapter -DhcpGuard On
IP address management (IPAM) :
Chapter 6. Highly Effective Hyper-V Design
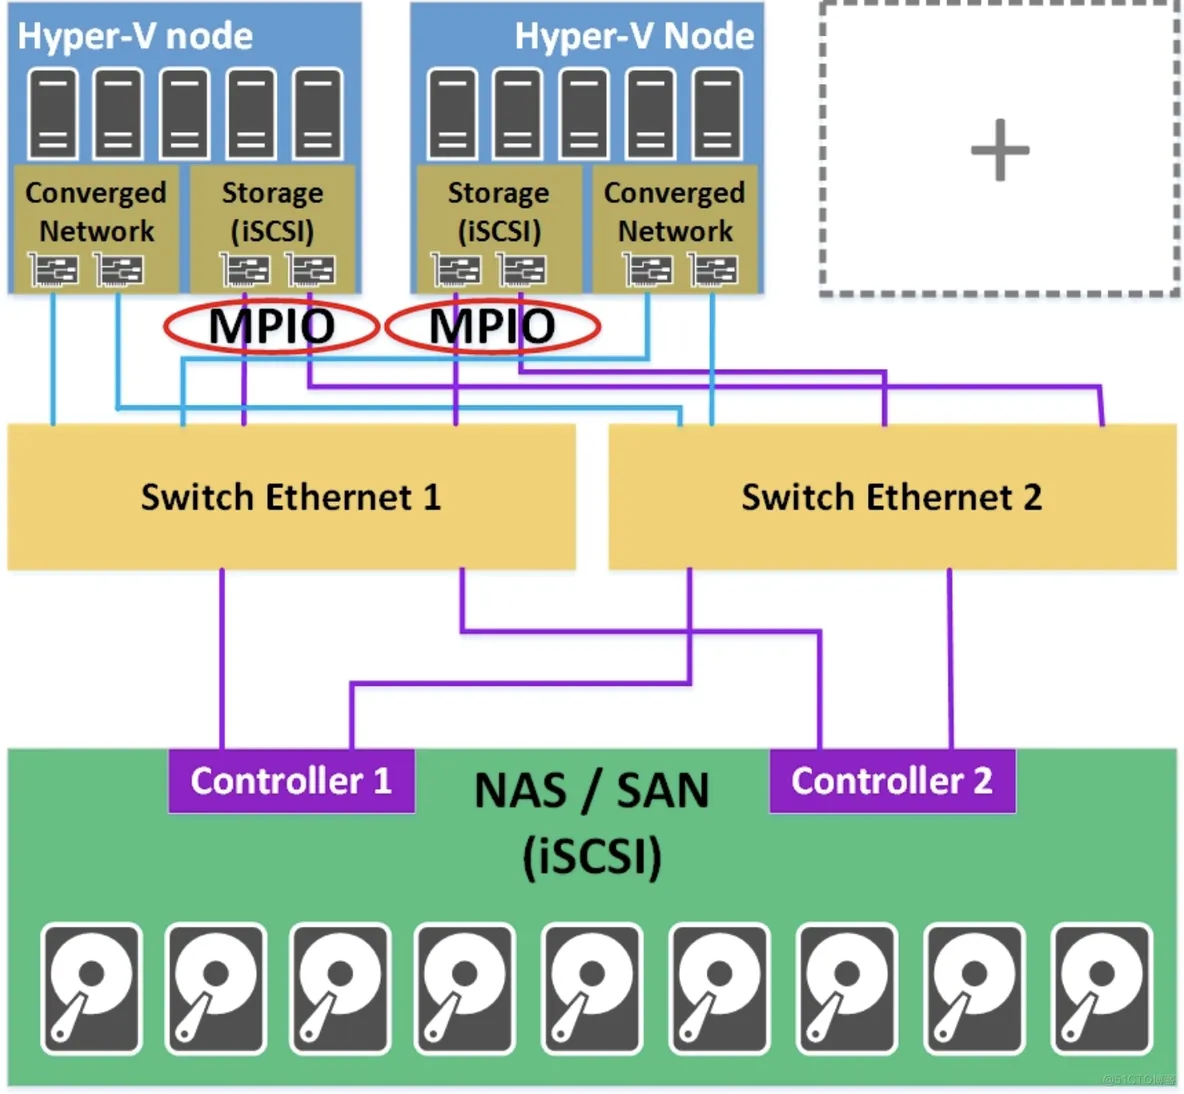
a solution based on iSCSI NAS should require at least two dedicated NICs for storage traffic. A hyperconverged solution requires RDMA ready NICs with 10 GB/s at least.
Hyper-V Cluster connected to a NAS or a SAN with iSCSI:
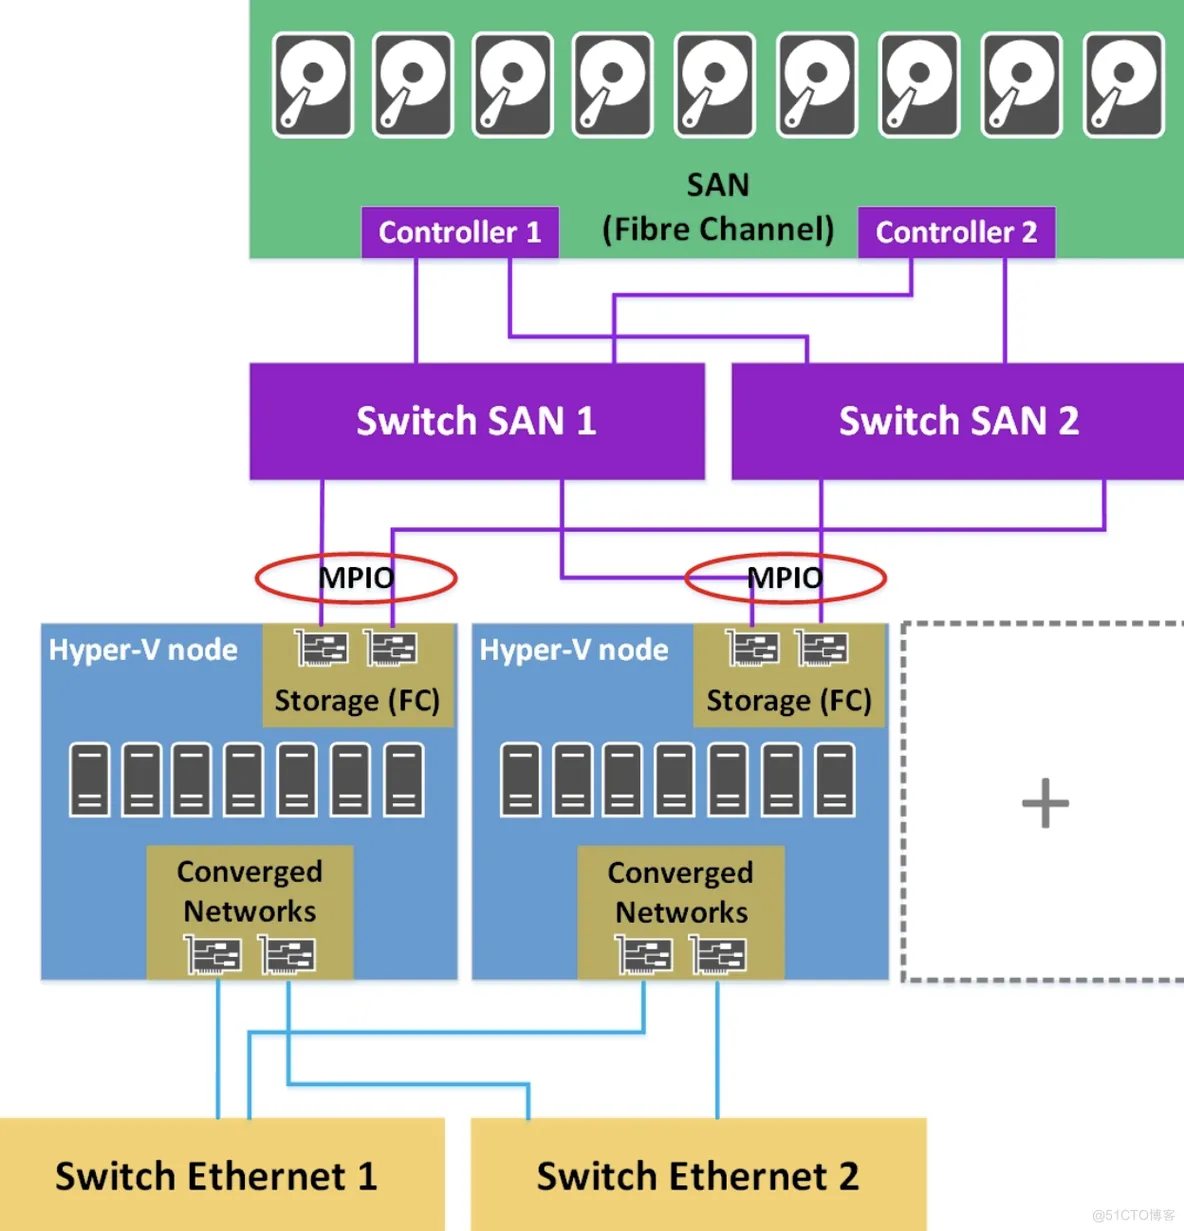
Hyper-V cluster connected to a SAN:
The following is an example of IP addressing plan and associated VLAN:

Storage configuration:
If your SAN/NAS supports Offloaded Data Transfer (ODX), I recommend that you enable this feature to increase storage performance.
Regarding storage configuration, you should configure it to have at least two levels of performance. For example, you can create a LUN hosted in a RAID 10 and another located in a RAID 5.

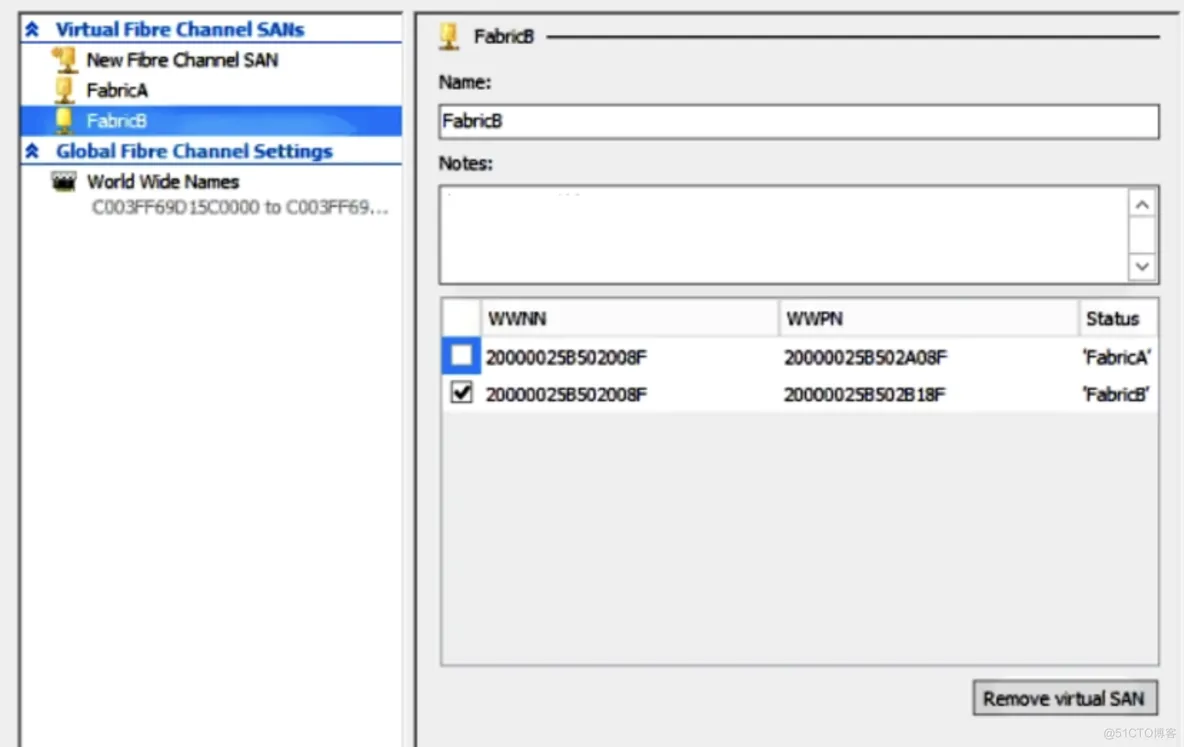
Hyper-V virtual SAN configuration:

Storage Spaces Direct design:
Network topology:
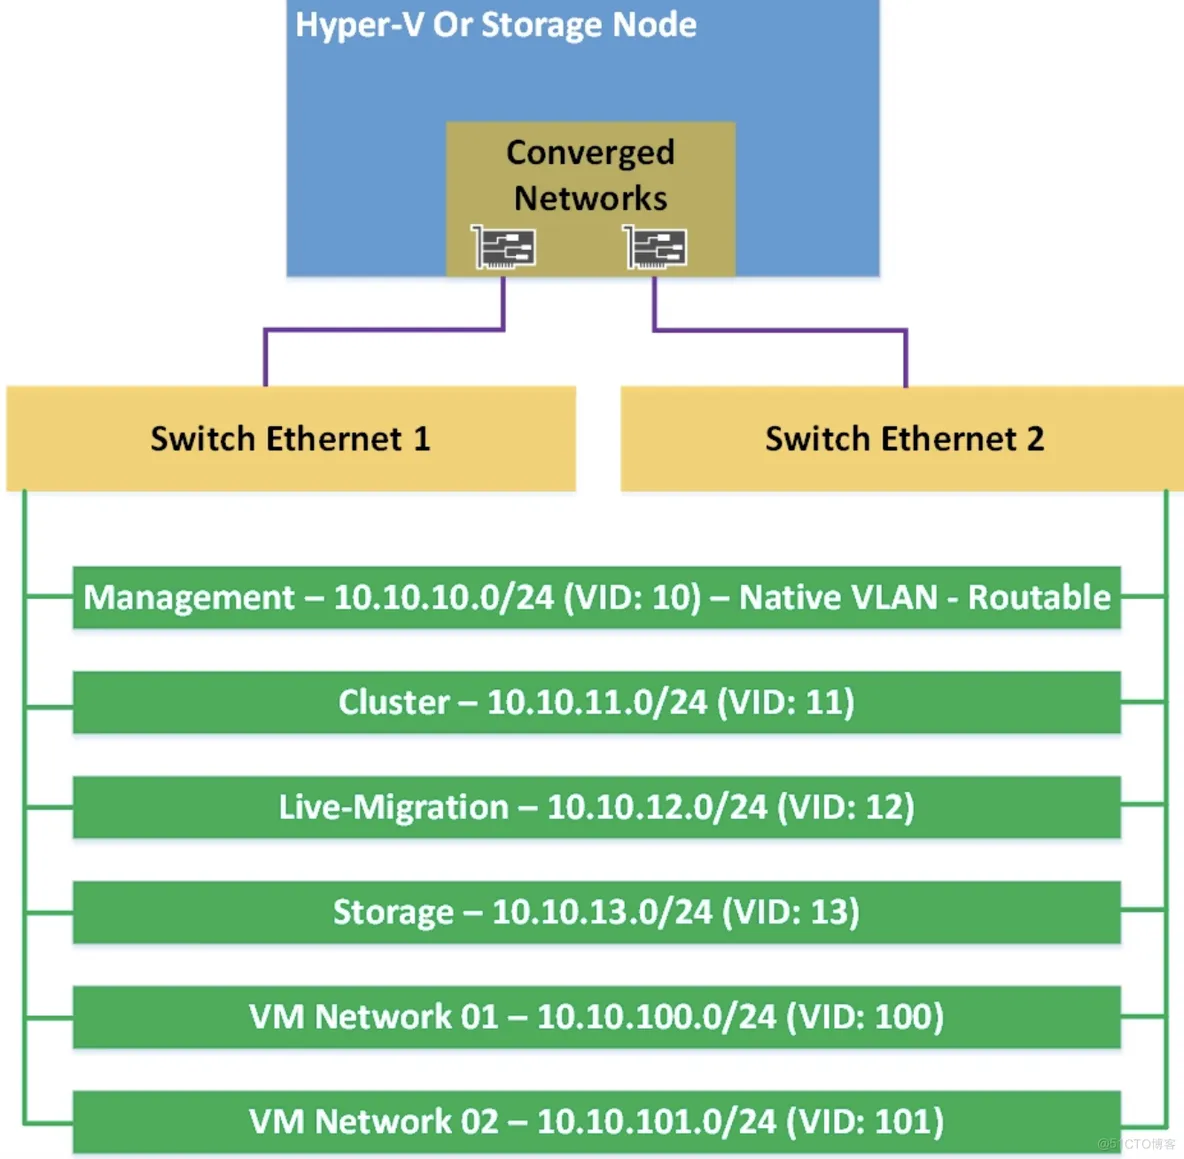
The management network should be the native VLAN to ease the deployment of Hyper-V across the network using.
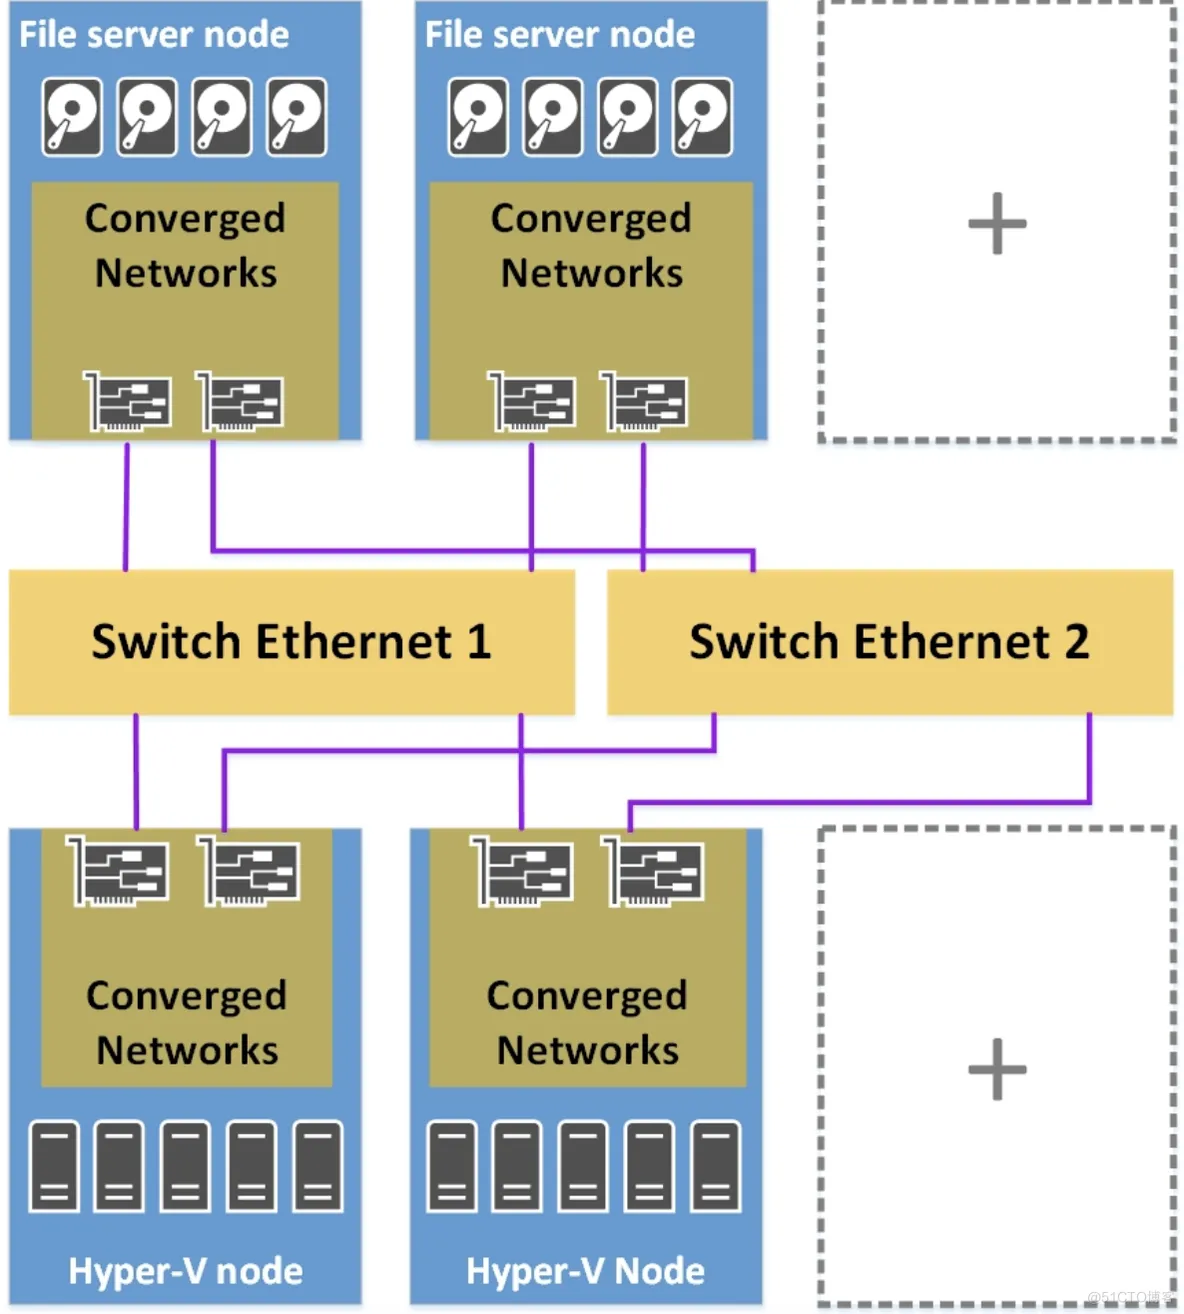
Disaggregated model
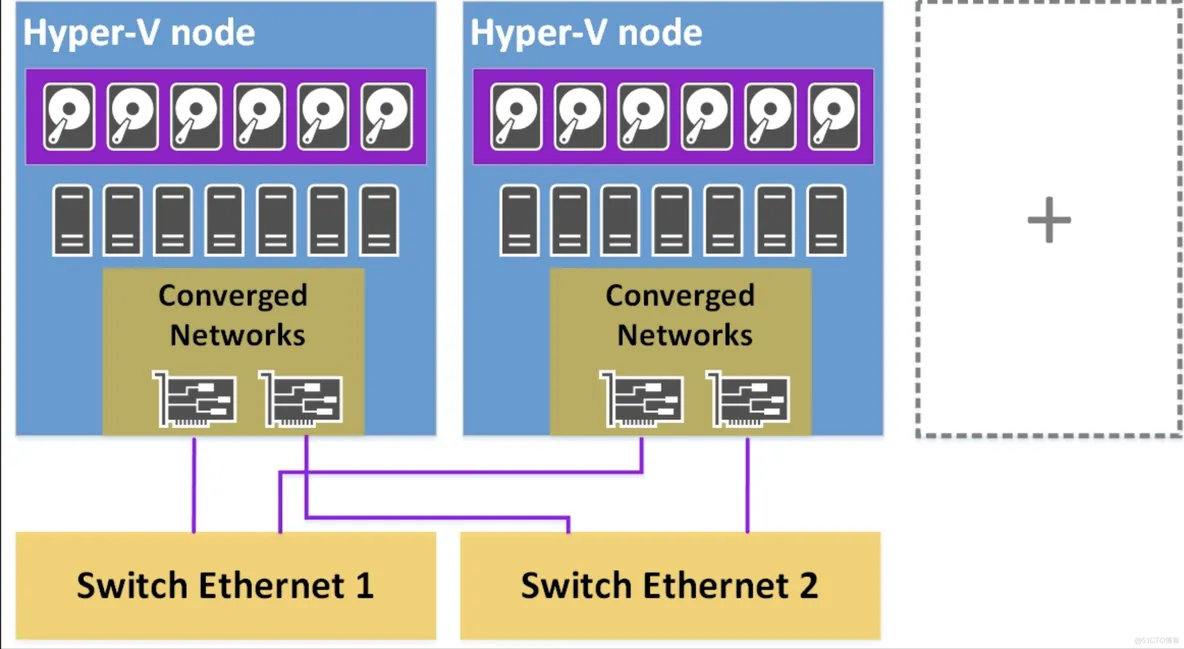
Hyperconverged model
Chapter 7. Hyper-V Performance Tuning
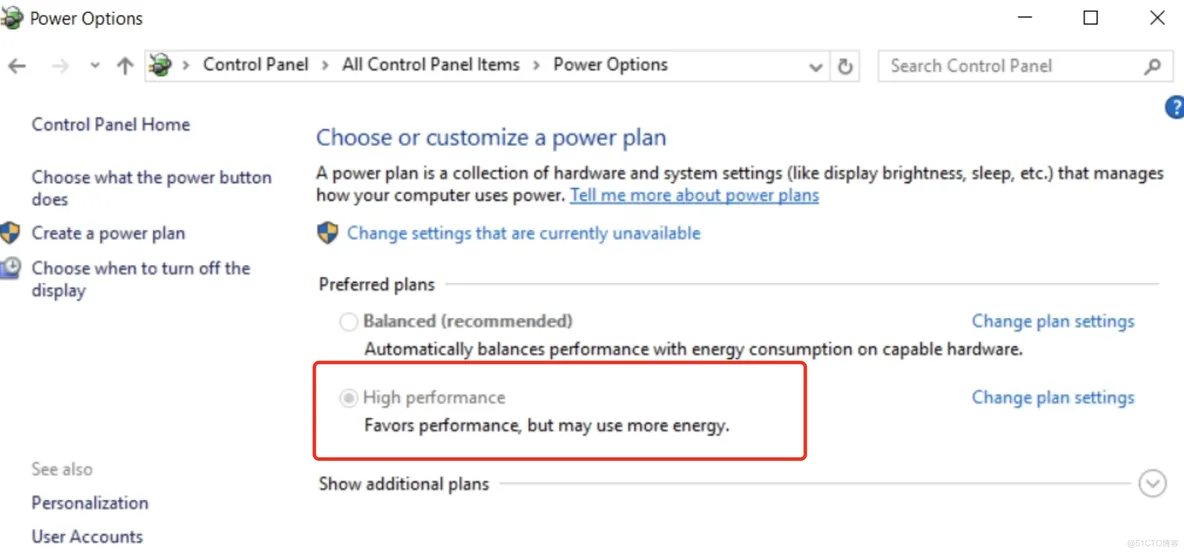
Change the power plan on the Hyper-V host to high performance:
POWERCFG.EXE /S SCHEME_MIN
To revert to the balanced power scheme:
POWERCFG.EXE /S SCHEME_BALANCED
Using CPUs with Second Level Address Translation (SLAT) is not required for server operating systems (for client operating systems, it is) but is highly recommended. SLAT is also required for VDI workloads. Adding SLAT options such as Extended Page Tables (EPT) or Nested Page Tables (NPT)increases the overall Hyper-V performance.
Network-hardware-tuning options:
Receive Side Scaling (RSS):an NIC-driver technology that enables the efficient distribution of a network that receives processing across multiple CPUs in multiprocessor systems. RSS is only available on the physical host, but not inside virtual machines.
Dynamic Virtual Machine Queue (D-VMQ):With D-VMQ enabled on our hosts, we can use RSS on our virtual machines.
Get-NetAdapterVmq -Name NICName
Enable-NetAdapterRSS -Name NICName
Single Root IO Virtualization(SR-IOV):
It allows for a PCIe device, such as an NIC, to be presented to multiple devices, such as virtual machines. Think of it as PCIe virtualization. This only works when it is supported at a physical level (network card),SR-IOV offers more performance than VMQ because it uses Direct memory access (DMA) for direct communication between the physical NIC and the virtual machine.
disable IPv6:
New-ItemProperty "HKLM:\SYSTEM\CurrentControlSet\Services\Tcpip6\Parameters" -Name "DisabledComponents" -Value 0xffffffff -PropertyType "DWord"
Hyper-V for virtual desktops:
New-RDVirtualDesktopDeployment -ConnectionBroker VDI01.int.homecloud.net -WebAccessServer VDI02.int.homecloud.net -VirtualizationHost VDI03.int.homecloud.net
Golden Image:
C:\Windows\System32\Sysprep\Sysprep.exe /OOBe /Generalize /Shutdown /Mode:VM
Using the new /Mode:VM switch allows for a faster sysprep, as there is a lot less hardware recognizing for virtual machines necessary as long as you are using the same virtualization environment.
create a new virtual desktop collection:
New-RDVirtualDesktopCollection -CollectionName demoPool -PooledManaged -VirtualDesktopTemplateName WinGold.vhdx -VirtualDesktopTemplateHostServer VDI01 -VirtualDesktopAllocation @{$Servername = 1} -StorageType LocalStorage -ConnectionBroker VDI02 -VirtualDesktopNamePrefix msVDI

Using RemoteFX:


RemoteFX features can be configured via Group Policy as follows:
Open the Group Policy Management Editor and navigate to ComputerConfiguration | AdministrativeTemplates | WindowsComponents | Remote Desktop Services | Remote Desktop Session Host | Remote Session Environment:
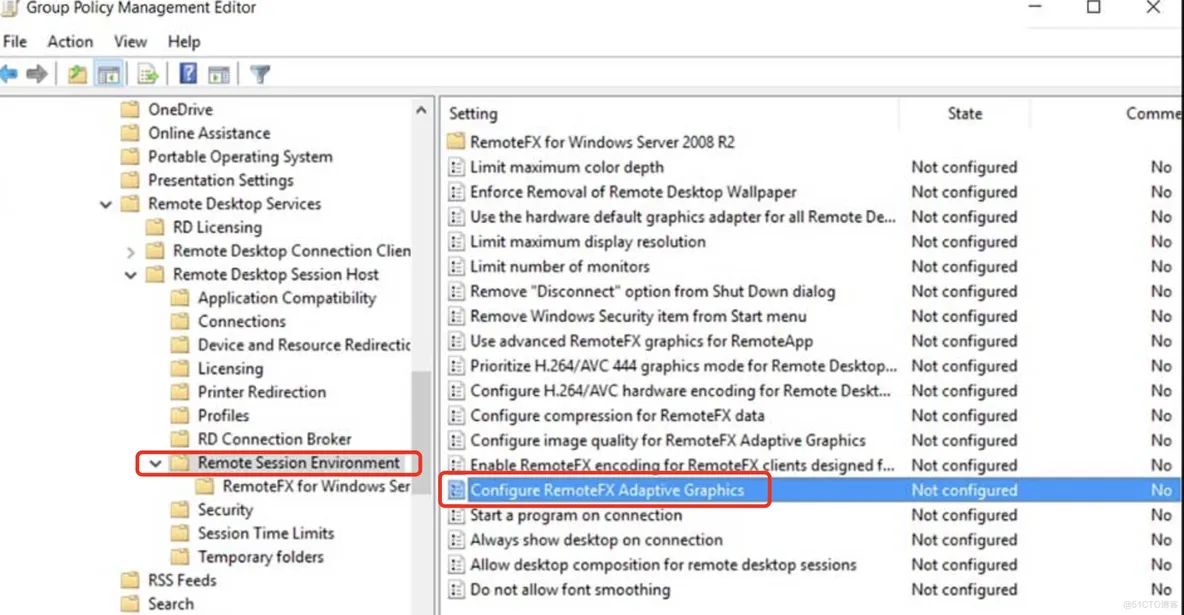
RemoteFX GPO rules:
These GPOs must be linked to the virtualization hosts, not the virtual desktops or RDSH-VMs that run on top of the virtualization hosts.
Edit the Configure image quality for RemoteFX Adaptive Graphics setting.Change it from Default Medium to High or Lossless if you want to use better graphics. This will consume more bandwidth.
Edit the Configure RemoteFX Adaptive Graphics setting in the same path.Choose RemoteFX to optimize between server scalability or bandwidth usage.
Edit the Configure compression for RemoteFX data setting in the same path.Choose one of Optimize to use less memory (which will require more network), Optimize to use less network bandwidth (which requires more memory), balances memory and network bandwidth, and does not use an RDP-compression algorithm. It's highly recommend to use the last option.
Edit the Limit maximum color depth setting.Select 32 bits per pixel. In my experience, this offers the best performance.
Now RemoteFX supports Gen 2 VM, 4K resolution, OpenGL and OpenCL API and Microsoft.You need to choose a GPO that supports DirectX 11.0 or higher and uses a WDDM 1.2 driver or higher.
To add a GPU to a virtual machine:
Add-VMRemoteFx3dVideoAdapter -VMName VM01
specify the resolution:
SET-VMRemoteFx3dVideoAdapter -VMName VM01 -MaximumResolution 1920x1200

 支付宝微信扫一扫,打赏作者吧~

