 ()
()

The Windows Firewall can be one of the biggest nightmares for system administrators to configure, with the addition of Group Policy precedence it just becomes a headache. Here we will take you from start to finish on how to easily configure the Windows Firewall via Group Policy and as a bonus show you how to fix one of the biggest gotchas.
Windows防火墙可能是系统管理员要配置的最大噩梦之一,加上组策略优先级,这实在令人头疼。 在这里,我们将带您从头到尾,了解如何通过组策略轻松配置Windows防火墙,并作为奖励向您展示如何修复最大的陷阱之一。
我们的任务 (Our Mission)
It has come to our attention that a lot of users have Skype installed on their machines and it is making them less productive. We have been given the task of making sure that users cant use Skype at work, however they are welcome to keep it installed on their laptops and use it at home or during lunch breaks on a 3G/4G connection. Given this information we decide to make use of the Windows Firewall and Group Policy.
引起我们注意的是,许多用户在其计算机上安装了Skype,这使他们的生产力下降。 我们的任务是确保用户不能在工作中使用Skype,但是欢迎他们将其安装在笔记本电脑上,并在家中或在3G / 4G连接上的午餐时间使用。 有了这些信息,我们决定使用Windows防火墙和组策略。
方法 (The Method)
The easiest way to start controlling the Windows Firewall through Group Policy is to set up a reference PC and create the rules using Windows 7, we can then export that policy and import it into Group Policy. By doing this, we have the extra advantage of being able to see if all the rules are set up and working as we want them to be, before deploying them to all the client machines.
通过组策略开始控制Windows防火墙的最简单方法是设置参考PC并使用Windows 7创建规则,然后我们可以导出该策略并将其导入组策略。 这样,我们的额外优势在于,在将规则部署到所有客户端计算机之前,可以查看所有规则是否都已设置并按期望工作。
创建防火墙模板 (Creating a Firewall Template)
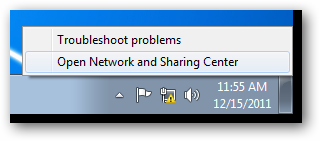
In order to create a template for the Windows Firewall we need to launch the Network and Sharing Center, the easiest way to do this is to right-click on the network icon and select Open Network and Sharing Center from the context menu.
为了为Windows防火墙创建模板,我们需要启动网络和共享中心,最简单的方法是右键单击网络图标,然后从上下文菜单中选择“打开网络和共享中心”。
When the Network and Sharing Center opens, click on the Windows Firewall link in the lower left hand corner.
当网络和共享中心打开时,单击左下角的Windows防火墙链接。

When creating a template for Windows Firewall it is best done through the Windows Firewall with Advanced Security console, to launch this click on Advanced Settings on the left hand side.
在为Windows防火墙创建模板时,最好通过具有高级安全性的Windows防火墙控制台来完成此操作,然后单击左侧的“高级设置”以启动此操作。
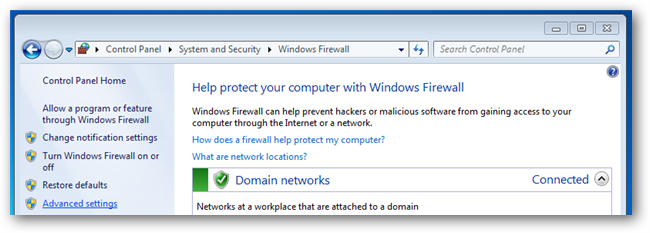
Note: At this point I am going to edit the Skype specific rules, however you can add your own rules for ports or even applications. Whatever modifications you need to make to the firewall should be done now.
注意:现在,我将编辑Skype特定的规则,但是您可以为端口甚至应用程序添加自己的规则。 现在,您需要对防火墙进行任何修改。
From here we can start editing our firewall rules, in our case when the Skype application is installed it creates its own Firewall exceptions that allow skype.exe to communicate on the Domain, Private and Public network profiles.
从这里我们可以开始编辑防火墙规则,在我们安装Skype应用程序的情况下,它会创建自己的防火墙例外,该例外允许skype.exe在域,专用和公用网络配置文件上进行通信。
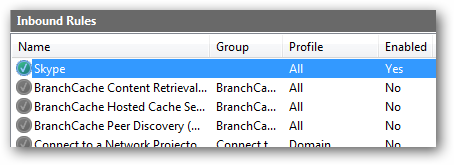
Now we need to edit our Firewall rule, to edit it double click on the rule. This will bring up the properties of the Skype rule.
现在,我们需要编辑防火墙规则,要对其进行编辑,请双击该规则。 这将调出Skype规则的属性。
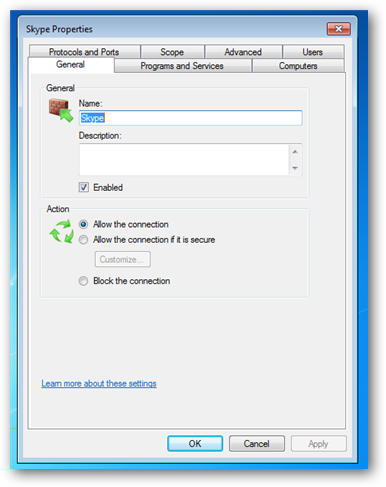
Switch over to the Advanced tab and uncheck the Domain check box.
切换到“高级”选项卡,然后取消选中“域”复选框。
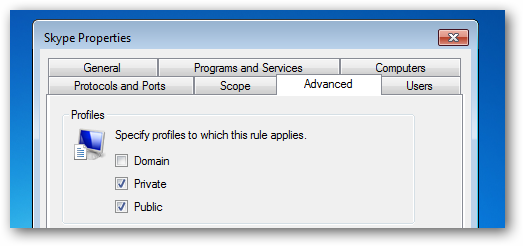
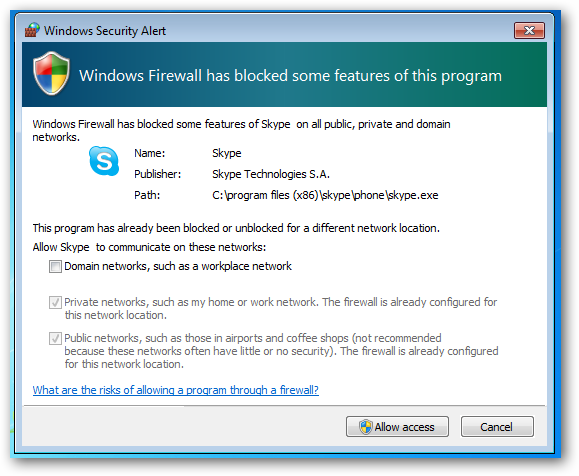
When you try launch Skype now, you will be prompted to ask if it can communicate on the Domain Network Profile, uncheck the box and click allow access.
当您尝试立即启动Skype时,系统将提示您询问它是否可以在域网络配置文件上进行通信,请取消选中该复选框,然后单击允许访问。
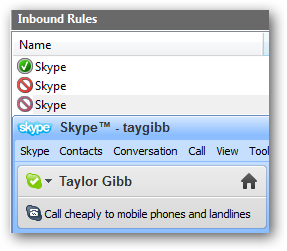
If you now go back to your Inbound Firewall Rules you will see that there are two new rules, this is because when you were prompted you chose not to allow Inbound Skype traffic. If you look over to the profile column you will see that they are both for the Domain network profile.
如果现在返回到“入站防火墙规则”,则会看到有两个新规则,这是因为当系统提示您时,您选择了不允许入站Skype通信。 如果查看配置文件列,您将看到它们都适用于域网络配置文件。
Note: The reason there is two rules is because there is separate rules for TCP and UDP
注意:之所以有两个规则,是因为TCP和UDP有单独的规则

Everything is good so far, however if you launch Skype you will still be able to log in.
到目前为止,一切都很好,但是,如果您启动Skype,您仍然可以登录。
Even if you change the rules to block inbound traffic for skype.exe and set it to block traffic using ANY protocol its is still able to somehow get back in. The fix is simple, stop it from being able to communicate in the first place. To do this switch to Outbound Rules and start creating a new rule.
即使您更改了规则以阻止skype.exe的入站流量,并将其设置为使用ANY协议阻止流量,它仍然可以以某种方式重新进入。修复很简单,请从一开始就阻止它进行通信。 为此,请切换到“出站规则”并开始创建新规则。
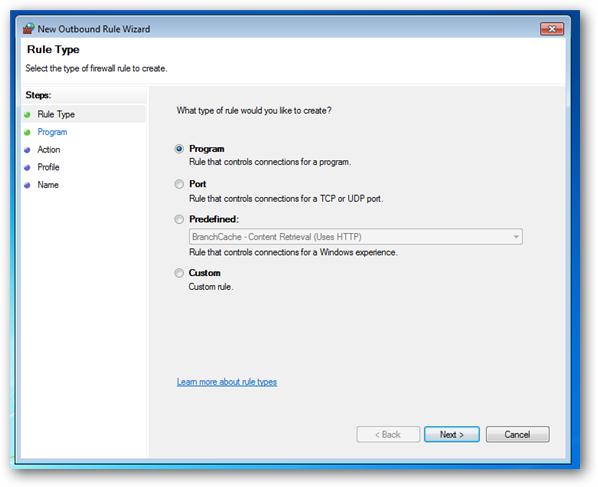
Since we want to create a rule for the Skype program just click next, then browse for the Skype executable file and click next.
由于我们要为Skype程序创建规则,因此只需单击下一步,然后浏览至Skype可执行文件并单击下一步。
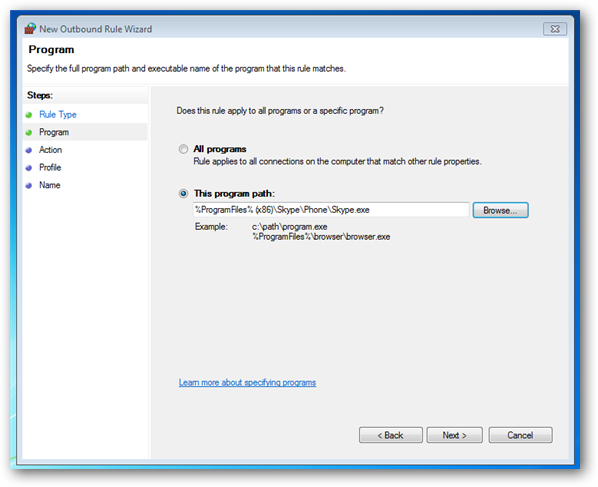
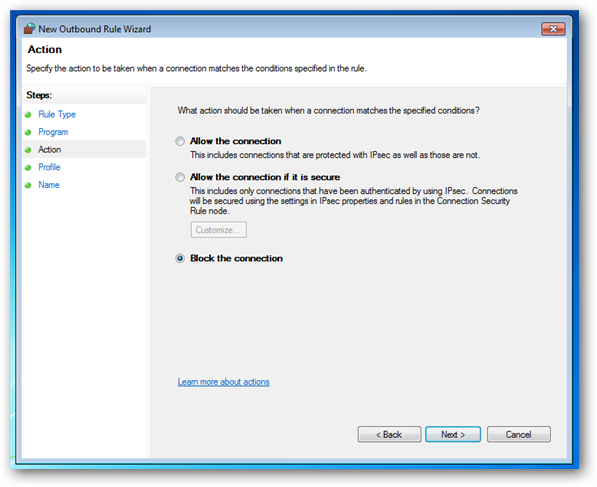
You can leave the action at the default which is to block the connection and click next.
您可以将操作保留为默认状态,即阻止连接,然后单击下一步。
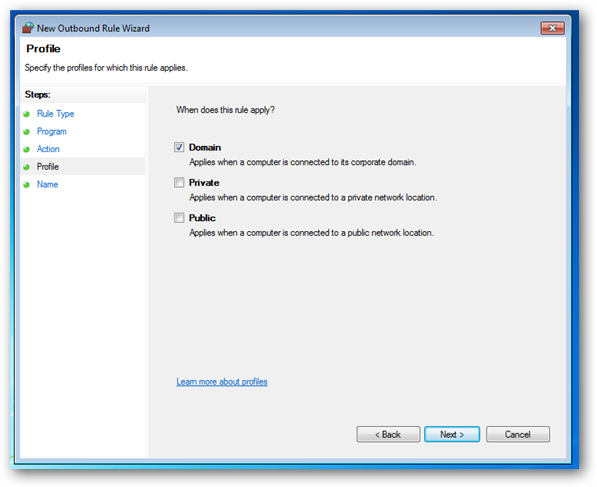
Deselect the Private and Public check boxes and click next to continue.
取消选中“私人”和“公共”复选框,然后单击“下一步”继续。
Now give your rule a name and click finish
现在给您的规则起一个名字,然后单击完成
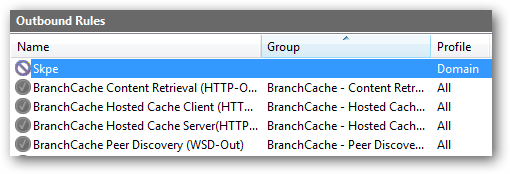
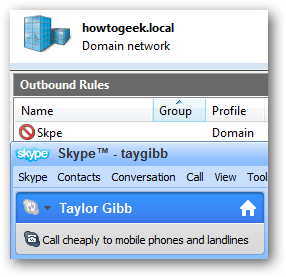
Now if you try and launch Skype while connected to a Domain network it will not work
现在,如果您尝试在连接到域网络时启动Skype,它将无法正常工作
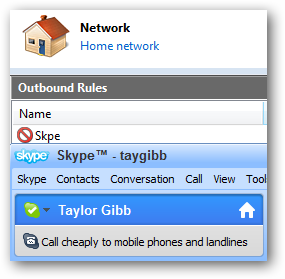
However if they try and connect when they get home it will allow them to connect fine
但是,如果他们在回家时尝试连接,则可以正常连接
That’s all the Firewall rules we are going to create for now, don’t forget to test out your rules just like we did for Skype.
这就是我们现在要创建的所有防火墙规则,不要忘记像对Skype一样测试您的规则。
导出政策 (Exporting the Policy)
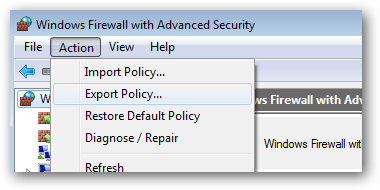
To export the policy, in the left hand pane click on the root of the tree which says Windows Firewall with Advanced Security. Then click on Action and select Export Policy from the Menu.
要导出策略,请在左侧窗格中单击树的根,该树的根目录为“具有高级安全性的Windows防火墙”。 然后单击“操作”,然后从菜单中选择“导出策略”。
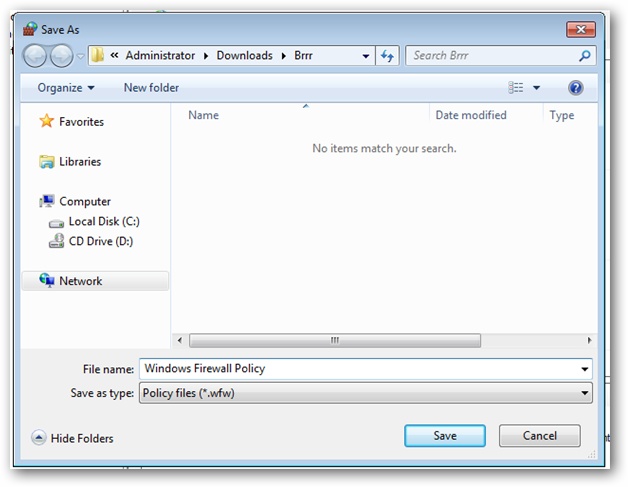
You should save this to either a network share, or even a USB if you have physical access to your server. We will go with a network share.
如果您可以物理访问服务器,则应将其保存到网络共享,甚至USB。 我们将分享网络。
Note: Be careful of viruses when using a USB, the last thing you want to do is infect a server with a virus
注意:使用USB时要小心病毒,最后要做的就是用病毒感染服务器
将策略导入组策略 (Importing the Policy Into Group Policy)
To import the firewall policy you need to open an existing GPO or create a new GPO and link it to an OU that contains computer accounts. We have an GPO called Firewall Policy that is linked to an OU called Geek Computers, this OU contains all our computers. We will just go ahead and use this policy.
要导入防火墙策略,您需要打开一个现有的GPO或创建一个新的GPO并将其链接到包含计算机帐户的OU。 我们有一个称为防火墙策略的GPO,它链接到一个称为Geek Computers的OU,该OU包含我们所有的计算机。 我们将继续使用此政策。

Now navigate to:
现在导航至:
Open Computer Configuration\Policies\Windows Settings\Security Settings\Windows Firewall with Advanced Security
打开计算机配置\策略\ Windows设置\安全设置\具有高级安全性的Windows防火墙
Click on Windows Firewall with Advanced Security and then click on Action and Import Policy
单击具有高级安全性的Windows防火墙,然后单击“操作和导入策略”
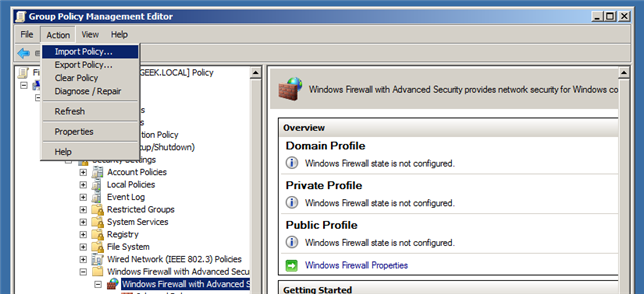
You will be told that if you import the policy it will overwrite all existing settings, click yes to continue and then browse for the policy that you exported in the previous section of this article. Once the policy has finished being Imported you will be notified.
您将被告知,如果导入该策略,它将覆盖所有现有设置,请单击“是”继续,然后浏览到本文上一部分中导出的策略。 导入政策完成后,您将收到通知。
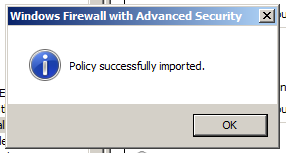
If you go and look at our rules you will see that the Skype rules I created are still there.
如果您查看我们的规则,您会发现我创建的Skype规则仍然存在。

测试中 (Testing)
Note: You should not do any testing before you complete the next section of the article. If you do, any rules that have been configured locally will be adhered to. The only reason I did some testing now was to point out a few things.
注意:在完成本文的下一部分之前,您不应进行任何测试。 如果您这样做,将遵守在本地配置的所有规则。 我现在进行测试的唯一原因是指出了几件事。
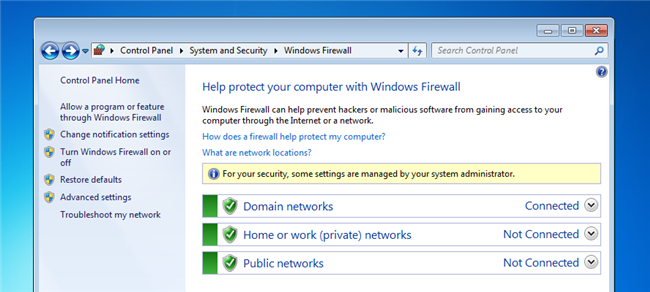
To see if the Firewall Rules have been deployed to clients, you will need to switch to a client machine and again open the Windows Firewall Settings. As you can see there should be a message saying that some of the firewall rules are managed by your system administrator.
要查看防火墙规则是否已部署到客户端,您将需要切换到客户端计算机,然后再次打开Windows防火墙设置。 如您所见,应该有一条消息说某些防火墙规则是由系统管理员管理的。
Click on the Allow a program or feature through Windows Firewall link on the left hand side.
单击左侧的“允许程序或功能通过Windows防火墙”链接。

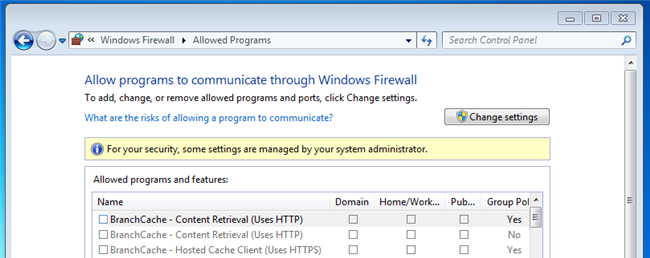
As you should see now, we have rules both applied by Group Policy as well as those created locally.
正如您现在应该看到的,我们既有组策略应用的规则,也有本地创建的规则。
这是怎么回事,我该如何解决? (What’s Going On Here and How Can I Fix It?)
By default, rule merging is enabled between local firewall policies on Windows 7 computers and firewall policy specified in Group Policies that target those computers. This means that local administrators can create their own firewall rules, and these rules will be merged with the rules obtained through Group Policy. To fix this right click on Windows Firewall with Advanced Security and select properties from the context menu. When the dialog box opens click on the Customize button under the settings section.
默认情况下,在Windows 7计算机上的本地防火墙策略与以这些计算机为目标的组策略中指定的防火墙策略之间启用规则合并。 这意味着本地管理员可以创建自己的防火墙规则,并且这些规则将与通过组策略获得的规则合并。 要解决此问题,请右键单击具有高级安全性的Windows防火墙,然后从上下文菜单中选择属性。 对话框打开时,单击设置部分下的“自定义”按钮。
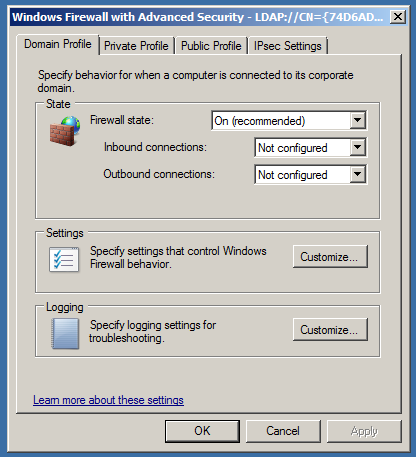
Change the Apply local firewall rules option from Not Configured to No.
将“应用本地防火墙规则”选项从“未配置”更改为“否”。
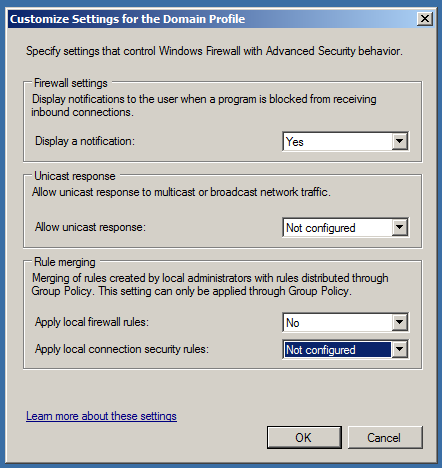
Once you click ok, switch to the Private and Public profiles and do the same thing for both of them.
单击“确定”后,切换到“私人”和“公共”配置文件,并对它们执行相同的操作。
That’s all there is to it guys, go have some firewall fun.
伙计们就这些了,去玩一些防火墙吧。
翻译自: https://www.howtogeek.com/100409/group-policy-geek-how-to-control-the-windows-firewall-with-a-gpo/

 支付宝微信扫一扫,打赏作者吧~
本文链接:https://kinber.cn/post/2613.html 转载需授权!
推荐本站淘宝优惠价购买喜欢的宝贝:


