Zabbix 服务端安装部署
1、环境准备(centos 7.4)
关闭防火墙:
systemctl stop firewalld.service
关闭SELinux:
修改/etc/selinux/config文件中的SELINUX="" 为 disabled ,然后重启。
如果不想重启系统,使用命令setenforce 0
由于zabbix提供集中的web监控管理界面,因此服务在web界面的呈现需要LAMP架构支持。
yum install -y httpd mariadb-server mariadb php php-mysql php-gd libjpeg* php-ldap php-odbc php-pear php-xml php-xmlrpc php-mhash
编辑配置httpd
vim /etc/httpd/conf/httpd.conf
ServerName zabbix
DirectoryIndex index.html index.php //添加首页支持格式
编辑配置php,配置中国时区
vim /etc/php.ini
date.timezone = PRC //PRC为中国时区
启动httpd,mysql
systemctl start httpd.service
systemctl start mariadb.service
netstat -ntap | egrep '(80|3306)'
启动msyql后执行初始安全设置。
mysql_secure_installation
mysql -u root -p
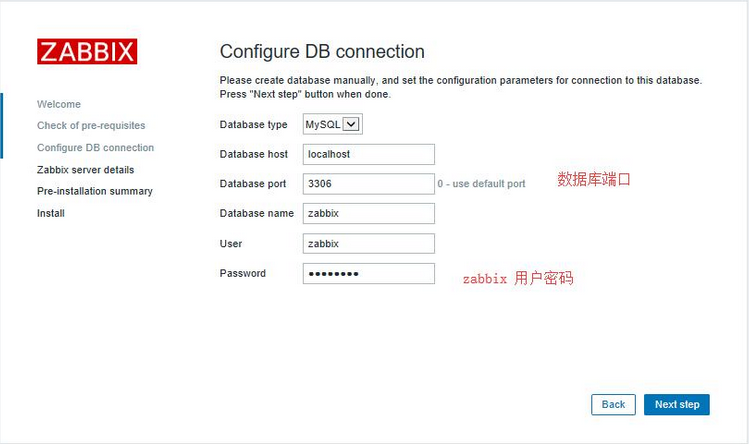
CREATE DATABASE zabbix character set utf8 collate utf8_bin;
GRANT all ON zabbix.* TO 'zabbix'@'%' IDENTIFIED BY '123456'; //创建zabbix数据库,并设定用户密码
flush privileges;
数据库设置完成,检测php与数据库连通情况
vim /var/www/html/index.php
<?php
$link=mysql_connect('10.1.28.70','zabbix','123456');
if($link) echo "<h1>Success!!</h1>";
else echo "Fail!!";
mysql_close();
?>
在网页中输入zabbix主机ip地址显示Success表示连通数据库成功
为保证zabbix用户也可以登录数据库,若出现本地无法登录情况,解决方式如下。
使用root账户登录数据库
select user,host from mysql.user; //有空用户名称占用导致本地无法登录远程可登录
+--------+-----------+
| user | host |
+--------+-----------+
| zabbix | % |
| root | 127.0.0.1 |
| root | ::1 |
| | cacti |
| root | cacti |
| | localhost |
| root | localhost |
+--------+-----------+
drop user ''@localhost; //删除空用户
drop user ''@cacti;
flush privileges;
2、部署Zabbix Server
yum install php-bcmath php-mbstring -y 安装php支持zabbix组件
rpm -ivh http://repo.zabbix.com/zabbix/3.5/rhel/7/x86_64/zabbix-release-3.5-1.el7.noarch.rpm //会自动生成yum源文件,保证系统可以上网
yum install zabbix-server-mysql zabbix-web-mysql -y 安装zabbix组件
zcat /usr/share/doc/zabbix-server-mysql-4.0.0/create.sql.gz | mysql -uzabbix -p zabbix //生成数据库文件,注意密码不要输成root的
查看、修改zabbix配置文件
grep -n '^'[a-Z] /etc/zabbix/zabbix_server.conf
38:LogFile=/var/log/zabbix/zabbix_server.log
49:LogFileSize=0
72:PidFile=/var/run/zabbix/zabbix_server.pid
90:DBHost=127.0.0.1
91:DBName=zabbix
107:DBUser=zabbix
108:DBPassword=123456
287:SNMPTrapperFile=/var/log/snmptrap/snmptrap.log
413:Timeout=4
455:AlertScriptsPath=/usr/lib/zabbix/alertscripts
465:ExternalScripts=/usr/lib/zabbix/externalscripts
501:LogSlowQueries=3000
修改zabbix在httpd中的时区
vim /etc/httpd/conf.d/zabbix.conf
php_value date.timezone Asia/Shanghai
zabbix基本配置完成,启动服务,实现web界面安装
systemctl enable zabbix-server
systemctl start zabbix-server
netstat -anpt | grep zabbix //监听在10051端口上
systemctl restart httpd.service
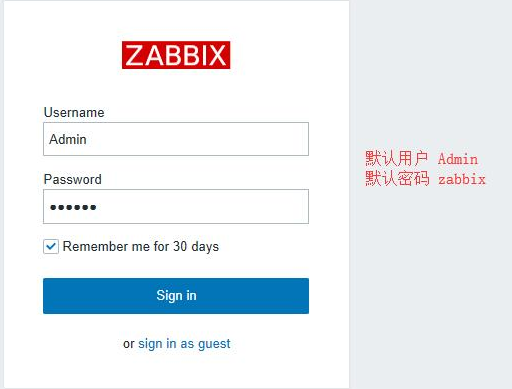
web界面安装访问。http://IP/zabbix
Zabbix agent 在linux上安装部署
安装zabbix-agent客户端
rpm -ivh http://repo.zabbix.com/zabbix/3.5/rhel/7/x86_64/zabbix-release-3.5-1.el7.noarch.rpm
yum install -y zabbix-agent
编辑修改配置文件
grep -n '^'[a-Z] /etc/zabbix/zabbix_agentd.conf
vim /etc/zabbix/zabbix_agentd.conf
13:PidFile=/var/run/zabbix/zabbix_agentd.pid
32:LogFile=/var/log/zabbix/zabbix_agentd.log
43:LogFileSize=0
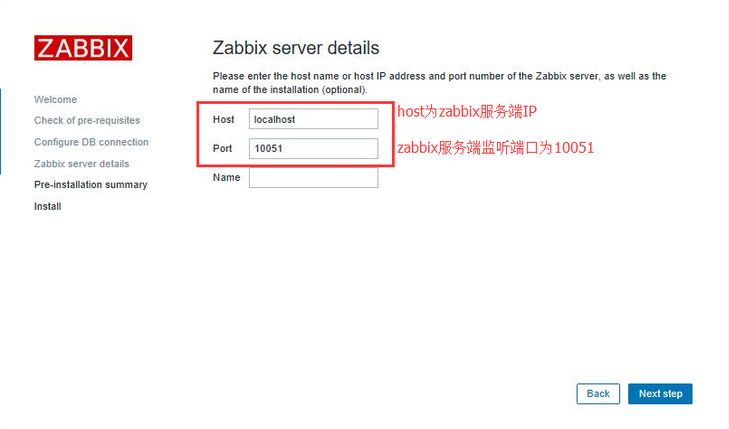
95:Server=10.1.28.70 //zabbix服务器地址
136:ServerActive=10.1.28.70 //活跃服务器地址
147:Hostname=zabbix_agent
265:Include=/etc/zabbix/zabbix_agentd.d/*.conf
关闭防火墙,启动服务
systemctl stop firewalld.service
setenforce 0
systemctl enable zabbix-agent.service
systemctl restart zabbix-agent.service
netstat -anpt | grep zabbix //监听在10050端口
添加主机(hosts)
configuration(组态,配置)–>Hosts(主机)–>Create host(创建主机)–>代理接口IP填本机IP–>连接模板–>添加
Zabbix agent 在windows上安装部署
Zabbix agent 在windows上安装部署
1、下载与解压
地址: http://www.zabbix.com/downloads/2.4.4/zabbix_agents_2.4.4.win.zip
解压zabbix_agents_2.4.0.win.zip
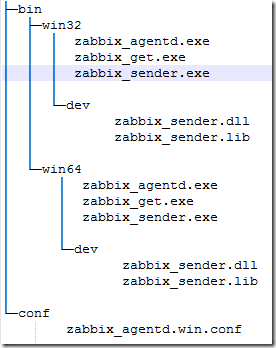
conf目录存放是agent配置文件
bin文件存放windows下32位和64位安装程序。
2、配置zabbix agent.win.conf
找到conf下的配置文件 zabbix_agentd.win.conf ,修改LogFile、Server、ServerActive 、Hostname(客户端计算机名)这几个参数。具体配置如下:
LogFile=E:\zabbix\zabbix_agentd.log
Server=172.17.22.155
ServerActive=172.17.22.155
Hostname=Windows_A
参数说明:
Server: zabbix server的ip地址,
ServerActive: zabbix 主动监控server的ip地址,
其中Server和ServerActive都指定zabbix Server的IP地址,不同的是,前者是被动后者是主动。也就是说Server这个配置是用来允许172.17.22.155这个ip来我这取数据。而ServerActive的172.17.22.155的意思是,客户端主动提交数据给他。
Hostname 主机名,必须唯一,区分大小写。Hostname必须和zabbix web上配置的一直,否则zabbix主动监控无法正常工作。因为agent拿着这个主机名去问server,我有配置主动监控项吗?server拿着这个主机名去配置里面查询,然后返回信息。
zabbix agent检测分为主动(agent active)和被动(agent)两种形式,主动与被动的说法均是相对于agent来讨论的。
主动:agent请求server获取主动的监控项列表,并主动将监控项内需要检测的数据提交给server/proxy
被动:server向agent请求获取监控项的数据,agent返回数据。
3、安装agent
修改好文件后,用CMD(需有管理员权限)将Zabbix Agent安装为Windows系统的服务,在windows控制台下执行以下命令:
E:\zabbix\bin\win64\zabbix_agentd.exe -i -c E:\zabbix\conf\zabbix_agentd.win.conf
控制台信息如下:
zabbix_agentd.exe [10540]: service [Zabbix Agent] installed successfully
zabbix_agentd.exe [10540]: event source [Zabbix Agent] installed successfully
4、启动agent客户端
E:\zabbix\bin\win64>zabbix_agentd.exe -c E:\zabbix\conf\zabbix_agentd.win.conf -s
控制台信息
zabbix_agentd.exe [3176]: service [Zabbix Agent] started successfully
查看Windows端口使用
E:\zabbix\bin\win64>netstat -ano|findstr "10050"
TCP 0.0.0.0:10050 0.0.0.0:0 LISTENING 10268
TCP [::]:10050 [::]:0 LISTENING 10268
E:\zabbix\bin\win64>tasklist|findstr "10268"
zabbix_agentd.exe 10268 Services 0 6,944 K
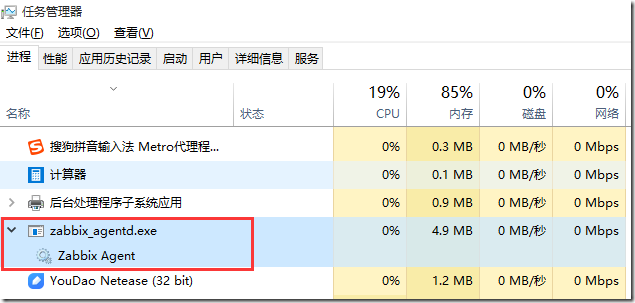
查看任务管理器
查看启动的日志zabbix_agentd.log:
11036:20160114:102150.316 Starting Zabbix Agent [Windows host]. Zabbix 2.4.4 (revision 52334).
11036:20160114:102150.317 using configuration file: E:\zabbix\conf\zabbix_agentd.win.conf
11036:20160114:102150.319 agent #0 started [main process]
11040:20160114:102150.320 agent #1 started [collector]
11024:20160114:102150.320 agent #4 started [listener #3]
9112:20160114:102150.320 agent #3 started [listener #2]
11108:20160114:102150.320 agent #3 started [listener #2]
11028:20160114:102150.320 agent #5 started [active checks #1]
11028:20160114:102150.328 no active checks on server [172.17.22.155:10051]: host [Windows host] not found
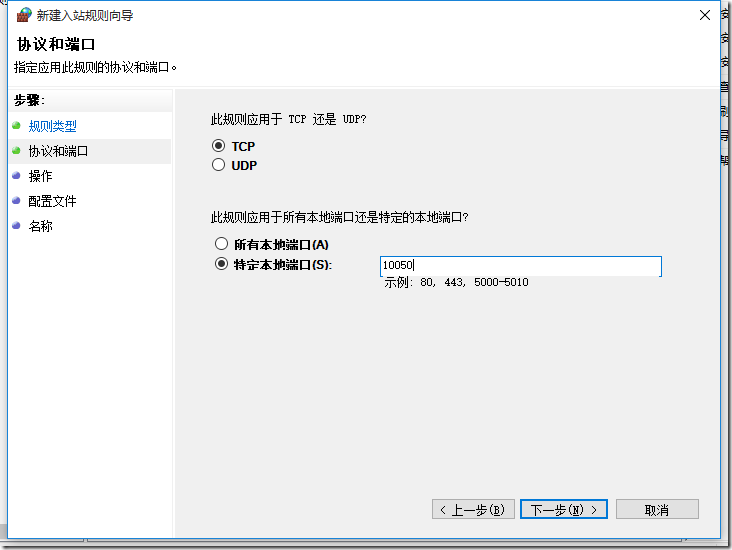
5、windows系统防火墙中开放端口10050
参照http://www.xitonghe.com/jiaocheng/Windows10-3861.html开放10050端口
控制面板--à选择windows 防火墙--à高级设置--à设置入站规则--à新建规则
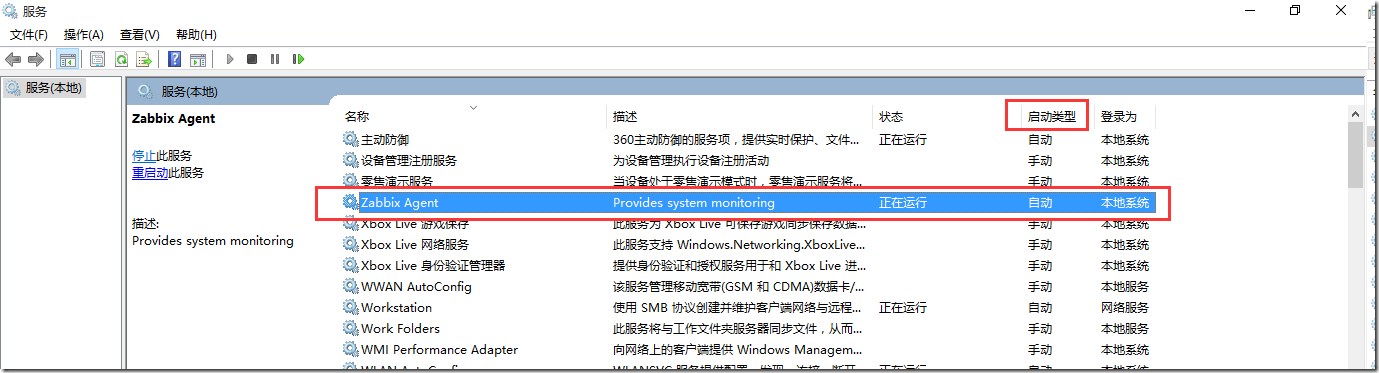
6、设置开机启动
运行services.msc
7、zabbix_agentd.exe命令说明
-c 制定配置文件所在位置
-i 安装客户端
-s 启动客户端
-x 停止客户端
-d 卸载客户端
8、批处理脚本agentd.bat
下面为Windows批处理脚本agentd.bat对客户端服务器上的zabbix_agentd进行安装、启动、停止、卸载。
前提:
1、解压zabbix_agents_2.4.4.win.zip到c:\zabbix目录
2、修改了参数文件c:\zabbix\conf\zabbix_agentd.win.conf
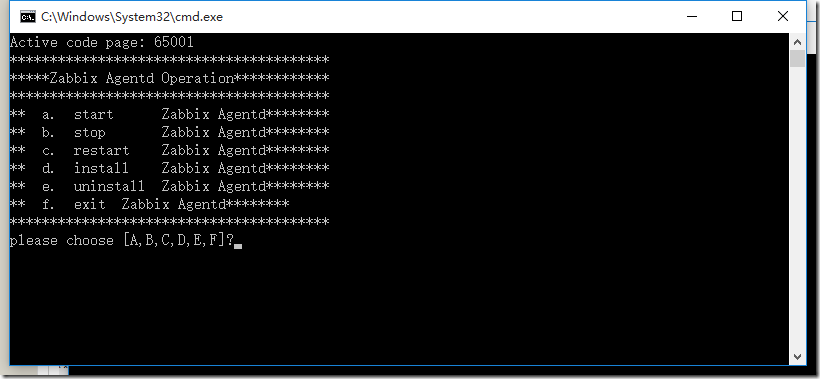
脚本内容如下:
@echo off
CHCP 65001
echo ****************************************
echo *****Zabbix Agentd Operation************
echo ****************************************
echo ** a. start Zabbix Agentd********
echo ** b. stop Zabbix Agentd********
echo ** c. restart Zabbix Agentd********
echo ** d. install Zabbix Agentd********
echo ** e. uninstall Zabbix Agentd********
echo ** f. exit Zabbix Agentd********
echo ****************************************
:loop
choice /c abcdef /M "please choose"
if errorlevel 6 goto :exit
if errorlevel 5 goto uninstall
if errorlevel 4 goto install
if errorlevel 3 goto restart
if errorlevel 2 goto stop
if errorlevel 1 goto start
:start
c:\zabbix\bin\win64\zabbix_agentd.exe -c c:\zabbix\conf\zabbix_agentd.win.conf -s
goto loop
:stop
c:\zabbix\bin\win64\zabbix_agentd.exe -c c:\zabbix\conf\zabbix_agentd.win.conf -x
goto loop
:restart
c:\zabbix\bin\win64\zabbix_agentd.exe -c c:\zabbix\conf\zabbix_agentd.win.conf -x
c:\zabbix\bin\win64\zabbix_agentd.exe -c c:\zabbix\conf\zabbix_agentd.win.conf -s
goto loop
:install
c:\zabbix\bin\win64\zabbix_agentd.exe -c c:\zabbix\conf\zabbix_agentd.win.conf -i
goto loop
:uninstall
c:\zabbix\bin\win64\zabbix_agentd.exe -c c:\zabbix\conf\zabbix_agentd.win.conf -d
goto loop
:exit
exit
9、创建主机,查看监控效果
configuration(组态,配置)–>Hosts(主机)–>Create host(创建主机)–>连接模板–>添加
10、安装中遇到的问题
如果未开放10050端口
后台日志
2924:20160114:103211.044 cannot send list of active checks to [172.17.22.187]: host [Windows host] not found,原因是被监控的window系统防火墙未开放10050端口

 支付宝微信扫一扫,打赏作者吧~
本文链接:https://kinber.cn/post/1901.html 转载需授权!
推荐本站淘宝优惠价购买喜欢的宝贝:

 您阅读本篇文章共花了: